Flutter的手势GestureDetector分析详解
Flutter的手势GestureDetector分析详解
前言
前面的文章我们介绍了Flutter的一些基础知识点,Flutter布局,Flutter路由,今天来详细的讲一下Flutter的手势识别器。
在我们的App开发中,手势操作是必不可少的步骤,我们可以通过手势操作实现各种交互,也可以通过手势识别器的回调监听获得相关的触摸反馈信息和数据,以便相关功能开发中可以使用到这些数据。
熟练掌握手势识别器对于开发有着很重大的影响。下面就开始详细讲解一下手势识别器(GestureDetector)的知识点。

今天是感恩节,首先在这里感谢各位朋友们一直默默关注着我的公众号。我会继续坚持初心,为大家分享更多的干货好文。希望大家多多关注。有了你们的支持我会更坚定不移的走下去。
本文的源码发布在GitHub上,如果有什么问题,欢迎留言。
https://github.com/AweiLoveAndroid/Flutter-learning/blob/master/README-CN.md

1
手势识别器的分类
GestureDetector手势操作是开发中必不可少的。
Flutter中的GestureDetector一共有 7大类25种。分别是:
Tap(单击)
● onTapDown: (details) {},
● onTapUp: (details) {},
● onTap: () {},
● onTapCancel: () {},
双击
双击:
● onDoubleTap: () {},
长按
● onLongPress: () {},
● onLongPressUp: () {},
垂直滑动
● onVerticalDragDown: (details) {},
● onVerticalDragStart: (details) {},
● onVerticalDragUpdate: (details) {},
● onVerticalDragEnd: (details) {},
● onVerticalDragCancel: () {},
水平滑动
● onHorizontalDragDown: (details) {},
● onHorizontalDragStart: (details) {},
● onHorizontalDragUpdate: (details) {},
● onHorizontalDragEnd: (details) {},
● onHorizontalDragCancel: () {},
Pan事件(指针移动事件)
● 指针已接触屏幕并可能开始移动。
onPanDown: (details) {},
● 指针已经接触屏幕并开始移动。
onPanStart: (details) {},
● 与屏幕接触并移动的指针再次移动。
onPanUpdate: (details) {},
● 先前与屏幕接触并移动的指针不再与屏幕接触,并且当它停止接触屏幕时以特定速度移动。
onPanEnd: (details) {},
● 先前触发 onPanDown 的指针未完成。
onPanCancel: () {},
Scale事件(缩放事件)
● onScaleStart: (details) {},
● onScaleUpdate: (details) {},
● onScaleEnd: (details) {},
2
闭包函数属性详细图解
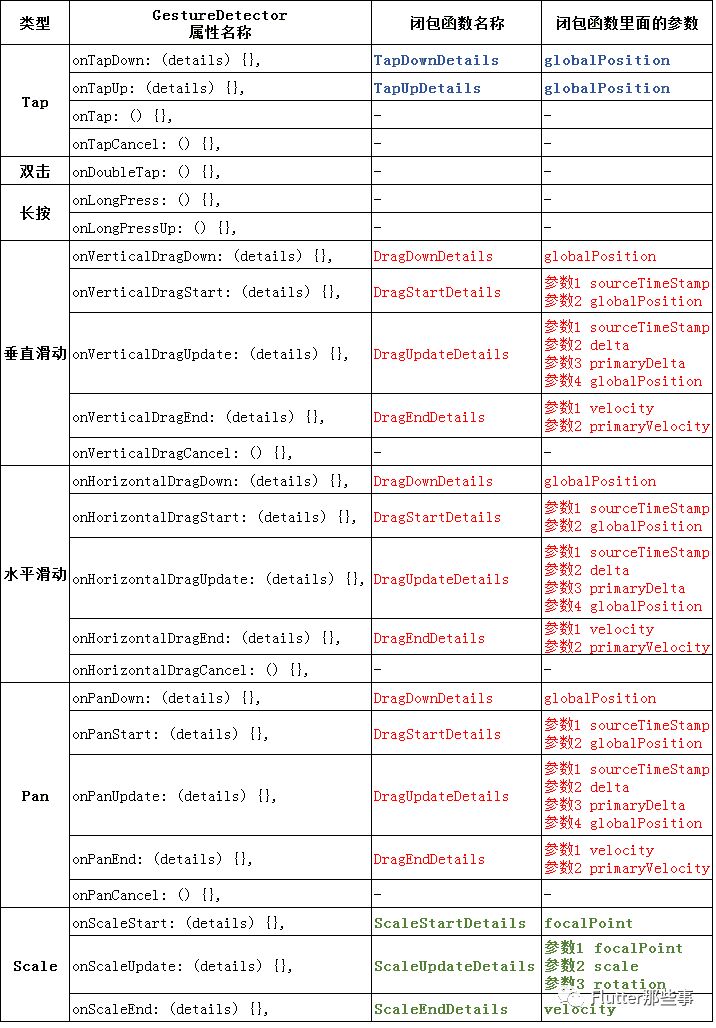
我查看了一下每一个事件类型源码,做了一张 价值100W的图,如下所示:
我们可以得到几点信息:
★ (1)双击和长按事件不需要传入闭包函数。
★ (2)垂直滑动、水平滑动、Pan事件的闭包函数是一样的,它们几个的事件生命周期函数都是一样的。
★ (3)Tap 和 Scale传入的闭包函数不一样。
所以我图中使用了三种不同颜色表示,便于区分。
3
手势的使用
在Flutter里面,手势操作有以下三种情况:
组件自带有手势操作回调函数,优先使用改手势操作。
例如 ListView、RaisedButton 等组件自带有点击事件。
RsisedButton使用示例:
- -
`new RaisedButton(`
-
` onPressed: () {`
-
` print('onPressed');`
-
` },`
-
`);`
ListView使用示例:
- -
`new ListView(`
-
` children:
组件如果没有手势操作回调函数,可以使用Ink或者InkWell包裹组件,实现点击时的水波纹效果。
使用 Ink 包裹可以实现点击效果,但是没有相关回调函数,不方便获取相关的点击坐标等信息。
例如:
- -
`new Ink(`
-
` child: new FlutterLogo(`
-
` colors: Colors.teal,`
-
` size: 150.0,`
-
` curve: Curves.fastOutSlowIn,`
-
` duration: new Duration(seconds: 3),`
-
` ),`
-
`);`
使用 InkWell 包裹可以实现水波纹点击效果,并且可以获取相关的点击坐标等信息。(推荐使用)
- -
`new InkWell(`
-
` child: new FlutterLogo(`
-
` colors: Colors.teal,`
-
` size: 150.0,`
-
` curve: Curves.fastOutSlowIn,`
-
` duration: new Duration(seconds: 3),`
-
` ),`
-
` onTap: () {`
-
` print('click ==> onTap');`
-
` },`
-
` onTapDown: (TapDownDetails details) {`
-
` print('click ==> onTapDown ${details.globalPosition}');`
-
` },`
-
` onLongPress: () {`
-
` print('click ==> onLongPress');`
-
` },`
-
` onDoubleTap: () {`
-
` print('click ==> onDoubleTap');`
-
` },`
-
` onTapCancel: () {`
-
` print('click ==> onTapCancel');`
-
` },`
-
` onHighlightChanged: (bool value) {`
-
` print('click ==> onHighlightChanged ${value}');`
-
` },`
-
`);`
组件如果没有手势操作回调函数,可以使用GestureDetector包裹组件。
下面是GestureDetecor的详细使用示例:(后文会针对这个做详细讲解。)每一个回调函数都是一个事件类型。
- -
`new GestureDetector(`
-
` child: new FlutterLogo(`
-
` colors: Colors.teal,`
-
` size: 150.0,`
-
` curve: Curves.fastOutSlowIn,`
-
` duration: new Duration(seconds: 3),`
-
` ),`
-
` onTapDown: (details) {},`
-
` onTapUp: (details) {},`
-
` onTap: () {},`
-
` onTapCancel: () {},`
-
` onDoubleTap: () {},`
-
` onLongPress: () {},`
-
` onLongPressUp: () {},`
-
` onVerticalDragDown: (details) {},`
-
` onVerticalDragStart: (details) {},`
-
` onVerticalDragUpdate: (details) {},`
-
` onVerticalDragEnd: (details) {},`
-
` onVerticalDragCancel: () {},`
-
` onHorizontalDragDown: (details) {},`
-
` onHorizontalDragStart: (details) {},`
-
` onHorizontalDragUpdate: (details) {},`
-
` onHorizontalDragEnd: (details) {},`
-
` onHorizontalDragCancel: () {},`
-
` onPanDown: (details) {},`
-
` onPanStart: (details) {},`
-
` onPanUpdate: (details) {},`
-
` onPanEnd: (details) {},`
-
` onPanCancel: () {},`
-
` onScaleStart: (details) {},`
-
` onScaleUpdate: (details) {},`
-
` onScaleEnd: (details) {},`
-
`);`
由于内容过多,为了方便阅读和理解,我这里分两篇描述。希望大家能够谅解。

