IndeterminateProgressbar解析-Part 2
IndeterminateProgressbar解析-Part 2
- 原文链接 : Indeterminate – Part 2
IndeterminateProgressBar 能在用户进行某项不定时长的耗时操作时提供绝佳的用户体验,之前我有教过大家怎么创建水平的 IndeterminateProgressBar,今天我就来教大家实现圆形的 IndeterminateProgressBar,这个控件将支持 API 11(Honeycomb)以上的设备。
在上一篇博文中我们学习了圆形 IndeterminateProgressBar 的 AOSP 实现方式,以及 AnimatedVectorDrawable 如何被用于显示 VectorDrawable 路径动画以得到圆形 IndeterminateProgressBar 的长度变化动画。在本篇博文中我们将把注意力转移到插值器上,即研究圆形 IndeterminateProgressBar 在显示长度变化动画时,是如何控制圆弧起点和终点的位置的。
不妨直接看 AOSP 的源码吧,首先看 控制 trimPathStart 的值的插值器:
<?xml version="1.0" encoding="utf-8"?>
<!--
 Copyright (C) 2014 The Android Open Source Project
     Licensed under the Apache License, Version 2.0 (the "License");
     you may not use this file except in compliance with the License.
     You may obtain a copy of the License at
          http://www.apache.org/licenses/LICENSE-2.0
     Unless required by applicable law or agreed to in writing, software
     distributed under the License is distributed on an "AS IS" BASIS,
     WITHOUT WARRANTIES OR CONDITIONS OF ANY KIND, either express or implied.
     See the License for the specific language governing permissions and
     limitations under the License.
-->
<pathInterpolator xmlns:android="http://schemas.android.com/apk/res/android"
    android:pathData="L0.5,0 C 0.7,0 0.6,1 1, 1" />
乍一看这代码怎么这么少,那个 PathInterpolator 到底是什么鬼?
PathInterpolator 其实就是 Lollipop 中介绍的描述插值器功能最具代表性的插值器子类,看到这里不要绝望,在以后的博文中我们还会遇到 PathInterpolatorCompat 这个类。
A PathInterpolator takes an SVG pathData parameter which describes a mapping function of the form y = f(x). That sounds rather complex, but it is actually much simpler than it sounds. Effectively it is a square canvas which is one unit in each direction from 0,0 to 1,1. The PathInterpolator works by returning the y value for any given x value. The input values range from 0.0-1.0, so there only stipulation is that each possible value for x can only map to a single value of y – the path cannot double back on itself in the horizontal plane in other words.
PathInterpolator 需要 SVG pathData 参数以描述 y = f(x) 的映射关系,可能听起来有点复杂,但其实它非常简单。实际上,就是一个每个方向上都有一个从 0,0 到 1,1 的单元的方形画布,PathInterpolator 可以根据任意给定的 x 的值返回给定函数所映射的 y 值,其接收的输入的取值范围是 0.0 - 1.0,所以其输入的唯一约定就是:每一个可能的 x 和 y 必须是1对1映射。
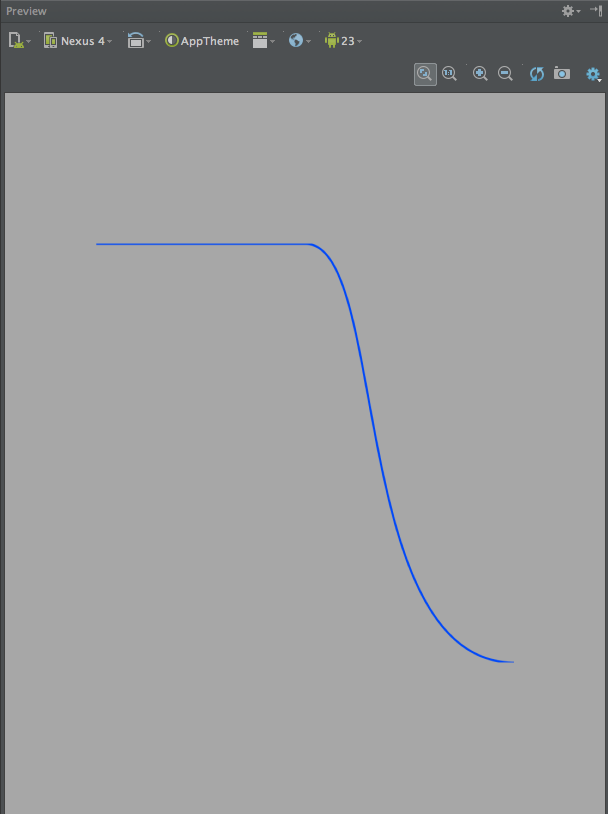
如果我们画了一条从 0,0 到 1,1 的直线,实际上就相当于创建了线性插值器(LinearInterpolator),因为每一个 x 的值对应的 y 值都相同。那么上述代码中 pathData 到底做了什么?运用一个有趣的技巧,我们可以创建 VectorDrawable 并添加该 path 元素,然后用 Android Studio 的预览功能就会看到下图:
<?xml version="1.0" encoding="utf-8"?>
<vector xmlns:android="http://schemas.android.com/apk/res/android"
  xmlns:tools="http://schemas.android.com/tools"
  android:width="72dp"
  android:height="72dp"
  android:viewportWidth="1"
  android:viewportHeight="1"
  tools:ignore="UnusedResources">

  <path
    android:strokeColor="#0000FF"
    android:strokeWidth="0.005"
    android:pathData="L0.5,0 C 0.7,0 0.6,1 1, 1" />

<vector>
由图可知,0,0 就是路径的左上角,1,1 就是路径的右下角。当 x = [0.0 - 0.5], y = 0;当 x = (0.5, 1.0],y 值的增长逐渐增加,然后超过中值,增长速率又渐渐变慢,最终为 1.0。其实际作用与 AccelerateDecelerateInterpolator 相同。如果我们研究 trimPathEnd 使用的插值器,会发现这两个阶段完成的工作比使用传统插值器要复杂:
<?xml version="1.0" encoding="utf-8"?>
<!--
 Copyright (C) 2014 The Android Open Source Project
     Licensed under the Apache License, Version 2.0 (the "License");
     you may not use this file except in compliance with the License.
     You may obtain a copy of the License at
          http://www.apache.org/licenses/LICENSE-2.0
     Unless required by applicable law or agreed to in writing, software
     distributed under the License is distributed on an "AS IS" BASIS,
     WITHOUT WARRANTIES OR CONDITIONS OF ANY KIND, either express or implied.
     See the License for the specific language governing permissions and
     limitations under the License.
-->
<pathInterpolator xmlns:android="http://schemas.android.com/apk/res/android"
    android:pathData="C0.2,0 0.1,1 0.5, 1 L 1,1" />
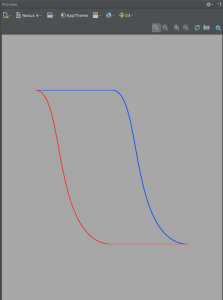
看起来这段 xml 代码和上面的很类似,但 pathData 对应的值是不同的,不妨再次利用 VectorDrawable 将这个插值器对应的函数图像显示出来:

图中红色显示作加速的部分,y 值快速增加直到大于中值,然后减缓增大的速率直到值为 1.0,相当于把上面的过程反过来。
trimPathEnd 会控制长度变化动画中圆弧的终点,trimPathStart 则控制该圆弧的起点。利用这些插值器我们可以让圆弧的长度自动变化,以显示长度变化的动画。最终结合旋转动画就可以实现该圆形 IndeterminateProgressbar 的效果,即下面视频展示的效果:
现在我们明白该控件是怎么实现的了,而且 AnimatedVectorDrawable 支持 Android 5.0 以前的版本,因此我们不用担心它的兼容性问题(在写下本文时 VectorDrawableCompat 由于兼容性的问题不是个好选择)。因此我们不需要 VectorDrawable 就可以利用到目前为止学习的知识在 API 11 上实现酷炫的动画效果,在下一篇博文中我将会介绍应该怎么去实现。
因为这篇博文都是基于 Google 源码进行的,所以我就不提供源码了,但后面的文章我保证都会有源码!