Android 干货分享:插件化换肤原理
目录
Android 干货分享:插件化换肤原理(1)—— 布局加载过程、View创建流程、Resources 浅析
https://juejin.cn/post/7153807668988084237
Android 干货分享:插件化换肤原理(2)—— 实现思路、主流框架分析
https://juejin.cn/post/7154205345462616077
1前言
本篇博客将以上一篇博客为基础,分享换肤功能的实现思路以及对主流换肤框架 Android-skin-support 的源码简单分析。https://github.com/ximsfei/Android-skin-support
2插件化换肤 Demo
一般的换肤功能,都是点击换肤按钮后,瞬间发生改变,也就可以理解为瞬间触发了 View 的 setColor,setBackgroudColor,setDrawable 等等方法。一个个方法进行调用显然是不现实的,对于这种公用的功能需求一般都会抽取成接口,让 View 继承实现自己的逻辑。在上一篇内容中,跟踪 AppCompatActivity 源码时,在其 onCreate 方法中给 LayoutInflater 设置了 Factory2,从而达成了 XML 布局中的部分 View 在创建时变成 appcompat 包中的 View。
整体思路
- 定义换肤功能接口,让需要换肤的 View 实现自己的换肤逻辑。
- 给 LayoutInflater 设置自定义的 Factory2,将 XML 中的 View 改为实现换肤接口的 View,并且将 View 记录下来。
- 制作皮肤包,这里让皮肤包和 App 本身资源名相同,值不同,这样换肤时,根据 View 设置的资源名去皮肤包中找同名资源。
- 换肤时,循环记录下来的换肤 View,调用其换肤方法即可。
加载皮肤包的资源
如图所示,当打包出 Apk 后,保持资源名称相同,值不同:
如 SkinButton 背景色设置的为 R.color.colorPrimary,App 本身是白色,而皮肤包中为黑色,当换肤时,可以根据 name 去皮肤包中找出资源的值。然后 set 给 SkinButton 达成换肤。
这部分的示例代码将在下一小节贴出。
偷梁换柱
先来尝试下替换一个 Button 为我们自己的换肤 View
首先定义出换肤的接口:
interface SkinSupportable {
    fun applySkin() // 换肤方法
}
新建一个 SkinButton 实现换肤接口:
class SkinButton @JvmOverloads constructor(
    context: Context, attrs: AttributeSet? = null
) : Button(context, attrs), SkinSupportable {

    // 换肤方法 在这里写换肤的逻辑
    override fun applySkin() {
        // 皮肤包路径
        val skinApkPath = "xxx/skin/skin.apk"

        // 获取皮肤包的 packageInfo
        val pInfo = context.packageManager.getPackageArchiveInfo(skinApkPath, PackageManager.GET_ACTIVITIES)
        pInfo.applicationInfo.sourceDir = skinApkPath
        pInfo.applicationInfo.publicSourceDir = skinApkPath

        // 获取皮肤包的 Resources
        val skinRes = context.packageManager.getResourcesForApplication(pInfo.applicationInfo)
        // 获取 app 的 Resources 用于获取 displayMetrics、configuration
        val res = context.resources

        // 构造出新的皮肤包 Resources;skinRes.assets 是皮肤包的 AssetManager
        val newRes = Resources(skinRes.assets, res.displayMetrics, res.configuration)

        // 当前按钮默认背景色
        val defaultResId = R.color.colorPrimary
        val resName = res.getResourceEntryName(defaultResId) // name 用于去皮肤包中寻找资源
        val resType = res.getResourceTypeName(defaultResId) // type
        // 从皮肤包中寻找同名资源的 id
        val skinResId = newRes.getIdentifier(resName, resType, pInfo.packageName)
        // 通过资源 id 在皮肤包的 Resources 中寻找 color
        val skinColor = newRes.getColor(newColorId)
        setBackgroundColor(newColor)
    }
}
仿照 AppCompatActivity 的思路在 onCreate 替换 Factory2:
// 用于记录换肤 View
val skinViews = mutableListOf<SkinSupportable>()

override fun onCreate(savedInstanceState: Bundle?) {
    LayoutInflater.from(this).factory2 = object : LayoutInflater.Factory2 {
        override fun onCreateView(name: String, context: Context, attrs: AttributeSet): View? {
            return onCreateView(null, name, context, attrs)
        }

        override fun onCreateView(parent: View?, name: String, context: Context, attrs: AttributeSet): View? {
            if (name == "Button"){ // 如果是 Button 就替换为我们自己的 SkinButton
                val view = SkinButton(context, attrs)
                skinViews.add(view) //记录
                return view
            }
            return null
        }
    }
    // 要在调用父类 onCreate 方法前对 Factory2 进行替换
    super.onCreate(savedInstanceState)
}

// 换肤按钮
bnSkin.setOnClickListener {
    for (view in skinViews) {
        view.applySkin() // 换肤
    }
}
这就简单实现了给 Button View 支持上换肤的逻辑,代码非常简陋,重在思路。这里还有一个注意点,就是 Factory2 的设置时机,看一下 setFactory2 的源码:
LayoutInflater.java
private boolean mFactorySet; // false

public void setFactory2(Factory2 factory) {
    if (mFactorySet) { // ture 则直接
        throw new IllegalStateException("A factory has already been set on this LayoutInflater");
    }

    // ...
    mFactorySet = true; // 设置一次 factory2 后直接设置为 true
    if (mFactory == null) {
        mFactory = mFactory2 = factory;
    }
    // ...
}
根据源码可以看出,设置一次 mFactory2 后,再次设置会直接抛出异常。在第一篇的分析中,AppCompatActivity 已经在 onCreate 中调用 setFactory2 了,所以最好还是用反射来修改 mFactory2,防止闪退。
3主流框架分析
上面的代码是非常简陋的实现,仅仅是对这个换肤思路的测试,我在实现换肤功能时借鉴了 Android-skin-support 开源库。下面根据上面所说的思路,来看一下开源库中的具体实现。
https://github.com/ximsfei/Android-skin-support
Android-skin-support
GitHub:
https://github.com/ximsfei/Android-skin-support
源码分析
mFactory2 的设置
趁热打铁先来看一下 Android-skin-support 是如何设置 mFactory2 的。刚刚的 Demo 中因为仅仅是一个 Activity,所以直接在 Activity 的 onCreate 中实现,开源库中则是利用了 Application 中设置对 Activity 生命周期回调 ActivityLifecycleCallbacks 实现:
SkinActivityLifecycle.java
public class SkinActivityLifecycle implements Application.ActivityLifecycleCallbacks {
    // 初始化
    public static SkinActivityLifecycle init(Application application) {
        if (sInstance == null) {
            synchronized (SkinActivityLifecycle.class) {
                if (sInstance == null) {
                    sInstance = new SkinActivityLifecycle(application); // 构造
                }
            }
        }
        return sInstance;
    }

    // 构造方法
    private SkinActivityLifecycle(Application application) {
        application.registerActivityLifecycleCallbacks(this); // Application 注册回调
        installLayoutFactory(application); // 设置 Factory2
        SkinCompatManager.getInstance().addObserver(getObserver(application));
    }

    private void installLayoutFactory(Context context) {
        try {
            LayoutInflater layoutInflater = LayoutInflater.from(context);
            // 另写了个工具类 LayoutInflaterCompat 来设置
            // getSkinDelegate(context) 获取自定义的 Factory2
            LayoutInflaterCompat.setFactory2(layoutInflater, getSkinDelegate(context));
        } catch (Throwable e) {
            Slog.i("SkinActivity", "A factory has already been set on this LayoutInflater");
        }
    }
}
继续看一下 LayoutInflaterCompat.setFactory2 源码:
LayoutInflaterCompat.java
public static void setFactory2(
        LayoutInflater inflater, LayoutInflater.Factory2 factory) {
    inflater.setFactory2(factory); // 直接设置
    if (Build.VERSION.SDK_INT < 21) { // api 21 以下利用反射修改
        final LayoutInflater.Factory f = inflater.getFactory();
        if (f instanceof LayoutInflater.Factory2) {
            forceSetFactory2(inflater, (LayoutInflater.Factory2) f);
        } else {
            forceSetFactory2(inflater, factory);
        }
    }
}

// 反射修改
private static void forceSetFactory2(LayoutInflater inflater, LayoutInflater.Factory2 factory) {
    // ...
    sLayoutInflaterFactory2Field = LayoutInflater.class.getDeclaredField("mFactory2");
    sLayoutInflaterFactory2Field.setAccessible(true);
    // ...
    sLayoutInflaterFactory2Field.set(inflater, factory);
    // ...
}
View 的创建
View 的创建也就是在设置的自定义 Factory2 上,回看 getDelegate 方法:
SkinActivityLifecycle.java
private SkinCompatDelegate getSkinDelegate(Context context) {
    if (mSkinDelegateMap == null) { // 作者做了很多优化
        mSkinDelegateMap = new WeakHashMap<>();
    }

    SkinCompatDelegate mSkinDelegate = mSkinDelegateMap.get(context);
    if (mSkinDelegate == null) {
        mSkinDelegate = SkinCompatDelegate.create(context); // 新建
        mSkinDelegateMap.put(context, mSkinDelegate); // 缓存起来
    }
    return mSkinDelegate;
}
可以看出写法和 AppCompatActivity 非常相似,看一下 SkinCompatDelegate.create 源码:
SkinCompatDelegate.java
public static SkinCompatDelegate create(Context context) {
    return new SkinCompatDelegate(context);
}
直接 new 出来,接着查看 SkinCompatDelegate 对 Factory2 的实现:
// 用弱引用保存需要换肤的 View 防止内存泄漏
private List<WeakReference<SkinCompatSupportable>> mSkinHelpers = new CopyOnWriteArrayList<>();

@Override
public View onCreateView(View parent, String name, Context context, AttributeSet attrs) {
    // 创建View
    View view = createView(parent, name, context, attrs);
    // ...
    // 将换肤 View 保存起来
    if (view instanceof SkinCompatSupportable) {
        mSkinHelpers.add(new WeakReference<>((SkinCompatSupportable) view));
    }
    return view;
}

// 创建 View 方法
public final View createView(View parent, final String name, @NonNull Context context, @NonNull AttributeSet attrs) {
    // 给开发者们开放的 自定义 Inflater 这个已经标记删除
    View view = createViewFromHackInflater(context, name, attrs);

    if (view == null) { // 给开发者们开放的 自定义 Inflater
        view = createViewFromInflater(context, name, attrs);
    }

    if (view == null) { // 反射创建
        view = createViewFromTag(context, name, attrs);
    }
    // ...
    return view;
}
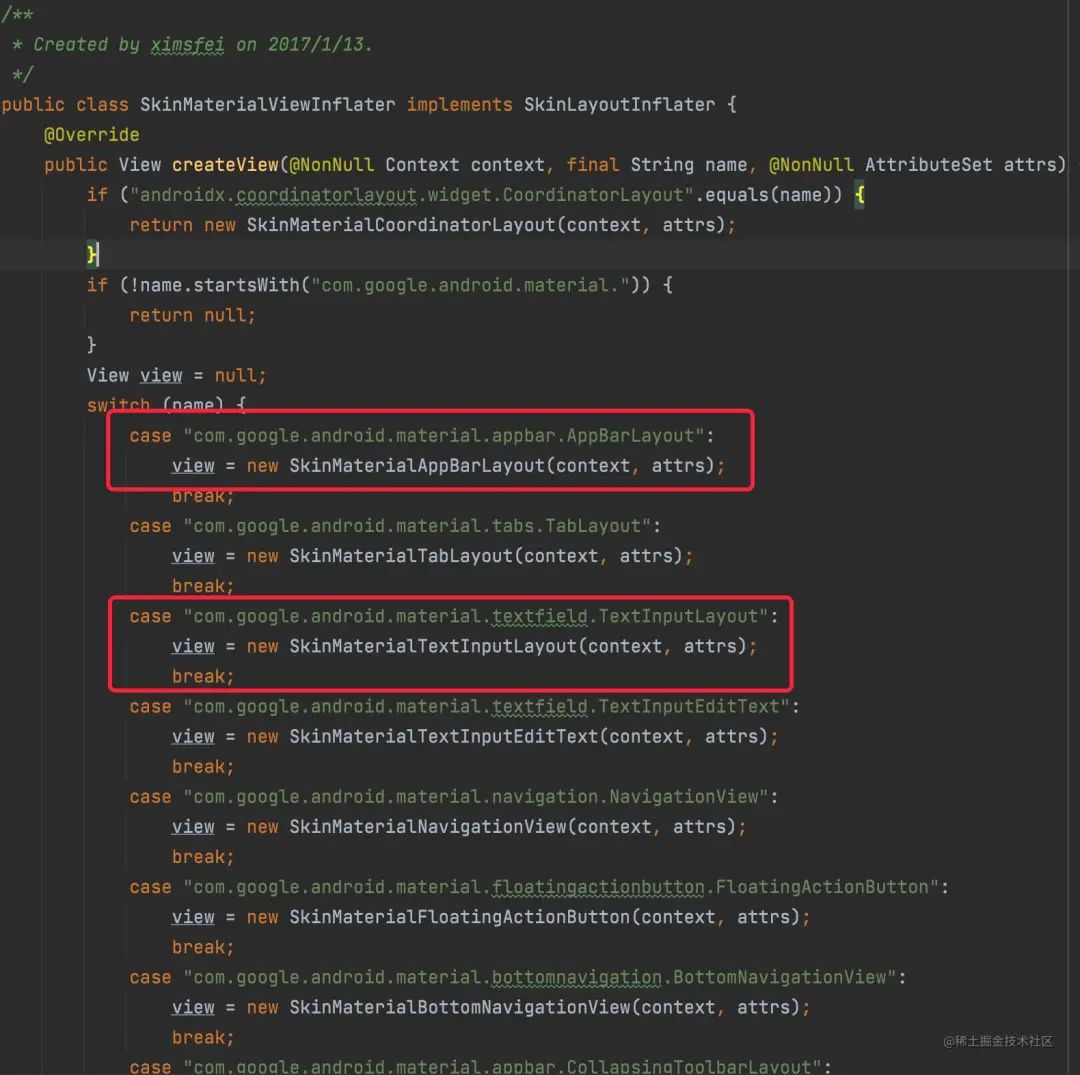
创建 View 的流程给使用者留出了可以定制的 api,框架内也提供了一些 Inflater,以 SkinMaterialViewInflater 为例看一下其实现:
都是继承自 SkinCompatSupportable 支持换肤的 View;
皮肤资源的获取
最后再来看一下加载皮肤包中资源的设计:
SkinCompatManager.java
public Resources getSkinResources(String skinPkgPath) {
        PackageInfo packageInfo = mAppContext.getPackageManager().getPackageArchiveInfo(skinPkgPath, 0);
        packageInfo.applicationInfo.sourceDir = skinPkgPath;
        packageInfo.applicationInfo.publicSourceDir = skinPkgPath;
        Resources res = mAppContext.getPackageManager().getResourcesForApplication(packageInfo.applicationInfo);
        Resources superRes = mAppContext.getResources();
        return new Resources(res.getAssets(), superRes.getDisplayMetrics(), superRes.getConfiguration());
}
获取皮肤包的 Resources 是和 Demo 中逻辑是一样的,再来看看获取资源的逻辑:
SkinCompatResources.java
public int getTargetResId(Context context, int resId) {
        // 获取 name
        String resName = null;
        if (mStrategy != null) {
            resName = mStrategy.getTargetResourceEntryName(context, mSkinName, resId);
        }
        if (TextUtils.isEmpty(resName)) {
            resName = context.getResources().getResourceEntryName(resId);
        }
        // 获取 type
        String type = context.getResources().getResourceTypeName(resId);
        // mResources 就是 皮肤包的 Resources
        // 查找皮肤包的同名同类型资源 id
        return mResources.getIdentifier(resName, type, mSkinPkgName);
}4最后
插件化换肤的整体思路非常简单,对 View 的创建流程、资源文件获取熟悉后,找到合适的切入点即可,Android-skin-support 换肤框架写的非常优秀,作者很多地方使用了弱应用避免内存泄漏,合理的对象缓存等等,博客中只对重点思路部分进行了分析,框架内还有很多代码设计值得学习(换肤策略等等)。

