自动化截图-应用分发时的自动截图方案
自动化截图-应用分发时的自动截图方案
- 原文链接 : Screenshots Through Automation
- 作者 : Flavien Laurent
在发布 App 到应用商店时有一件的事情不得不做,就是上传最新的高清无码截图到应用商店上。可是如果你的 App 有许多页面,那你每次发布更新都可能是一场梦魇,因为你需要一页一页地去截图。为了解决众多 App 开发者的这个痛点,我将在这篇博文中介绍一个实现自动化截图的方法:
刚到 Capitaine Train 公司里,就有人让我造个能自动截图的轮子,因为我们公司的 App 每次版本更新都让人很头疼:问题在于我们的 App 对应有3种设备,4种语言,也就是有 12 种版本。此外,我们有6个需要截图的页面,也就是说,我们每次版本更新都需要72张截图。我们无法忍受这种低效并浪费时间的工作,于是我们经过不懈的努力,找到了一个自动化截图的方案,在这个方案中,要实现自动化截图有三个关键点:uiautomator 自动化测试, accessibility 和 bash脚本。
修改 uiautomator
uiautomator 是一个用部分封装代码将 UI 处理成一个 JUnit 测试用例的框架。这里需要注意的是:被测试的 App 里没有包含这些测试用例,因为他们在一个独立的进程中运行。换句话说,你可以把 uiautomator 框架看作一个独立的机器人,它能帮你在设备上完成诸如:点击,滚动,截图等简单动作。
预备知识
在继续讲解之前,我建议你花些时间阅读官方文档,这能帮助你更好地理解接下来的内容。
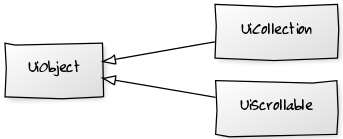
uiautomator 框架的 API 非常简单,里面有三个类分别代表了不同类型的 UI 界面元素:
-
UiObject: 基本界面元素,例如:TextView
-
UiCollection: 包含多个 UiObject 的界面元素,例如:LinearLayout
- UiScrollable: 包含多个 UiObject ,并能滚动的界面元素,例如:ListView
框架里这两个类你也需要了解:
-
UiDevice:用于执行设备常见的动作,例如:点击按钮,截图等等
- UiSelector:通过 id, 类型等获得屏幕上的 UI 界面元素
最后,UiAutomatorTestCase 是框架里你绝对不能忽略的类,因为我们必须通过继承它来获得一个 uiautomator 测试用例。
当然了,我刚刚提到的这些类在官方文档里面都有详细的解释,此外,文档还提供了一些示例来帮助我们熟悉 uiautomator 。
安装,创建和运行
接下来我们要做的就是创建 uiautomator ,但很不幸,uiautomator 并没有一个官方的 Gradle 整合模块,所以我们必须自己去完成这项工作。把这些工作都完成后,才能在我们的 App 上使用 uiautomator。uiautomator 测试用例的最终输出应该是一个独立的 JAR 包。具体步骤如下:
在你的项目里新建一个 Gradle 模块,并在其中添加与 local.properties 相同的 android.jar 依赖包:
.build.gradle
    apply plugin: 'java'

    Properties props = new Properties()
    props.load(new FileInputStream(file("../local.properties")))

    dependencies {
        compile fileTree(dir: props['sdk.dir'] + '/platforms/' + androidSdkTarget, include: '*.jar')
    }
通过使用 local.properties 和 gradle.properties 新建一个 ant 文件,使其获得与项目相同的配置信息(target, sdk path):
build.xml
    <?xml version="1.0" encoding="UTF-8"?>
    <project name="uiautomator" default="help">
        <loadproperties srcFile="../local.properties" />
        <loadproperties srcFile="gradle.properties" />
        <property name="target" value="${androidSdkTarget}" />
        <import file="${sdk.dir}/tools/ant/uibuild.xml" />
    </project>
使用ant 构建JAR(不要使用Gradle构建),并把它加到你的设备中,然后运行你的测试用例。
$ ant build
$ adb push uiautomator.jar data/local/tmp
$ adb shell uiautomator runtest uiautomator.jar -c com.your.TestCase
自动切换设置信息
现在我准备讲解怎么在设置中自动切换设置项和设置信息(特别是从一个语言切换到另一个语言)。首先,这是一个练习使用 uiautomator 的机会。同时,这也是自动化截图的关键步骤。但你要记住,我接下来介绍的只是一个能在 Android 5.0 系统上正常使用的办法,如果你有更好的建议或者想法,也可以通过留言和我交流,一起优化这个步骤。
- 打开快捷设置
mUiDevice.openQuickSettings();- 点击设置按钮以打开设置界面
new UiObject(new UiSelector().resourceId("com.android.systemui:id/settings_button")).click();- 因为在设置界面里我们没有可用的 View 的 id 值,所以我们必须根据设置栏的文字改变相对应的语言设置。所以我们滚动到某一项(FrameLayout)并点击它
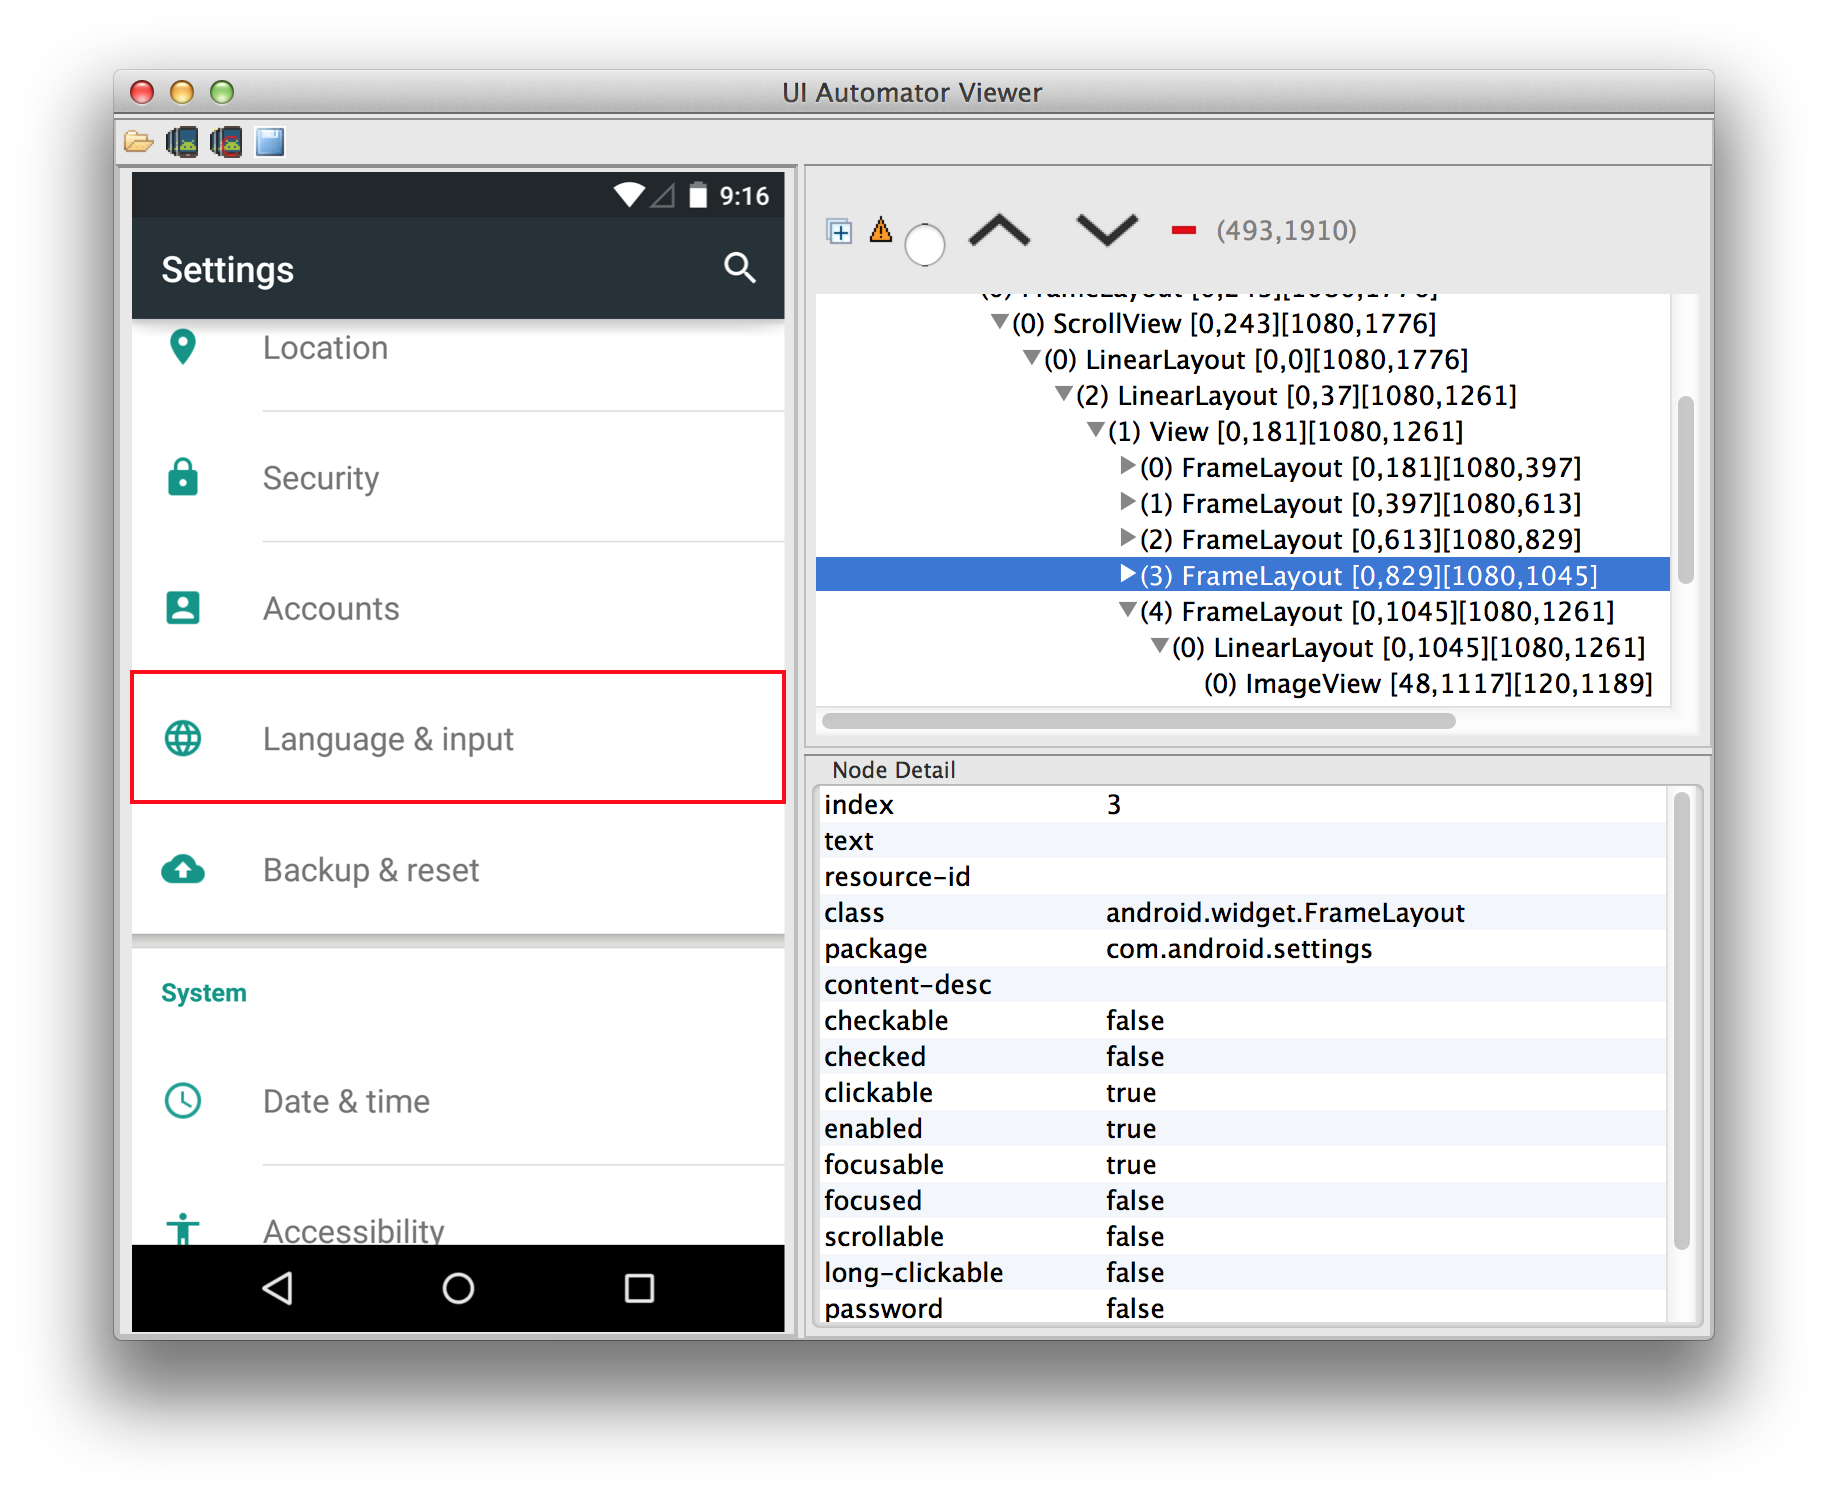
    UiScrollable scrollable = new UiScrollable(new UiSelector().resourceId("com.android.settings:id/dashboard"));

scrollable.getChildByText(new UiSelector().className(FrameLayout.class), "Language & input", true).click();- 通过上面的代码处理,整个“寻找并点击”的自动化逻辑已经能在语言设置栏里被使用了。
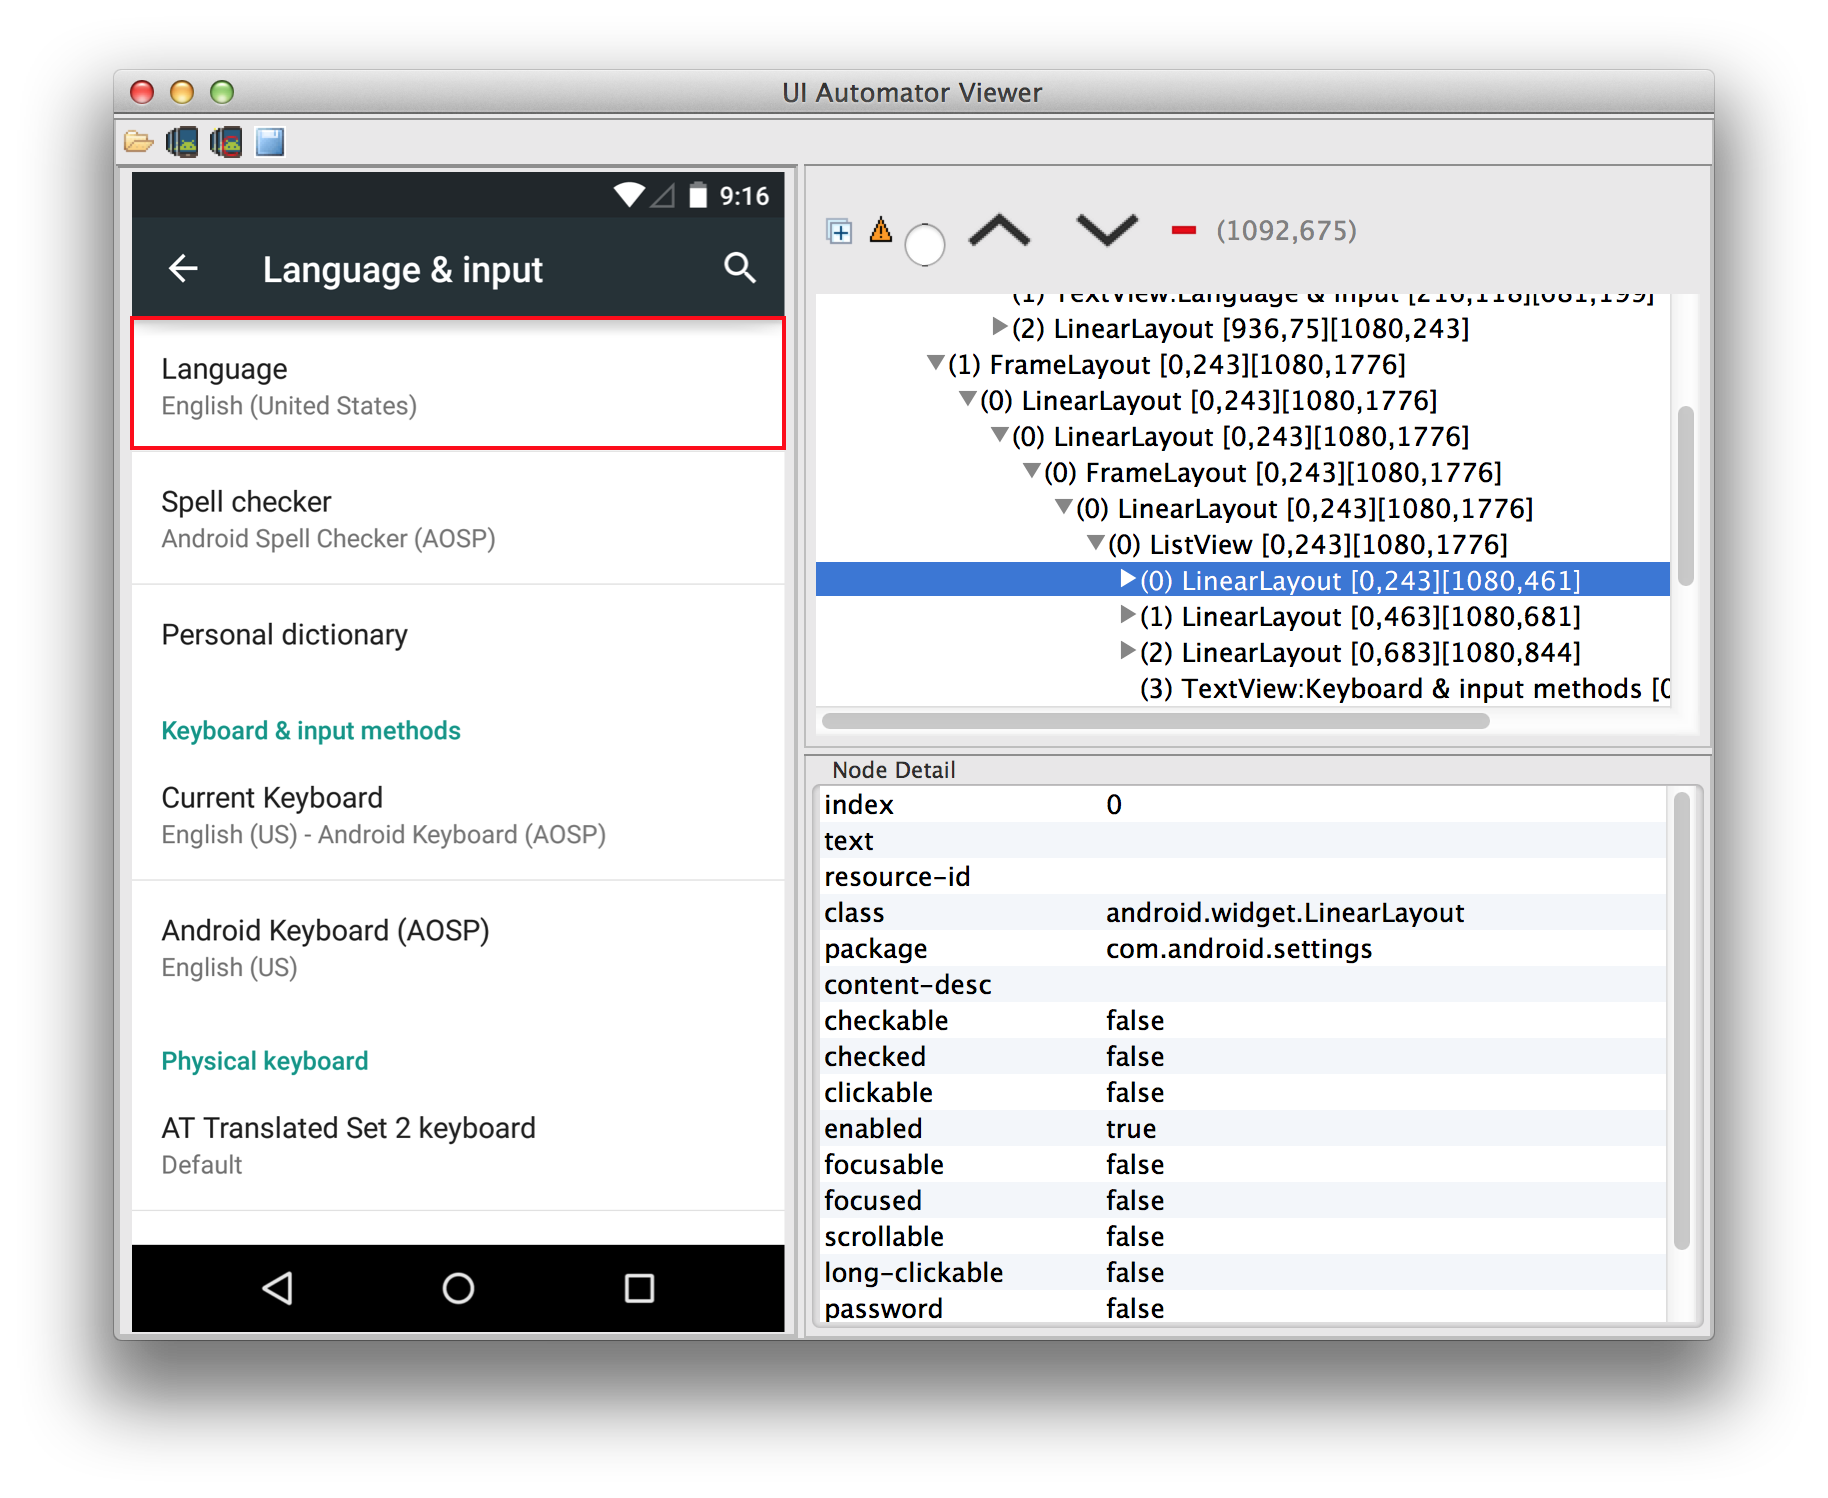
    UiScrollable scrollable = new UiScrollable(new UiSelector().className(ListView.class));
scrollable.getChildByText(new UiSelector().className(LinearLayout.class), "Language", true).click();- 添加这样的代码后,就能使得目标语言被选中了。
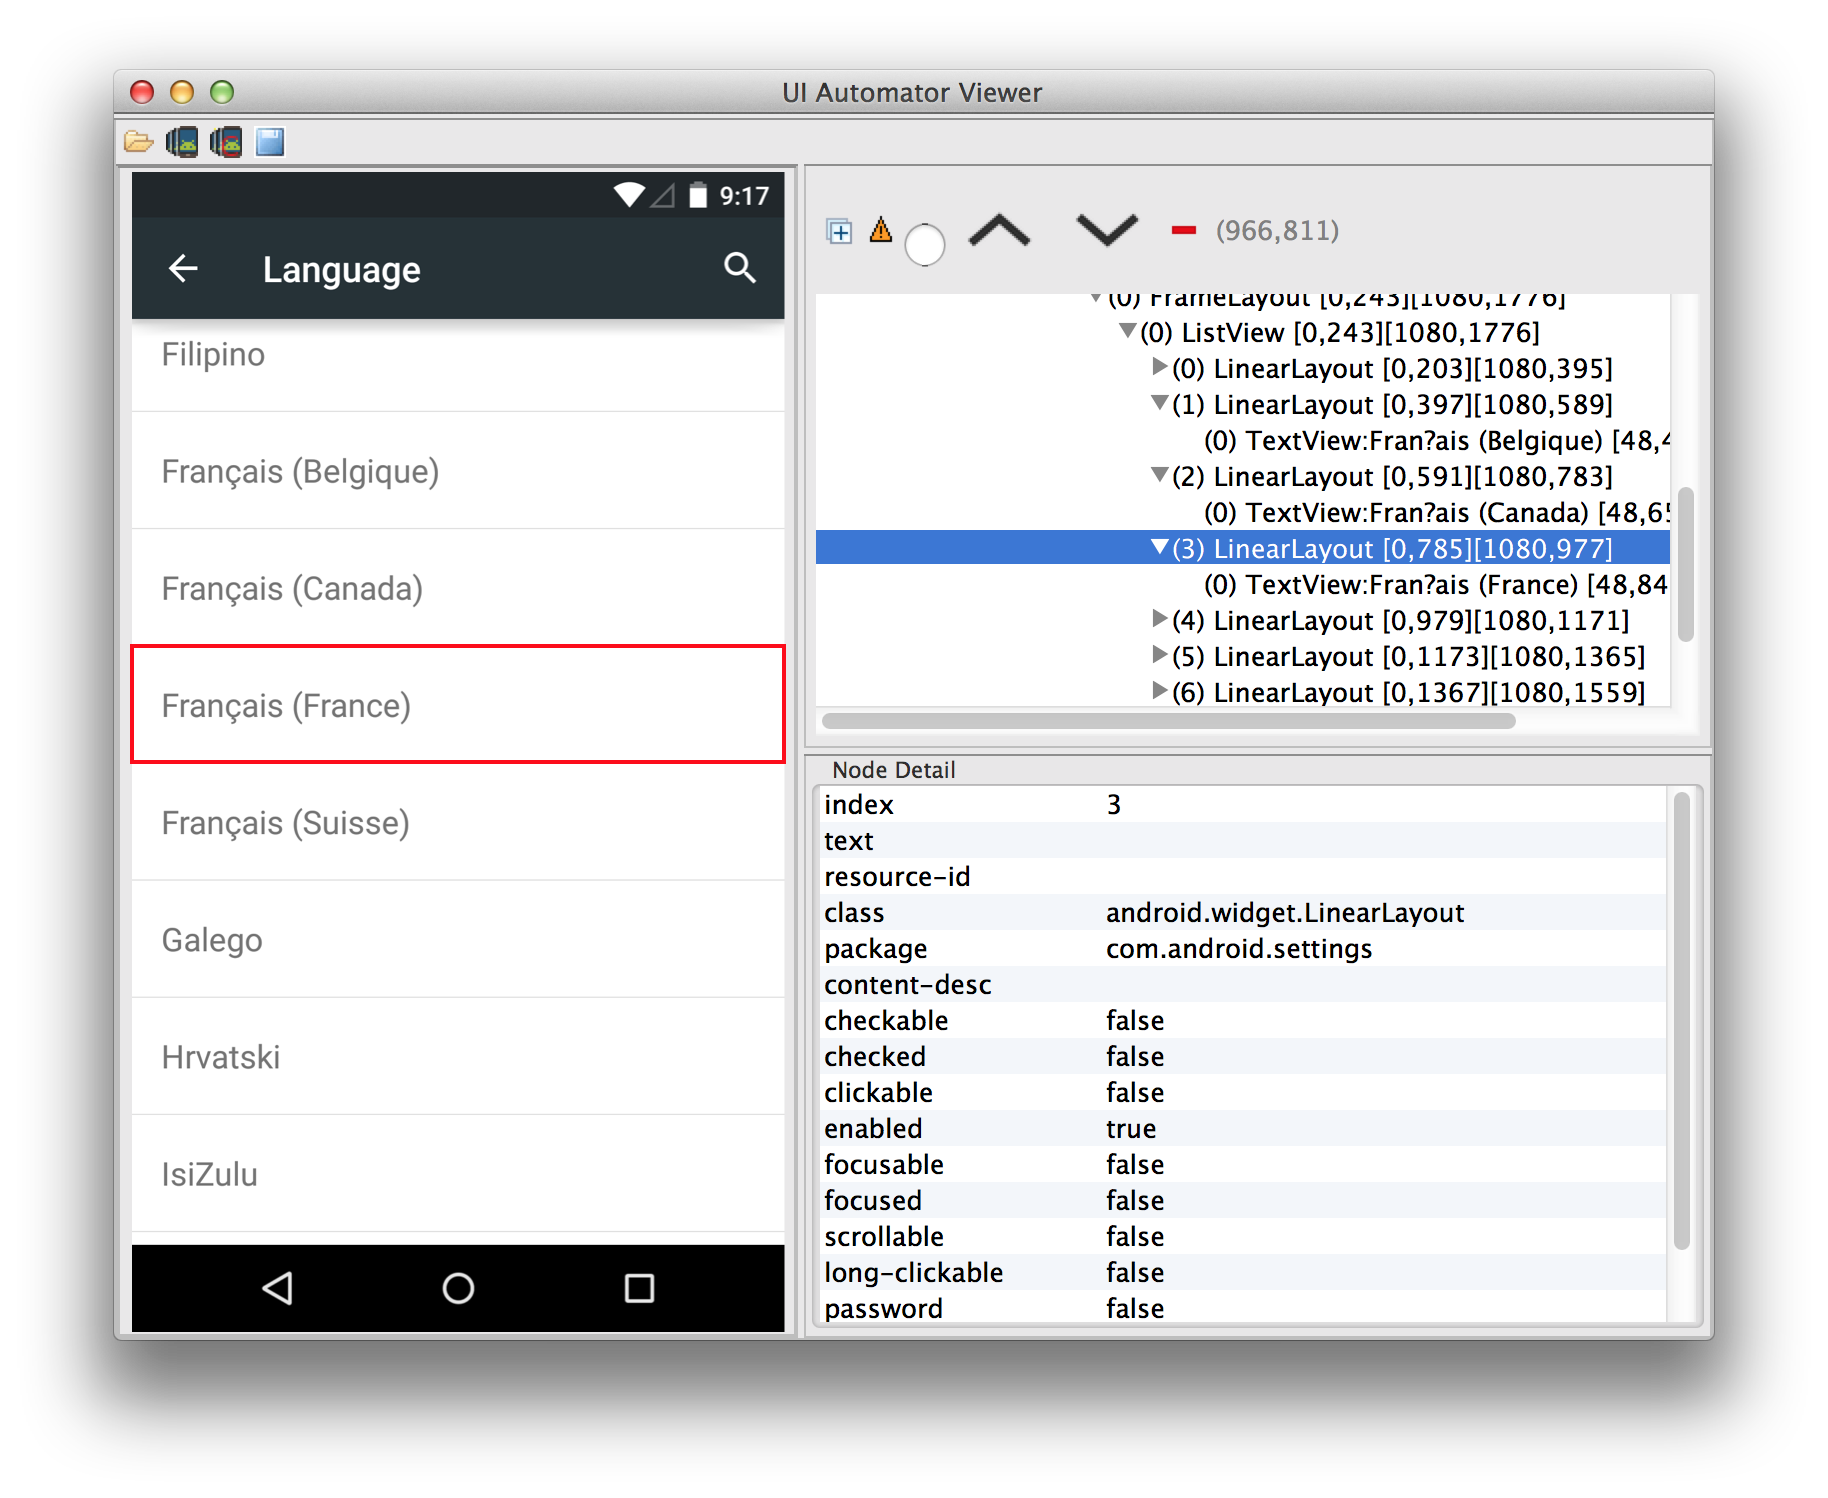
    UiScrollable scrollable = new UiScrollable(new UiSelector().className(ListView.class));
    scrollable.getChildByText(new UiSelector().className(LinearLayout.class), "Français (France)", true).click();
    Locale.setDefault(new Locale("fr"));
完成了上面的操作后,你还需要强制设置新的语言环境以避免 uiautomator 操作过程中保存了翻译缓存。
小提示
-
为了保证 uiautomator 的稳定性,当你在使用 uiautomator 时,必须关掉设备上的所有动画效果(你可以通过下面的设置完成:Settings > Developer options > Window animation|Transition animation|Animator duration scale)
-
如果你想打 Log 方便你的调试,你可以使用 android.util.Log。为了更好地区分 Log 信息,你可以使用特定的标记来筛选它们。
-
每一次你需要在 View 的不同层级间切换都要使用 uiautomatorviewer。因为它能为你提供一个精确的选择器,使你能够获得目标 UI 界面元素(uiautomatorviewer 在 sdk/tools/uiautomatorviewer 里)。
-
记住,uiautomator 测试用例不是 Android 的测试用例,所以你不需要使用任何形式的 Context。
-
你不能通过 uiautomator 进入你的 App 类,你只能引用 Android 框架中的类。
- 你可以在命令行中使用 -e 命令把 uiautomator 命令行的参数传递到测试用例类中,又或者是使用测试用例类中的 UiAutomatorTestCase.html#getParams()。
这样处理下来,你会发现自动完成语言的切换很简单对吧?uiautomator 虽然是个很好的工具,但如果你的 App 不是可访问的,它就没什么用了。特别是你的 App 需要创建完全自定义的 View 时,就可能会出现各种问题,所以接下来我们要解决的问题就是让 App 可以被访问,特别是自定义 View。
让自定义 View 可访问
可访问性对一个 App 来说非常重要,其作用主要体现在两个方面:有些用户/开发者需要它(但总有开发者会忽略这个需求),此外,uiautomator 都以可访问性为基础,也就是说,如果一个应用不能提供可访问的入口,我们将无法在其中使用 uiautomator 自动化测试工具。
大部分情况下,你都没有必要让你的 App 可以被其他应用访问。但事实上,大部分 View 都是可访问的,例如 TextView,ListView 等等。不过在你使用自定义 View 时,获得访问性可能会麻烦点,因为这需要你花费一些功夫去改变其中的代码。
在 Capitaine Train App 里,为了满足对日历视图的特殊需求,我们创建了一个自定义 View。这个 View 是基于 ListView 设计的,ListView 中的每一项都有好几个自定义 View,并且每一个自定义 View 都代表一个月(我们称为 MonthView)。MonthView 是一个纯粹的 View,它继承于 View,并没有子类。这样使得 MonthView 中的一切都需要通过 onDraw() 方法进行绘制。因此,MonthView 在默认情况下不能被访问。
首先要做的事情很简单:使用 View#setContentDescription 方法为每一个 MonthView 设置内容描述,这样我们能够把 ListView 滚动到一个特殊的月份上。
然后,一旦 ListView 停留在某一个给定的月份上,我们希望我们能够选择一个确定的日期。为了实现这个需求,我们需要使 MonthView 的内容是可访问的。幸运的是,Android 的支持库在类似的处理上提供了一个很有用的 Helper类:ExploreByTouchHelper。由于 MonthView 不是以树形结构结合展示其中的 View 集合,所以创建伪树状结构的 View 集合需要基于触摸反馈实现。
为自定义 View 实现 ExploreByTouchHelper
我们有四个方法可以实现:
-
getVirtualViewAt(float x, float y)
返回参数 x,y处所对应的虚拟 View 的 id。如果对应位置上没有虚拟 View,则返回 ExploreByTouchHelper.INVALID_ID -
getVisibleVirtualViews(List
virtualViewIds)
将自定义 View 中所有虚拟 View 的 id 添加到 virtualViewIds 数组中。 -
onPopulateEventForVirtualView(int virtualViewId, AccessibilityEvent event)
让虚拟 View 的相关信息可以被访问,例如:文字,内容描述 -
onPopulateNodeForVirtualView(int virtualViewId, AccessibilityNodeInfo node)
让给定结点能够访问虚拟 View 的相关信息,例如文字,内容描述,类名,与父类的关系。如果两者之间产生了交互,你必须在给定结点中说明。 - onPerformActionForVirtualView(int virtualViewId, int action, Bundle arguments)
在虚拟 View 中实现某种动作(在前面的方法中被指定)
怎么让 ExploreByTouchHelper 的接口变得更简单:
- 创建一个 VirtualView 类去持有虚拟 View 的各种信息,例如:id,文字,内容描述,与父类的关系。
- 在你的自定义 View 中使用一系列的 VirtualView。尽快初始化它们,并在绘制后更新它们
YourAccessibilityTouchHelper.java
    private class YourAccessibilityTouchHelper extends ExploreByTouchHelper {

        public YourAccessibilityTouchHelper(View forView) {
            super(forView);
        }

        @Override
        protected int getVirtualViewAt(float x, float y) {
            final VirtualView vw = findVirtualViewByPosition(x, y);
            if (vw == null) {
                return ExploreByTouchHelper.INVALID_ID;
            }
            return vw.id;
        }

        @Override
        protected void getVisibleVirtualViews(List<Integer> virtualViewIds) {
            for (int i = 0; i < mVirtualViews.size(); i++) {
                mVirtualViews.add(mVirtualViews.get(i).id);
            }
        }

        @Override
        protected void onPopulateEventForVirtualView(int virtualViewId, AccessibilityEvent event) {
            final VirtualDayView vw = findVirtualViewById(virtualViewId);
            if (vw == null) {
                return;
            }
            event.getText().add(vw.description);
        }

        @Override
        protected void onPopulateNodeForVirtualView(int virtualViewId, AccessibilityNodeInfoCompat node) {
            final VirtualDayView vw = findVirtualViewById(virtualViewId);
            if (vw == null) {
                return;
            }

            node.setText(Integer.toString(vw.text));
            node.setContentDescription(vw.description);
            node.setClassName(vw.className);
            node.setBoundsInParent(vw.boundsInParent);
        }
    }
在你的自定义 View 中使用 Helper 类
我们需要在 ListView.getView 方法被执行后通过 setAccessibilityDelegate() 方法重设代理,因为我们需要实现 dispatchHoverEvent() 方法来激活对触摸事件的探索。(如果你的自定义 View 没有在 ListView 中被使用的话,只需要在构造器中设置代理)。
YourCustomView.java
    public class YourCustomView extends View {

        private final YourAccessibilityTouchHelper mTouchHelper;

      public YourCustomView(Context context, AttributeSet attrs, int defStyle) {
          super(context, attrs, defStyle);
          mTouchHelper = new YourAccessibilityTouchHelper(this);
      }

      private void setAccessibilityDelegate() {
          setAccessibilityDelegate(mTouchHelper);
        }

      [...]

      public boolean dispatchHoverEvent(MotionEvent event) {
          if (mTouchHelper.dispatchHoverEvent(event)) {
              return true;
          }
          return super.dispatchHoverEvent(event);
      }
用 uiautmatorviewer 检查你的接口能否正常运行
如果一切都正常运行,在你用 uiautmatorviewer 截图后,你应该能在虚拟 View 图层看到在可访问结点中预设置的所有信息。
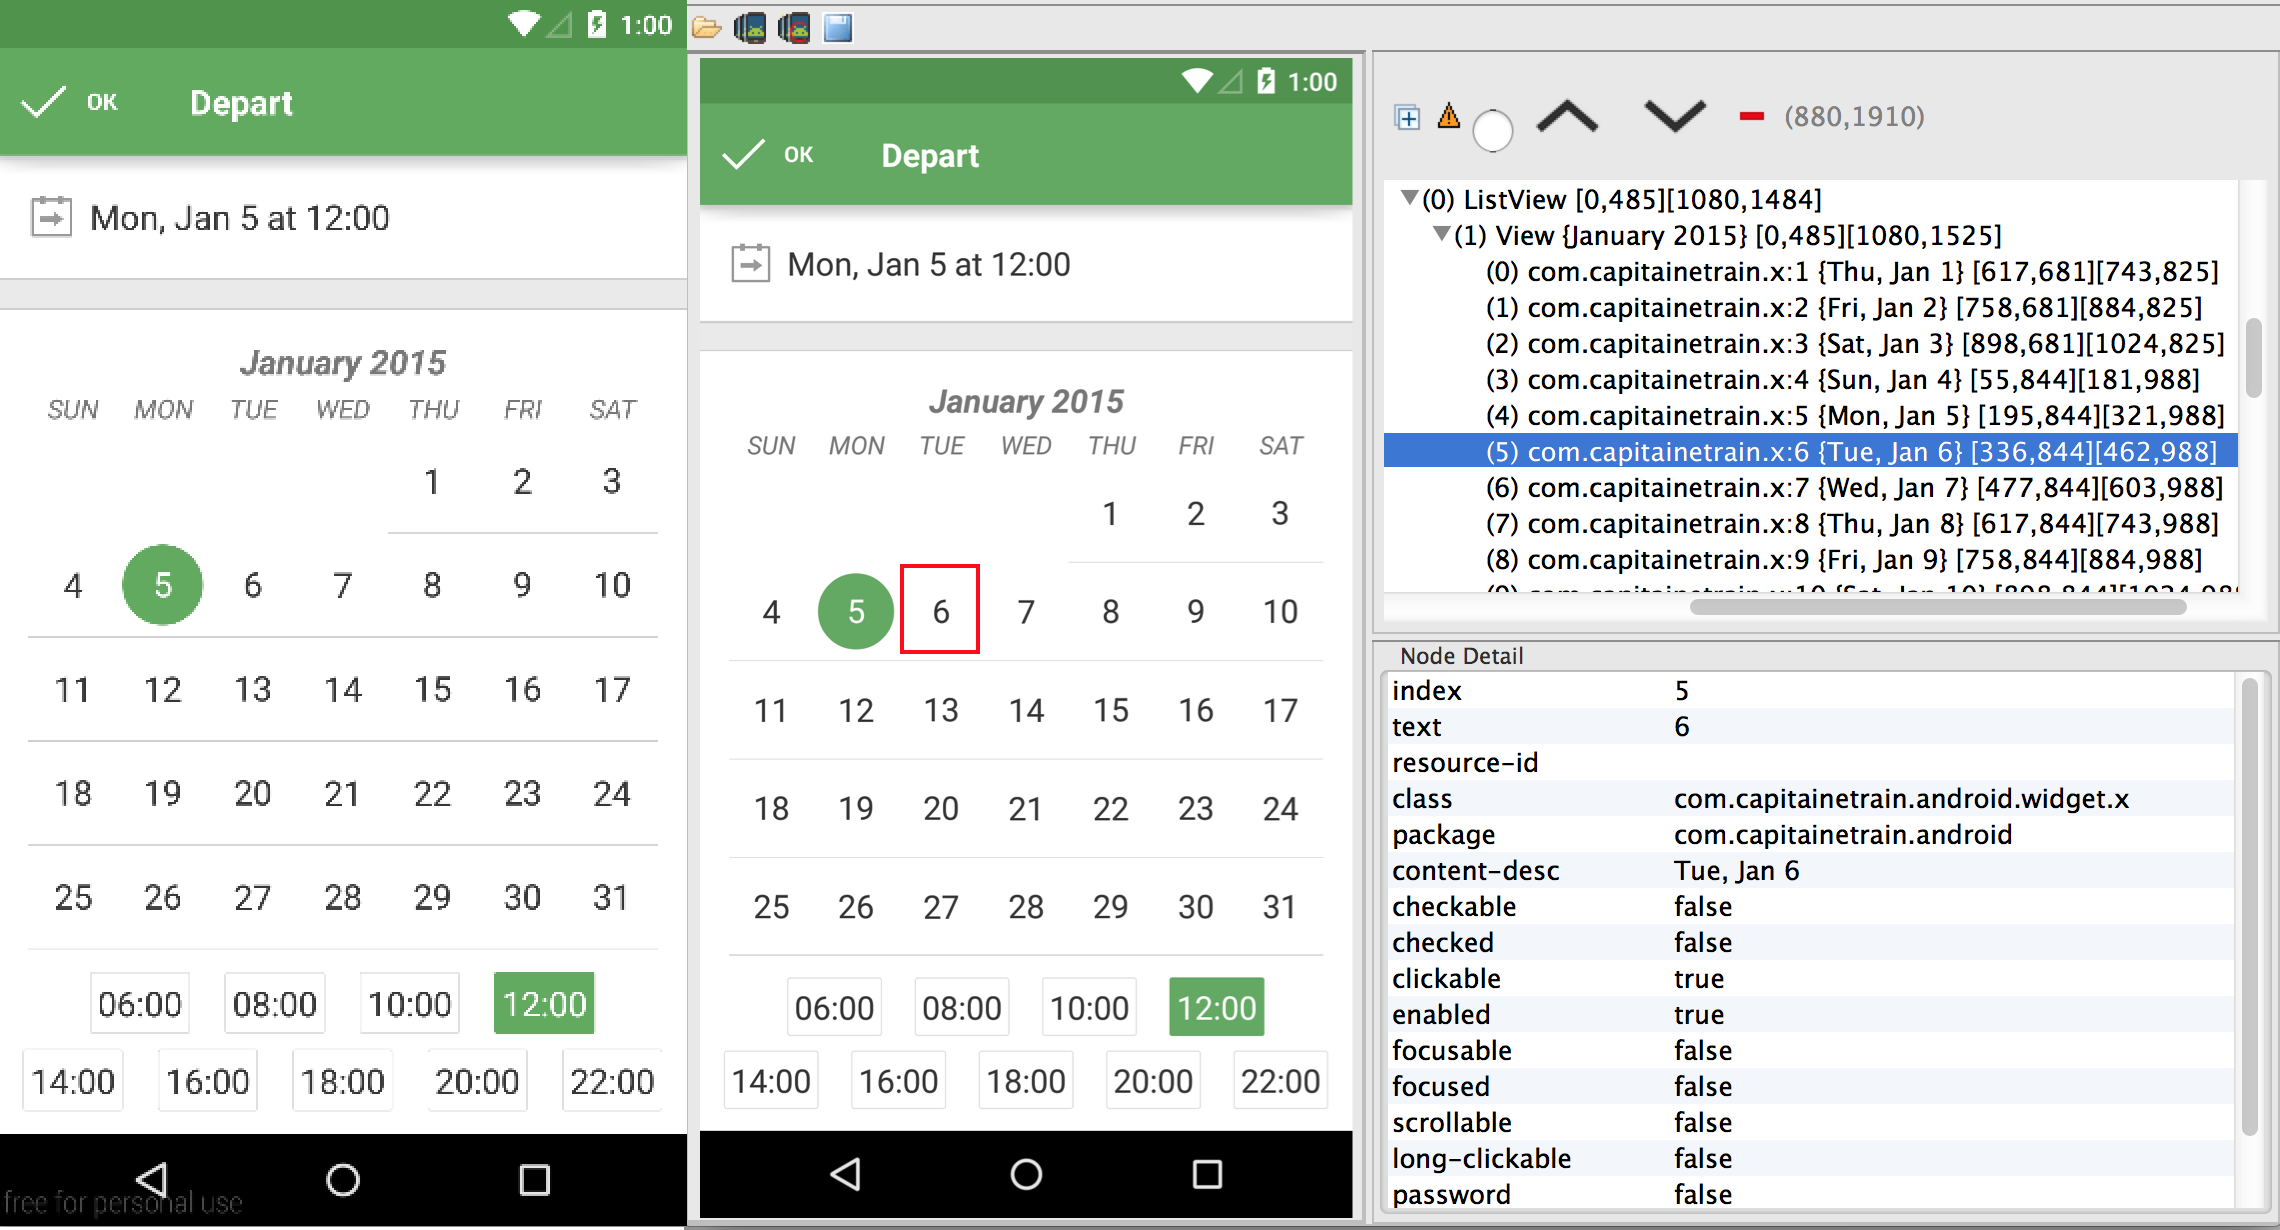
另一方面,在我写这篇博文的时候我发现 Capitaine Train App里的一个问题:每一个虚拟 View 的类名都是 com.capitainetrain.x,因为我们忘了用 Proguard。
现在 App 中的一切都是可访问的,我们总算可以在 App 中顺利使用 uiautomator 进行自动化截图了。打铁趁热,我们不妨对我们的代码稍作修改,让它能够“优雅地截图”。
优雅地截取图片
这篇博文要讲解的最后一个问题就是怎么改进 uiautomator ,使得它能在多种语言中优雅地自动截图。实现这个功能需要两个步骤:第一,使用 bash 脚本运行 uiautomator 测试用例,并按照你需要的图片数量进行自动化截图,之后用 imagemagick 处理你获得的照片。
首先要做的就是创建 uiautomator JAR包,然后运行测试用例。因为你已经在前面的讲解中学习了怎么在测试用例中转换语言,所以你只需要传递两个参数到测试用例中:当前设置中使用的语言和你将要切换的语言。
screenshot.sh
    # Build and push the uiautomator JAR
    ant build
    adb push bin/uiautomator.jar data/local/tmp

    adb shell uiautomator runtest uiautomator.jar
      -e current_language ${currentLanguage}
      -e new_language ${newLanguage}
      -c com.your.TestCase
接下来我们只要再创建一个能够切换语言,打开 App并截图的简单测试用例就可以啦:
TestCase.java
    public class TestCase extends UiAutomatorTestCase {
      [...]
      @Override
        protected void setUp() throws Exception {
            super.setUp();
            final Bundle params = getParams();
            mCurrentLanguage = params.getString("current_language");
            mNewLanguage = params.getString("new_language");
        }

        public void test() throws Exception {
            switchLanguage(mCurrentLanguage, mNewLanguage);
            openApp();
            takeScreenshot("data/local/tmp/screenshots");
        }
}- switchLanguage(String,String)只需要使用我在"修改 uiautomator"中讲解的方法就能轻松地实现
- openApp() 在 这里有详细的解释
- takeScreenshot() 使用了 UiDevice#takeScreenshot 方法。在这里只有一个小提示:如果一个 App 使用了可滚动的 View,在滚动条消失之前我们必须安静地等一会儿,不然的话我们会在最后的截图里看到它。
现在截图都被储存在设备里了,我们只需要把它们取出来就大功告成了:
screenshot.sh
    mkdir screenshots
    adb pull data/local/tmp/screenshots screenshots
在多语言环境中运行测试用例。它会从设备当前使用的语言开始运行,因为我找不到一个合适的方式去表示它,然后会在不同的语言环境下(我们需要截图的那些语言)运行测试用例。
screenshot.sh
    screenshot() {
        currentLanguage=$1
      newLanguage=$2
      adb shell uiautomator runtest uiautomator.jar
          -e current_language ${currentLanguage}
          -e new_language ${newLanguage}
          -c com.your.TestCase
    }

    screenshot $deviceLanguage fr
    screenshot fr en
    screenshot en de
App 每次卸载/安装后在相同的环境下运行测试用例都能正常地实现自动化截图的功能:
screenshot.sh
    screenshot() {
        currentLanguage=$1
      newLanguage=$2

      # Uninstall/Install the app
      adb uninstall com.your.app
      adb install ../app/build/outputs/apk/yourapp-release.apk

      adb shell uiautomator runtest uiautomator.jar
          -e current_language ${currentLanguage}
          -e new_language ${newLanguage}
          -c com.your.TestCase
    }
最后把所有模块糅合在一起:
screenshot.sh
    screenshot() {
      currentLanguage=$1
      newLanguage=$2

      # Uninstall/Install the app
      adb uninstall com.your.app
      adb install ../app/build/outputs/apk/yourapp-release.apk

      # Run the test case
      adb shell uiautomator runtest uiautomator.jar
          -e current_language ${currentLanguage}
          -e new_language ${newLanguage}
          -c com.your.TestCase

      mkdir screenshots
      adb pull data/local/tmp/screenshots screenshots
    }

    # Build and push the uiautomator JAR
    ant build
    adb push bin/uiautomator.jar data/local/tmp

    # Build the APK
    cd .. && ./gradlew assembleRelease && cd uiautomator

    # Screenshot everything
    screenshot $currentLanguage fr
    screenshot fr en
    screenshot en de
美化截图 分享一篇好文:Creating professional looking screenshots。
每一个 App 的运营者都应该尽其所能美化 App 的截图,因为这是用户在应用商店中对 App 的第一印象。大多数情况下,用户都不会阅读应用的描述,而是直接打开应用的截图,因为阅读文字比看图片更费劲。虽然不能说经过下面的处理能获得完美无瑕的图片,但也在水平线以上了。那么什么样的 App 截图是优雅的截图呢?
-
始终保持状态栏的整洁
-
移除导航栏
- 适配多种屏幕的尺寸
第二点可以用一个超神奇的工具—imagemagick 实现,虽然它的官方文档非常大,但我们用不到那么多的特性,所以我们只需要关注两个特性:组合和转换。
用组合图覆盖状态栏
组合图是用来把一个图片覆盖到另一个上面的,这是获得简洁状态栏的完美办法。
composite -quality 100 -compose atop clean_status_bar.png screenshot.png clean_screenshot.png通过转换裁剪导航栏
转换特性被用于转换图片的格式,使其格式与裁剪后的图片相同,这是从截图中移除导航栏的完美办法。
convert -quality 100 screenshot.png -gravity South -chop 0x144 clean_screenshot.png144是在Nexu5上导航栏的高度像素值。
结论
因为有了这篇博文,通常要花费半天,甚至一天的截图工作现在能通过 Capitaine Train 上用的这个自动化截图工具缩短到 20~30 分钟完成(我相信没有人想手动地做这些工作,或者因为嫌弃这样的工作,从不更新 App 的截图)。这个工具能高效地节省时间,如果能够更多的人和资源投入到这个工具的开发之中,我相信这个工具还能变得更好,也不会那么容易出错和崩溃。
接下来可能做的:
使用 Google Play 发布的 API 简化上传这些自动生成的截图的流程,并把这个工具整合到 Jenkins 里,让 App 每一次版本更新都能自动地获取最新的截图,并将其显示在应用商店中。