Android Espresso 测试框架介绍
Android Espresso 测试框架介绍
Espresso 是一个提供了简单 API 的用于 android app UI 测试的测试框架。最新的 2.0 版本发布后已经可以在 Android Support Repository 中下载了,那么在项目中集成它就方便多了。
但在我们看 Espresso 的 API 之前,让我们来细看下它与其它测试框架的不同:
- 你首先会注意到的是,他写出来的代码很像英文,可想而知它是很容易学习的
- API 相当的小,当然也会对扩展开放的
- Espresso 的测试跑起来那是相当的快(没有等待、睡眠)
- Gradle 和 Android Studio 的支持
在你的项目中添加 Espresso
1、首先保证你的 Android Support Repository 已经成功安装

2、在你程序的 build.gradle 文件中添加依赖
dependencies {
   androidTestCompile 'com.android.support.test:testing-support-lib:0.1'
   androidTestCompile 'com.android.support.test.espresso:espresso-core:2.0'
}
3、最后,在默认配置中指定 test instrumentation runner
android {

    defaultConfig {
        // ....
        testInstrumentationRunner "android.support.test.runner.AndroidJUnitRunner"
    }
}
这些基本上就是在你的项目中集成 Espresso 测试框架了(给你的项目一杯浓咖啡提提神~)!
Espresso 的主要组件
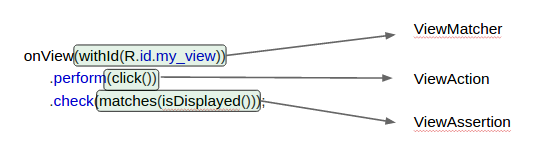
Espresso 由 3 个主要的组件构成。
这些组件是:
- ViewMatchers - 在当前的 view 层级中定位一个 view
- ViewActions - 跟你的 view 交互
- ViewAssertions - 给你的 view 设置断言
更简单的可以用下面的短语来表述它们:
- ViewMatchers – “
找某些东西“ - ViewActions – “
做某些事情“ - ViewAssertions – “
检查某些东西“
举个例子,当你需要 检查 某些东西(像在屏幕中显示一些文字),你就会知道你需要一个 ViewAssertions 来做这些工作。
Below is an example of a test in Espresso, and where the main components find their place.
下面是使用 Espresso 的例子,你会看到那些主要的组件将会在哪里出现使用。
一个使用 onView() 的简单测试
假设我们有一个 app,需要用户输入它的名字。
输入名字之后,用户按下了“下一步”按钮然后就会跳转到另一个显示问候信息的 activity。
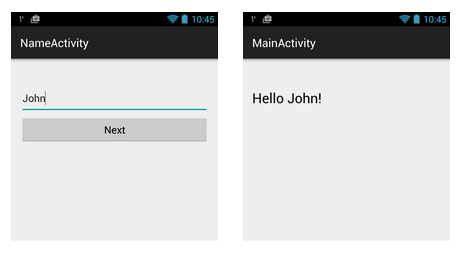
如果我们按这个方案来写一个测试的话,它看上去将会这样:
// locate the view with id "user_name" and type the text "John"
onView(withId(R.id.user_name)).perform(typeText("John"));

// locate the view with id "next" and click on it
onView(withId(R.id.next)).perform(click());

// locate the view with id "greeting_message" and check its text is equal with "Hello John!"
onView(withId(R.id.greeting_message)).check(matches(withText("Hello John!")));
注意到我们并没有特别指定与其交互的 view 的信息(eg: EditText、Button),我们只是简单的说明了我们要找一个指定 id 的 view。
同样,当点击“下一步”按钮时然后检测文本时,我们也没有写代码来告诉 Espresso 我们有跳转到其它的 activity。
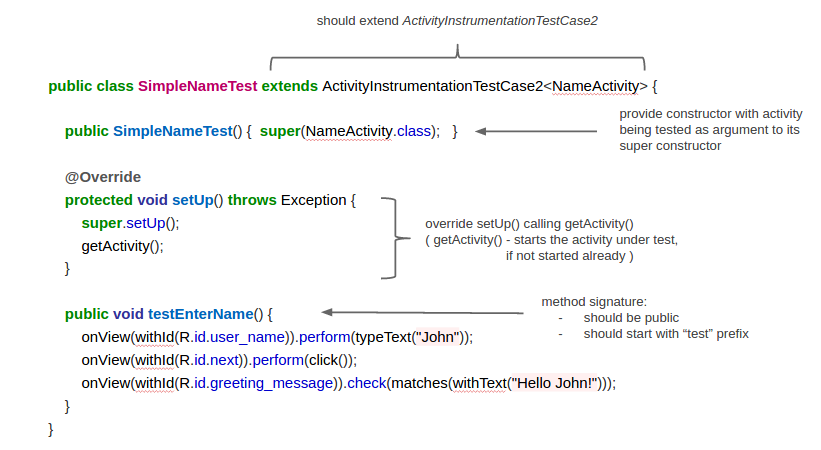
现在,如果要跑起这个测试用例,我们需要把这写代码写到一个类中,然后对于在 Gradle 中这个类应该保存的位置:yourApp/src/androidTest/java。
这个就是测试类的样子和它的主要特征:
一个使用 onData 的简单测试
每当你有一个 ListView、GridView、Spinner 或者其它基于 Adapter 的view时,你都必须使用 onData() 来把 item 和 list 的数据联系起来。
onData() 是给你的 adapter 提供数据的。这是什么意思呢,接下来你就会知道了。
在一个假想的程序中我们需要在一个 Spinner 中选择一个国家,一旦选定,这个国家的名字就会在 Spinner 的旁边显示出来。
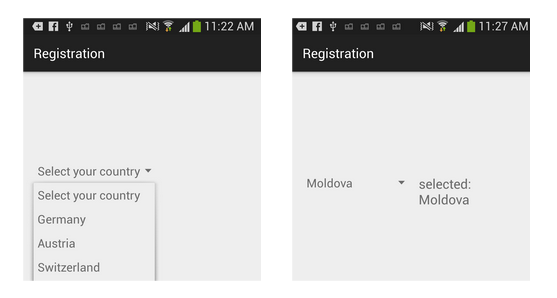
下面的测试就是检查显示出的国家是否与我们选择的相符合,代码长这样:
// locate the view with id "country_spinner" and click on it
onView(withId(R.id.country_spinner)).perform(click());

// match an item that is a String and is equal with whatever value the COUNTRY constant is initialized, then click on it.
onData(allOf(is(instanceOf(String.class)), is(COUNTRY))).perform(click());

// locate the view with id "selected_country" and check its text is equal with COUNTRY
onView(withId(R.id.selected_country)).check(matches(withText("selected: " + COUNTRY)));
上文中你看到的这个 Spinner 的适配数据是一个字符串的简单数组,所以对于我们要找的 item 来说我们也要指定 String 的数据类型。如果不是一个 String 而是一些自定义的对象呢,我们应该指定这些自定义的对象。
思考下下面这个显示一个 books 的 list 集合数据的例子:
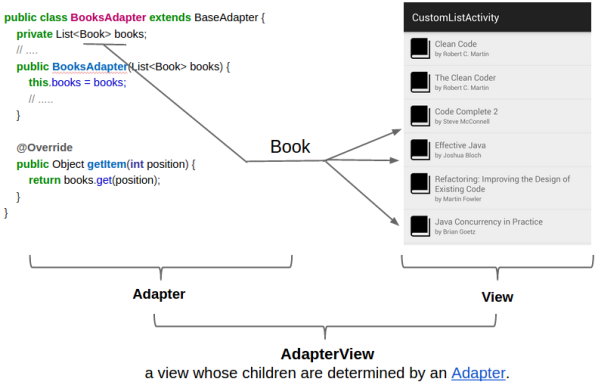
把 item 的数据改为 Book 后,来看看查询:
onData(allOf(is(instanceOf(Book.class)), withBookTitle(BOOK_TITLE))).perform(click());数据交互
Espresso 有一些很有用的方法可以用来处理数据间的交互。
atPosition() - 在下述的这些情况中会很有用,与相应元素交互的对象是不相关的,或 items 的顺序是特定的所以你知道每个 item 在哪个位置。
onData(...).atPosition(2).perform(click());inRoot() - 在没有默认窗口的情况下使用 inRoot()。这个场景可以应用在测试需自动完成时。这个 list 出现在自动输入填写完成的 view 是属于应用窗口之上的窗口视图。
这种情况下你必须指定你要查找的数据,而这数据并不在主程序窗口中。
onView(withText("AutoCompleteText"))
        .inRoot(withDecorView(not(is(getActivity().getWindow().getDecorView()))))
        .check(matches(isDisplayed()));
onChildView() - 这个数据交互可以进一步地精取出在一个 list 中的指定的(item) view。
你有一个集合列表,每一行的 item 上都有一个删除按钮。你想点击指定 item 上的删除按钮:
onData(withBookTitle("My Book"))
      .onChildView(withId(R.id.book_delete)).perform(click());
inAdapterView() - 可以选择指定一个 adapter view 去操作,默认情况下 Espresso 可以操作任何 adapter view。
你可能会发现这个在处理 ViewPagers 和 Fragments 时很有用,或者,你想要与当前显示的 AdapterView 交互时,你的 activity 中有多个 adapter view 时。
onData(withBookTitle("My Book"))
      .inAdapterView(allOf(isAssignableFrom(AdapterView.class), isDisplayed()))
      .perform(click());
Espresso 和 RecyclerView
RecyclerView 是一个像 ListView、GridVIew 那样呈现数据集合的 UI 组件,实际上它的目的是要替换掉这两个组件。从测试的角度上来看我们感兴趣的有是 RecyclerView 不是一个 AdapterView,这意味着你不能使用 onData() 去跟你的 list items 交互。
Fortunately, there is a class called RecyclerViewActions that exposes a small API to operate on a RecyclerView. RecyclerViewActions is part of a separate lib called espresso-contrib, that also should be added to build.gradle:
幸运的是,有一个叫 RecyclerViewActions 的类提供了简单的 API 给我们操作 RecyclerView。RecyclerViewActions 是 espresso-contrib库的一部分,这个库的依赖可以在 build.gradle 中添加:
dependencies {
    // ...

    androidTestCompile('com.android.support.test.espresso:espresso-contrib:2.0');
}
因为你的项目已经包括 recyclerview 依赖, 所以不妨也加上支持库的,一些依赖关系可能出现的冲突。在这种情况下可以在 espresso-contrib 中 exclude 他们:
dependencies {
    // ...

    androidTestCompile('com.android.support.test.espresso:espresso-contrib:2.0') {
        exclude group: 'com.android.support', module: 'appcompat'
        exclude group: 'com.android.support', module: 'support-v4'
        exclude module: 'recyclerview-v7'
    }
}
下面就是示例怎么(在RecyclerView)点击指定位置的 item:
onView(withId(R.id.recyclerView))
      .perform(RecyclerViewActions.actionOnItemAtPosition(0, click()));
或者怎么点击指定 item 上的 view:
onView(withId(R.id.recyclerView))
      .perform(RecyclerViewActions.actionOnItem(
                hasDescendant(withText(BOOK_TITLE)), click()));
更多 Espresso 的例子请戳:https://github.com/vgrec/EspressoExamples