Android自定义LayoutManager实现可滚动的环形菜单!
效果
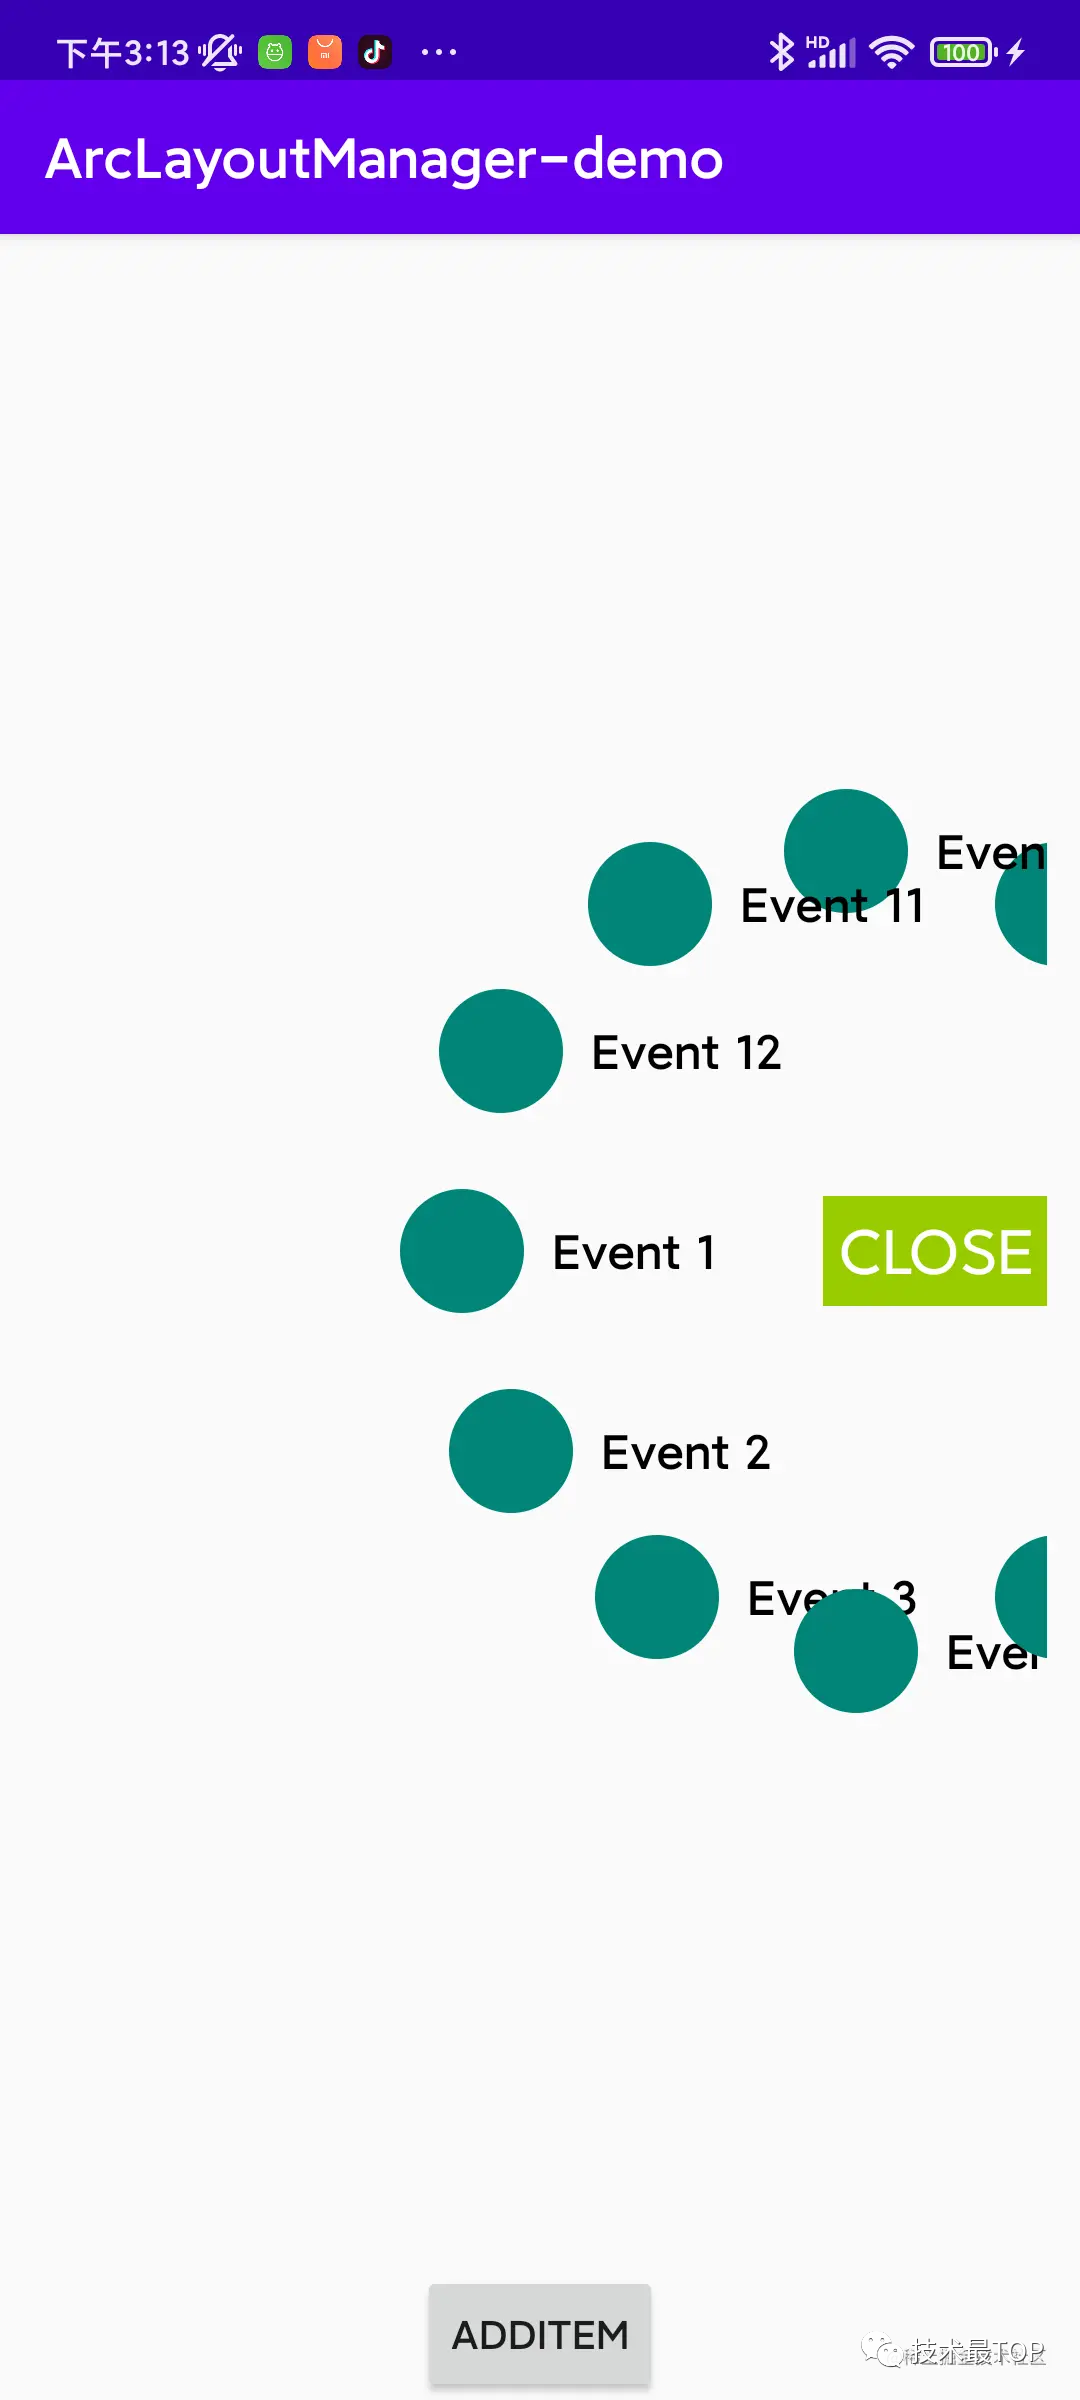
首先看一下实现的效果:

实现环形菜单的方式比较明确的方式就是两种,一种是自定义View,这种实现方式需要自己处理滚动过程中的绘制,不同item的点击、绑定数据管理等等,优势是可以深层次的定制化,每个步骤都是可控的。另外一种方式是将环形菜单看成是一个环形的List,也就是通过自定义LayoutManager来实现环形效果,这种方式的优势是自定义LayoutManager只需要实现子控件的onLayoutChildren即可,数据绑定也由RecyclerView管理,比较方便。本文主要是通过第二种方式来实现,即自定义LayoutManager的方式。
如何实现
第一步需要继承RecyclerView.LayoutManager:
class ArcLayoutManager(
    private val context: Context,
) : RecyclerView.LayoutManager() {
 override fun generateDefaultLayoutParams(): RecyclerView.LayoutParams =
        RecyclerView.LayoutParams(MATCH_PARENT, WRAP_CONTENT)

  override fun onLayoutChildren(recycler: RecyclerView.Recycler, state: RecyclerView.State) {
        super.onLayoutChildren(recycler, state)
        fill(recycler)
    }

  // layout子View
  private fun fill(recycler: RecyclerView.Recycler) {
  }
}继承LayoutManager之后,重写了onLayoutChildren,并且通过fill()函数来摆放子View,所以fill()函数如何实现就是重点了:
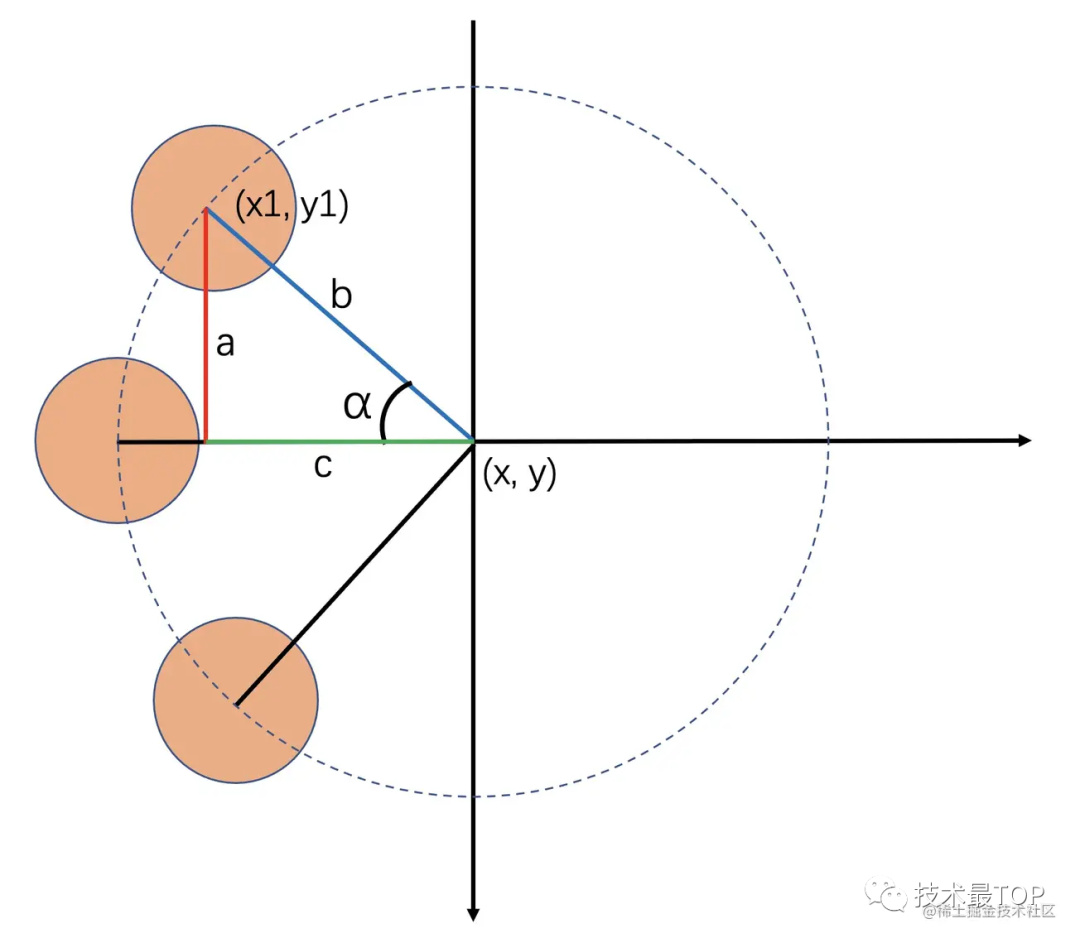
α=2π/n
∵sinα=a/b
∴a=sin(α)∗b
∵cosα=c/b
∴c=cos(α)∗b
∴x1=x+c
∴y1=y−a计算中,需要使用弧度计算,需要将角度首先转为弧度:Math.toRadians(angle)。弧度计算公式:弧度 = 角度 * π / 180
根据上述公式就可以得出fill()函数为:
// mCurrAngle: 当前初始摆放角度
// mInitialAngle:初始角度
private fun fill(recycler: RecyclerView.Recycler) {
  if (itemCount == 0) {
    removeAndRecycleAllViews(recycler)
    return
  }

  detachAndScrapAttachedViews(recycler)

  angleDelay = Math.PI * 2 / (mVisibleItemCount)

  if (mCurrAngle == 0.0) {
    mCurrAngle = mInitialAngle
  }

  var angle: Double = mCurrAngle
  val count = itemCount
  for (i in 0 until count) {
    val child = recycler.getViewForPosition(i)
    measureChildWithMargins(child, 0, 0)
    addView(child)

    //测量的子View的宽,高
    val cWidth: Int = getDecoratedMeasuredWidth(child)
    val cHeight: Int = getDecoratedMeasuredHeight(child)

    val cl = (innerX + radius * sin(angle)).toInt()
    val ct = (innerY - radius * cos(angle)).toInt()

    //设置子view的位置
    var left = cl - cWidth / 2
    val top = ct - cHeight / 2
    var right = cl + cWidth / 2
    val bottom = ct + cHeight / 2

    layoutDecoratedWithMargins(
      child,
      left,
      top,
      right,
      bottom
    )
    angle += angleDelay * orientation.value
  }

  recycler.scrapList.toList().forEach {
    recycler.recycleView(it.itemView)
  }
}通过实现以上fill()函数,首先就可以实现一个圆形排列的RecyclerView:
// 允许竖直方向的滑动
override fun canScrollVertically() = true

// 滑动过程的处理
override fun scrollVerticallyBy(
  dy: Int,
  recycler: RecyclerView.Recycler,
  state: RecyclerView.State
): Int {
  // 根据滑动距离 dy 计算滑动角度
  val theta = ((-dy * 180) * orientation.value / (Math.PI * radius * DEFAULT_RATIO)) * DEFAULT_SCROLL_DAMP
  // 根据滑动角度修正开始摆放的角度
  mCurrAngle = (mCurrAngle + theta) % (Math.PI * 2)
  offsetChildrenVertical(-dy)
  fill(recycler)
  return dy
}
在根据滑动距离计算角度时,将竖直方向的滑动距离,近似看成是在圆上的弧长,再根据自定义的系数计算出需要滑动的角度。然后重新摆放子View。实现了上述函数后,就可以正常滚动了。那么当我们希望滚动完成后,能够自动将距离最近的一个子View位置修正为初始位置(在本例中即为-90度的位置),应该如何实现呢?
// 当所有子View计算并摆放完毕会调用该函数
override fun onLayoutCompleted(state: RecyclerView.State) {
    super.onLayoutCompleted(state)
    stabilize()
}

// 修正子View位置
private fun stabilize() {
}要修正子View位置,就需要在所有子View都摆放完成后,再计算子View的位置,再重新摆放,所以stabilize() 实现就是关键了, 接下来就看下stabilize() 的实现:
// 修正子View位置
private fun stabilize() {
  if (childCount < mVisibleItemCount / 2 || isSmoothScrolling) return

  var minDistance = Int.MAX_VALUE
  var nearestChildIndex = 0
  for (i in 0 until childCount) {
    val child = getChildAt(i) ?: continue
    if (orientation == FillItemOrientation.LEFT_START && getDecoratedRight(child) > innerX)
    continue
    if (orientation == FillItemOrientation.RIGHT_START && getDecoratedLeft(child) < innerX)
    continue

    val y = (getDecoratedTop(child) + getDecoratedBottom(child)) / 2
    if (abs(y - innerY) < abs(minDistance)) {
      nearestChildIndex = i
      minDistance = y - innerY
    }
  }
  if (minDistance in 0..10) return
  getChildAt(nearestChildIndex)?.let {
    startSmoothScroll(
      getPosition(it),
      true
    )
  }
}

// 滚动
private fun startSmoothScroll(
        targetPosition: Int,
        shouldCenter: Boolean
    ) {
}在stabilize()函数中,做了一件事就是找到距离圆心最近距离的一个子View,然后调用startSmoothScroll() 滚动到该子View的位置。接下来就是startSmoothScroll()的实现了:
private val scroller by lazy {
  object : LinearSmoothScroller(context) {

    override fun calculateDtToFit(
      viewStart: Int,
      viewEnd: Int,
      boxStart: Int,
      boxEnd: Int,
      snapPreference: Int
    ): Int {
      if (shouldCenter) {
        val viewY = (viewStart + viewEnd) / 2
        var modulus = 1
        val distance: Int
        if (viewY > innerY) {
          modulus = -1
          distance = viewY - innerY
        } else {
          distance = innerY - viewY
        }
        val alpha = asin(distance.toDouble() / radius)
        return (PI * radius * DEFAULT_RATIO * alpha / (180 * DEFAULT_SCROLL_DAMP) * modulus).roundToInt()
      } else {
        return super.calculateDtToFit(
          viewStart,
          viewEnd,
          boxStart,
          boxEnd,
          snapPreference
        )
      }
    }

    override fun calculateSpeedPerPixel(displayMetrics: DisplayMetrics) =
    SPEECH_MILLIS_INCH / displayMetrics.densityDpi
  }
}

// 滚动
private fun startSmoothScroll(
  targetPosition: Int,
  shouldCenter: Boolean
) {
  this.shouldCenter = shouldCenter
  scroller.targetPosition = targetPosition
  startSmoothScroll(scroller)
}滚动的过程是通过自定义的LinearSmoothScroller来实现的,主要是两个重写函数:calculateDtToFit, calculateSpeedPerPixel。其中calculateDtToFit 需要说明一下的是,当竖直方向滚动的时候,它的参数分别为:(子View的top,子View的bottom,RecyclerView的top,RecyclerView的bottom),返回值为竖直方向上的滚动距离。当水平方向滚动的时候,它的参数分别为:(子View的left,子View的right,RecyclerView的left,RecyclerView的right),返回值为水平方向上的滚动距离。而calculateSpeedPerPixel 函数主要是控制滑动速率的,返回值表示每滑动1像素需要耗费多长时间(ms),这里SPEECH_MILLIS_INCH是自定义的阻尼系数。
关于calculateDtToFit计算过程如下:
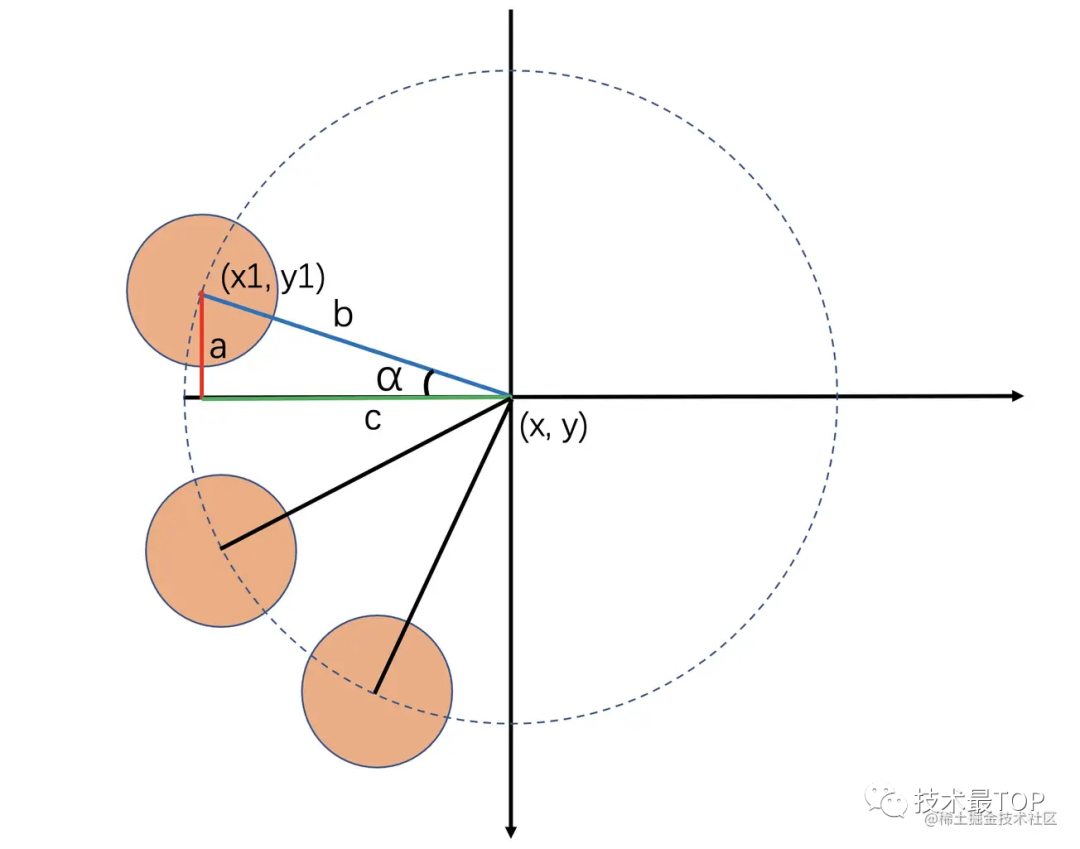
a=(viewStart+viewEnd)/2−y
∵sinα=a/b
∴α=arcsin(a/b)计算出目标子View与x轴的夹角后,再根据之前说过的根据滑动距离 dy计算滑动角度反推出dy的值就可以了。
通过上述一系列操作,就可以实现了大部分效果,最后再加上一个初始位置的View 放大的效果:
private fun fill(recycler: RecyclerView.Recycler) {
  ...
  layoutDecoratedWithMargins(
    child,
    left,
    top,
    right,
    bottom
  )
  scaleChild(child)
  ...
}

private fun scaleChild(child: View) {
  val y = (child.top + child.bottom) / 2
  val scale = if (abs( y - innerY) > child.measuredHeight / 2) {
    child.translationX = 0f
    1f
  } else {
    child.translationX = -child.measuredWidth * 0.2f
    1.2f
  }
  child.pivotX = 0f
  child.pivotY = child.height / 2f
  child.scaleX = scale
  child.scaleY = scale
}
当子View位于初始位置一定范围内,将其放大1.2倍,注意子View放大的同时,x坐标也同样需要变化。
经过上述步骤,就实现了基于自定义LayoutManager方式的环形菜单。