Android显示框架:Android应用视图的创建流程
Android应用在运行的过程中需要访问一些特定的资源和类,这些特定的资源或者类构成了Android应用运行的上下文环境,即Context。Context是一个抽象类,ContextImpl继承了Context, 并实现它的抽象方法。
因此,每个Activity组件关联的是ContextImpl对象,它们的类图关系如下:
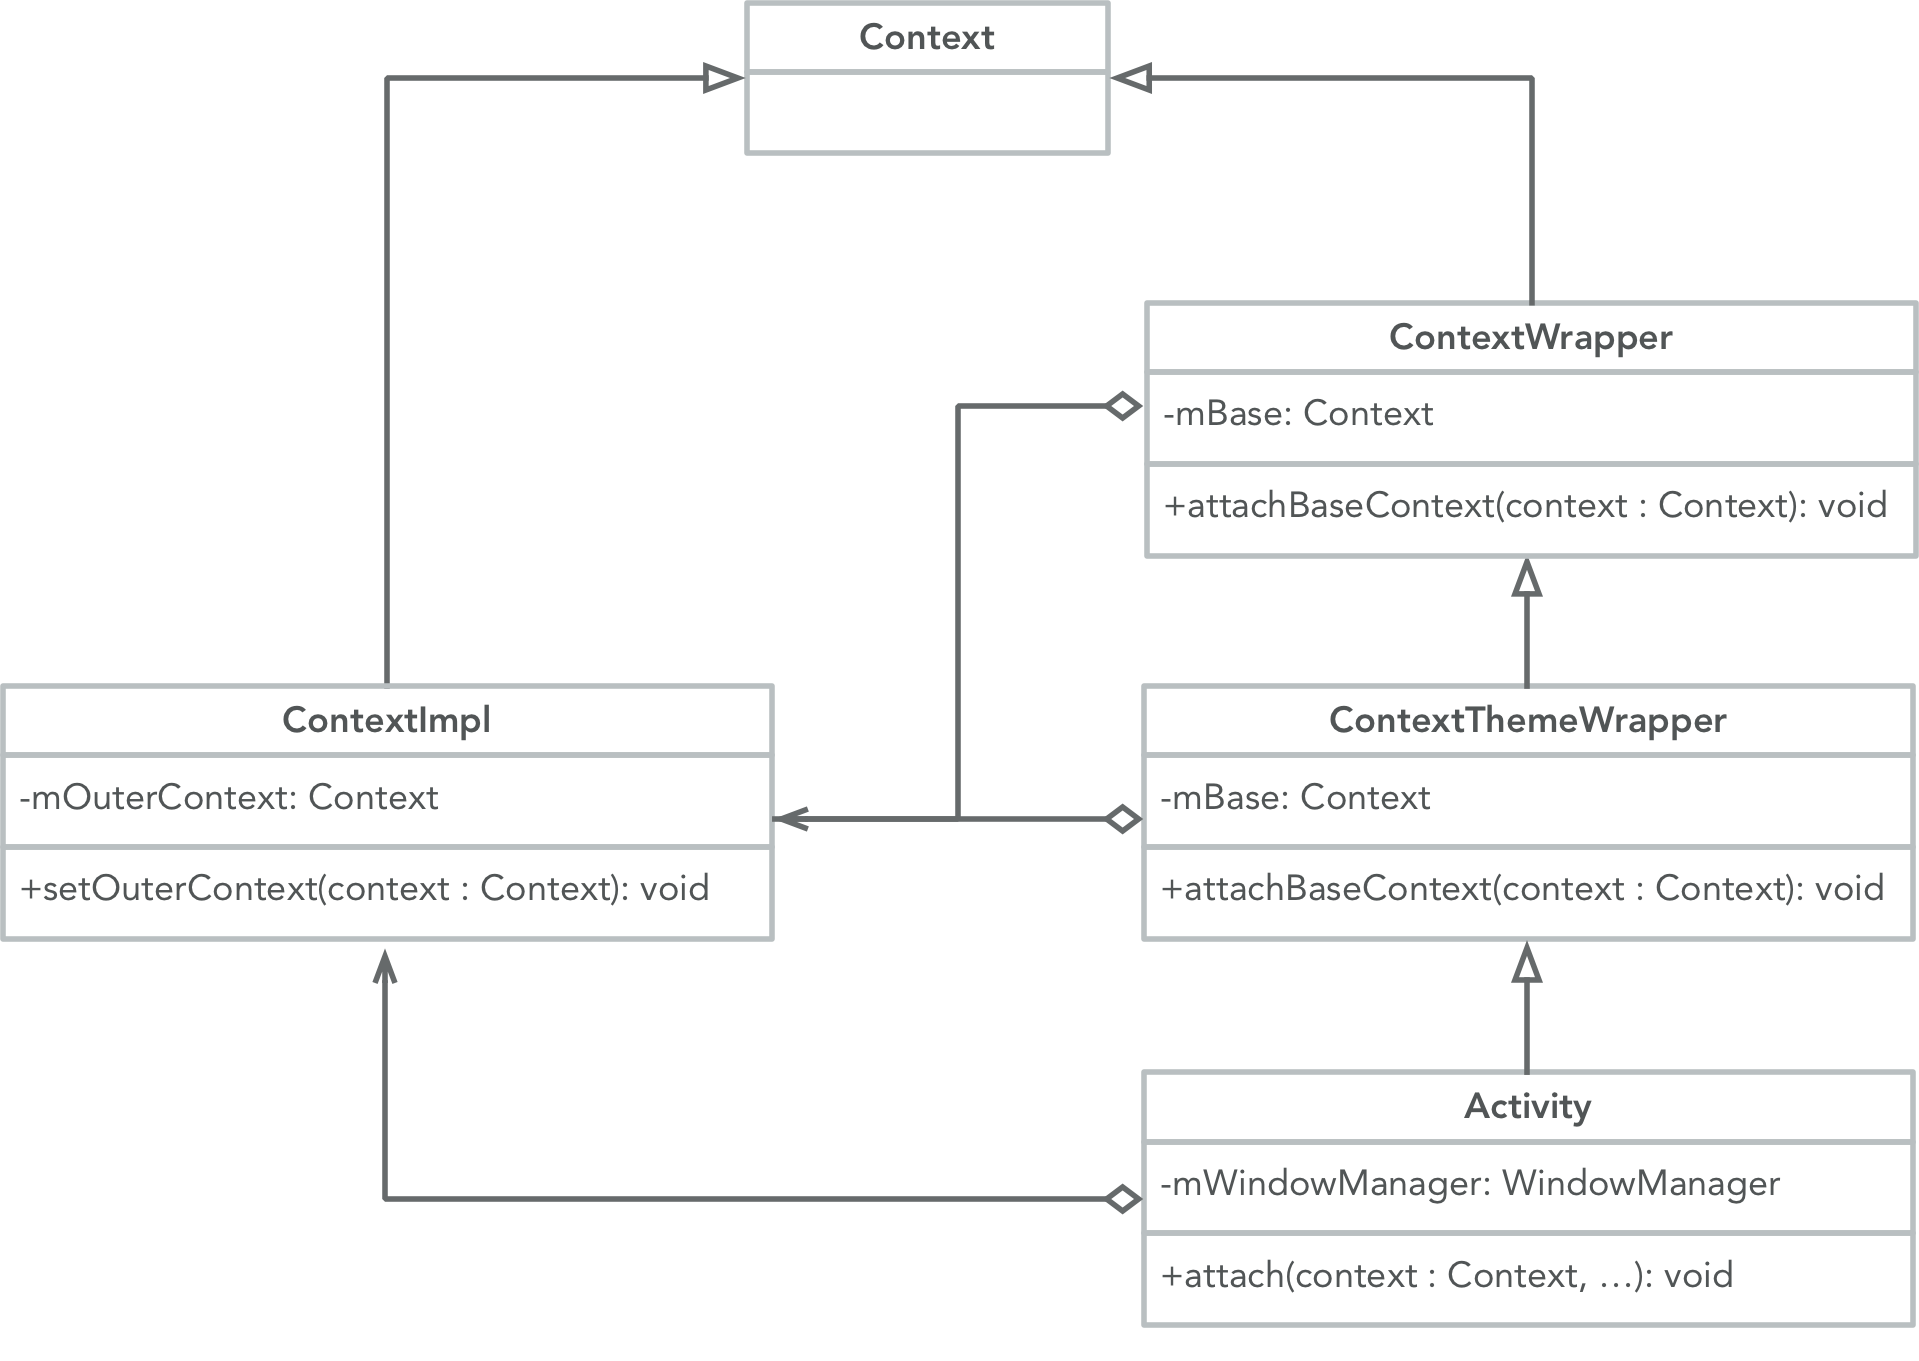
Context家族相关类采用装饰模式设计而成,ContextWrapper与ContextThemeWrapper继承于Context,是它的包装类,用于完成更多的功能。ContextWrapper与ContextThemeWrapper背部都通过 成员变量mBasae引用了一个ContextImpl对象,Activity正是通过这个ContextImpl对象执行一些具体的操作,例如:启动Activity、启动Service等。
Context mBase;

public ContextWrapper(Context base) {
    mBase = base;
}
比较有意思的是,ContextImpl内部也有一个mOuterContext对象,它在自己初始化的时候传入,它引用的正是与它关联的Activity,这样它也可以把一些操作转交给Activity。
private Context mOuterContext;

ContextImpl() {
    mOuterContext = this;
}
一 创建Context对象
我们之前分析过Activity的启动流程,可以得知这个流程的最后一步是调用ActivityThread.perforLaunchActivity()方法在应用进程中创建一个Activity实例,并为它蛇者一个 上下文环境,即创建一个ContexImpl对象。
ContexImpl的创建流程如下所示:
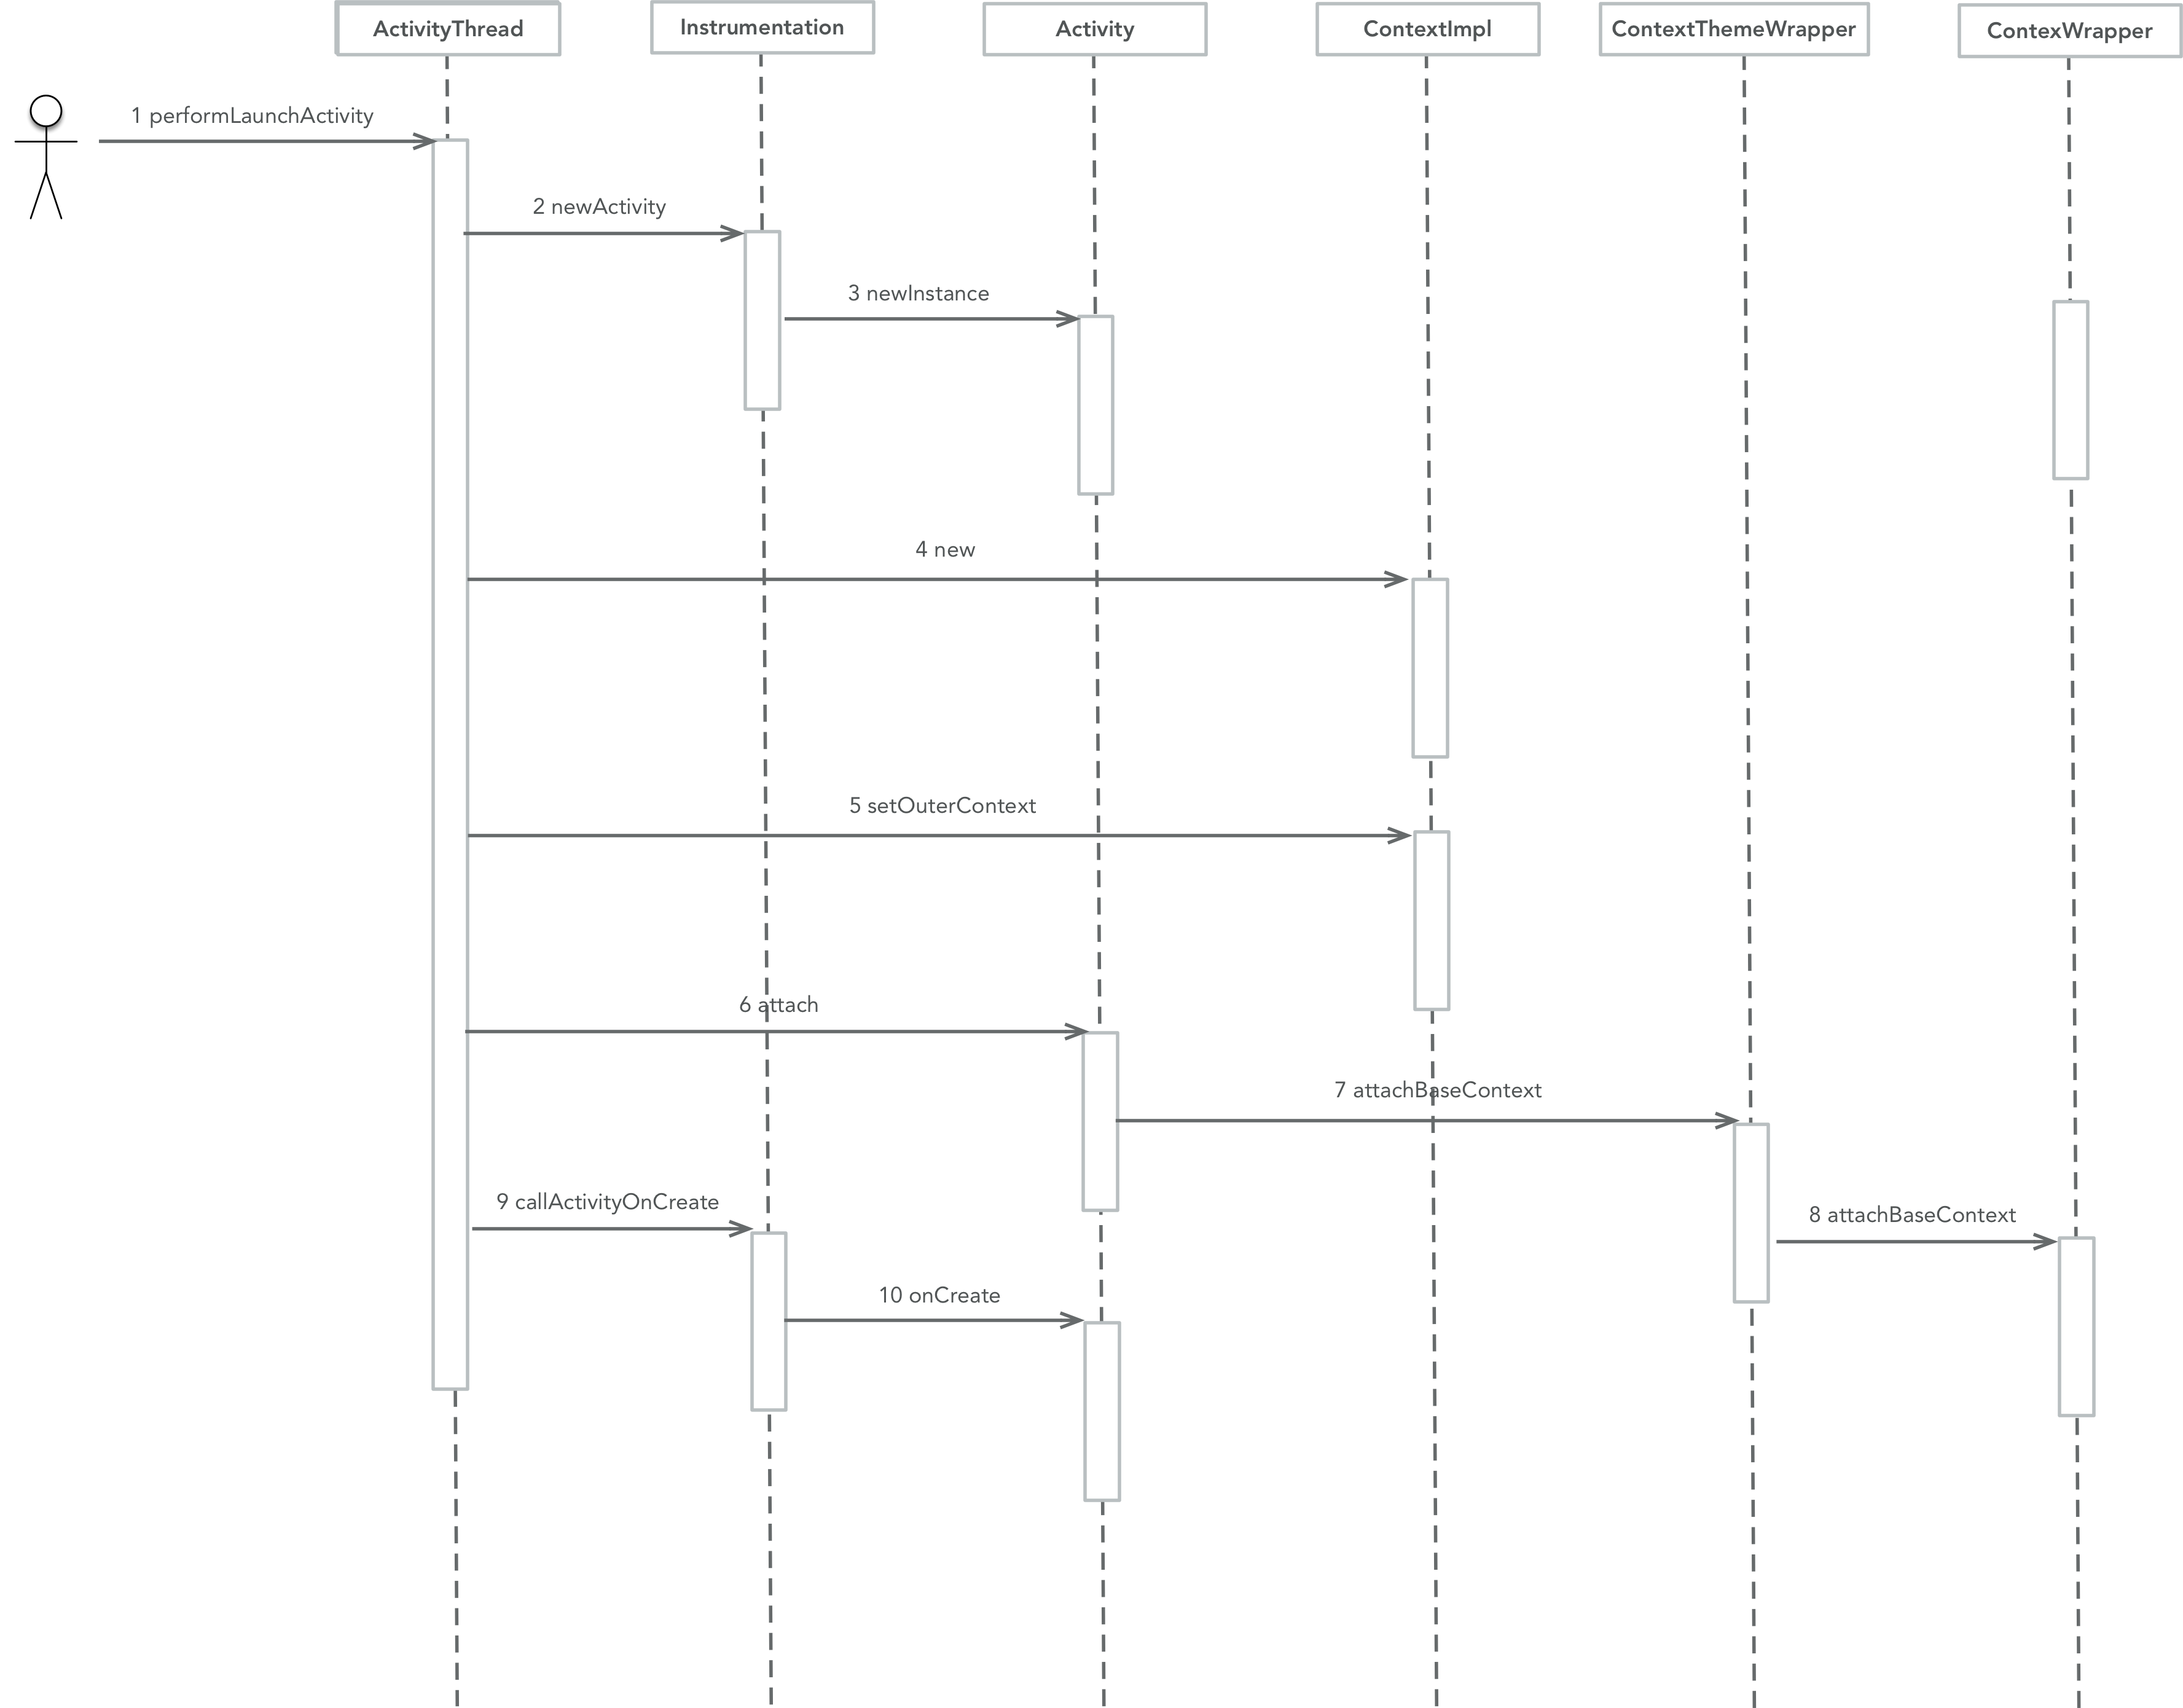
主要角色:
- Instrumenttation:记录应用与系统的交互过程
- Contextrapper: ContextImpl的代理类,包装了ContextImpl里的相关操作。
- ContextThemeWrapper:用来维护一个应用的窗口主题
整个流程还是比较简单清晰的,我们着重分析里面的关键点。
关键点1:ActivityThread.performLaunchActivity(ActivityClientRecord r, Intent customIntent)
这个方法完成了Activity启动以及ContextImpl创建的主要流程,它完成的工作有:
- 1 从Intent中获取Activity的组件名ComponentName,调用对应的类加载器进行加载,调用Activity的默认构造方法进行实例创建。
- 2 调用ContextImpl的构造方法创建ContextImpl,并调用ContextImpl.setOuterContext()方法将已经创建完成的Activity关了给ContextImpl。
- 3 调用Activity.attach()关联上下文信息、Activity信息、Intent信息等Activity运行所需要的信息。
- 4 调用InstrumentationcallActivityOnCreate(),通知Activity你已经被创建,相关环境与信息也已经准备好,可以执行你的onCreate()方法辣,接着Activity就去执行它的onCreate()方法了。
public final class ActivityThread {

    private final Activity performLaunchActivity(ActivityClientRecord r, Intent customIntent) {
            // System.out.println("##### [" + System.currentTimeMillis() + "] ActivityThread.performLaunchActivity(" + r + ")");

            ActivityInfo aInfo = r.activityInfo;
            if (r.packageInfo == null) {
                r.packageInfo = getPackageInfo(aInfo.applicationInfo,
                        Context.CONTEXT_INCLUDE_CODE);
            }

            //1 从Intent中获取Activity的组件名ComponentName,调用对应的类加载器进行加载,调用
            //Activity的默认构造方法进行实例创建。
            ComponentName component = r.intent.getComponent();
            if (component == null) {
                component = r.intent.resolveActivity(
                    mInitialApplication.getPackageManager());
                r.intent.setComponent(component);
            }

            if (r.activityInfo.targetActivity != null) {
                component = new ComponentName(r.activityInfo.packageName,
                        r.activityInfo.targetActivity);
            }

            Activity activity = null;
            try {
                java.lang.ClassLoader cl = r.packageInfo.getClassLoader();
                activity = mInstrumentation.newActivity(
                        cl, component.getClassName(), r.intent);
                r.intent.setExtrasClassLoader(cl);
                if (r.state != null) {
                    r.state.setClassLoader(cl);
                }
            } catch (Exception e) {
                if (!mInstrumentation.onException(activity, e)) {
                    throw new RuntimeException(
                        "Unable to instantiate activity " + component
                        + ": " + e.toString(), e);
                }
            }

            try {
                Application app = r.packageInfo.makeApplication(false, mInstrumentation);

                if (localLOGV) Slog.v(TAG, "Performing launch of " + r);
                if (localLOGV) Slog.v(
                        TAG, r + ": app=" + app
                        + ", appName=" + app.getPackageName()
                        + ", pkg=" + r.packageInfo.getPackageName()
                        + ", comp=" + r.intent.getComponent().toShortString()
                        + ", dir=" + r.packageInfo.getAppDir());

                if (activity != null) {
                    //2 调用ContextImpl的构造方法创建ContextImpl,并调用ContextImpl.setOuterContext()方法将已经创建完成的Activity关了给ContextImpl。
                    ContextImpl appContext = new ContextImpl();
                    appContext.init(r.packageInfo, r.token, this);
                    appContext.setOuterContext(activity);
                    CharSequence title = r.activityInfo.loadLabel(appContext.getPackageManager());
                    Configuration config = new Configuration(mConfiguration);
                    if (DEBUG_CONFIGURATION) Slog.v(TAG, "Launching activity "
                            + r.activityInfo.name + " with config " + config);
                    //3 调用Activity.attach()关联上下文信息、Activity信息、Intent信息等Activity运行所需要的信息。
                    activity.attach(appContext, this, getInstrumentation(), r.token,
                            r.ident, app, r.intent, r.activityInfo, title, r.parent,
                            r.embeddedID, r.lastNonConfigurationInstance,
                            r.lastNonConfigurationChildInstances, config);

                    if (customIntent != null) {
                        activity.mIntent = customIntent;
                    }
                    r.lastNonConfigurationInstance = null;
                    r.lastNonConfigurationChildInstances = null;
                    activity.mStartedActivity = false;
                    int theme = r.activityInfo.getThemeResource();
                    if (theme != 0) {
                        activity.setTheme(theme);
                    }

                    activity.mCalled = false;
                    mInstrumentation.callActivityOnCreate(activity, r.state);
                    if (!activity.mCalled) {
                        throw new SuperNotCalledException(
                            "Activity " + r.intent.getComponent().toShortString() +
                            " did not call through to super.onCreate()");
                    }
                    r.activity = activity;
                    r.stopped = true;
                    if (!r.activity.mFinished) {
                        activity.performStart();
                        r.stopped = false;
                    }
                    if (!r.activity.mFinished) {
                        if (r.state != null) {
                            //4 调用InstrumentationcallActivityOnCreate(),通知Activity你已经被创建,相关环境与信息也已经准备好,可以执行
                            // 你的onCreate()方法辣,接着Activity就去执行它的onCreate()方法了。
                            mInstrumentation.callActivityOnRestoreInstanceState(activity, r.state);
                        }
                    }
                    if (!r.activity.mFinished) {
                        activity.mCalled = false;
                        mInstrumentation.callActivityOnPostCreate(activity, r.state);
                        if (!activity.mCalled) {
                            throw new SuperNotCalledException(
                                "Activity " + r.intent.getComponent().toShortString() +
                                " did not call through to super.onPostCreate()");
                        }
                    }
                }
                r.paused = true;

                mActivities.put(r.token, r);

            } catch (SuperNotCalledException e) {
                throw e;

            } catch (Exception e) {
                if (!mInstrumentation.onException(activity, e)) {
                    throw new RuntimeException(
                        "Unable to start activity " + component
                        + ": " + e.toString(), e);
                }
            }

            return activity;
        }
}
关键点2:Activity.attach()
Activity在被类加载器加载时调用的是默认的构造方法,这个方法什么都没有做,只是创建了个实例,真正的初始化流程在attach()方法里完成。
你可以看到attach()方法会调用ContextWrapper.attachBaseContext(context)进一步设置Context信息,这个方法就是将创建的ContextImpl赋值 给它的成员变量mBase。
除此之外,它还做了两件事:
- 1 调用PolicyManager.makeNewWindow(this)创建了应用窗口Window,它实际是个PhoneWindow对象,它会接收一些事件,例如:键盘、触摸事件,它会 转发这些事件给它关联的Activity,转发操作通过Window.Callback接口实现。
- 2 将Activity运行的一些关键信息带入Activity。
后续的UI绘制就砸Window上完成,并被Window设置了WindowManager。
public class Activity extends ContextThemeWrapper{

    final void attach(Context context, ActivityThread aThread,
            Instrumentation instr, IBinder token, int ident,
            Application application, Intent intent, ActivityInfo info,
            CharSequence title, Activity parent, String id,
            Object lastNonConfigurationInstance,
            HashMap<String,Object> lastNonConfigurationChildInstances,
            Configuration config) {
        attachBaseContext(context);

        //1 调用PolicyManager.makeNewWindow(this)创建了应用窗口Window,它实际是个PhoneWindow对象,它会接收一些事
        // 件,例如:键盘、触摸事件,它会转发这些事件给它关联的Activity,转发操作通过Window.Callback接口实现。
        mWindow = PolicyManager.makeNewWindow(this);
        mWindow.setCallback(this);
        if (info.softInputMode != WindowManager.LayoutParams.SOFT_INPUT_STATE_UNSPECIFIED) {
            mWindow.setSoftInputMode(info.softInputMode);
        }
        mUiThread = Thread.currentThread();
        //2 将Activity运行的一些关键信息带入Activity。
        mMainThread = aThread;
        mInstrumentation = instr;
        mToken = token;
        mIdent = ident;
        mApplication = application;
        mIntent = intent;
        mComponent = intent.getComponent();
        mActivityInfo = info;
        mTitle = title;
        mParent = parent;
        mEmbeddedID = id;
        mLastNonConfigurationInstance = lastNonConfigurationInstance;
        mLastNonConfigurationChildInstances = lastNonConfigurationChildInstances;

        mWindow.setWindowManager(null, mToken, mComponent.flattenToString());
        if (mParent != null) {
            mWindow.setContainer(mParent.getWindow());
        }
        mWindowManager = mWindow.getWindowManager();
        mCurrentConfig = config;
    }
}
以上便是ContextImpl对象创建过程的一些关键点,还是比较简单的,我们再来总结一下。
1 一个Android应用窗口的运行上下文环境是使用一个ContextImpl对象来描述的,这个ContextImpl对象会分别保存在Activity类的
父类ContextThemeWrapper和ContextWrapper的成员变量mBase中,即ContextThemeWrapper类和ContextWrapper类的成员变量
mBase指向的是一个ContextImpl对象。
2 Activity组件在创建过程中,即在它的成员函数attach被调用的时候,会创建一个PhoneWindow对象,并且保存在成员变量mWindow
中,用来描述一个具体的Android应用程序窗口。
3 Activity组件在创建的最后,即在它的子类所重写的成员函数onCreate中,会调用父类Activity的成员函数setContentView来创建
一个Android应用程序窗口的视图。
二 创建Window对象
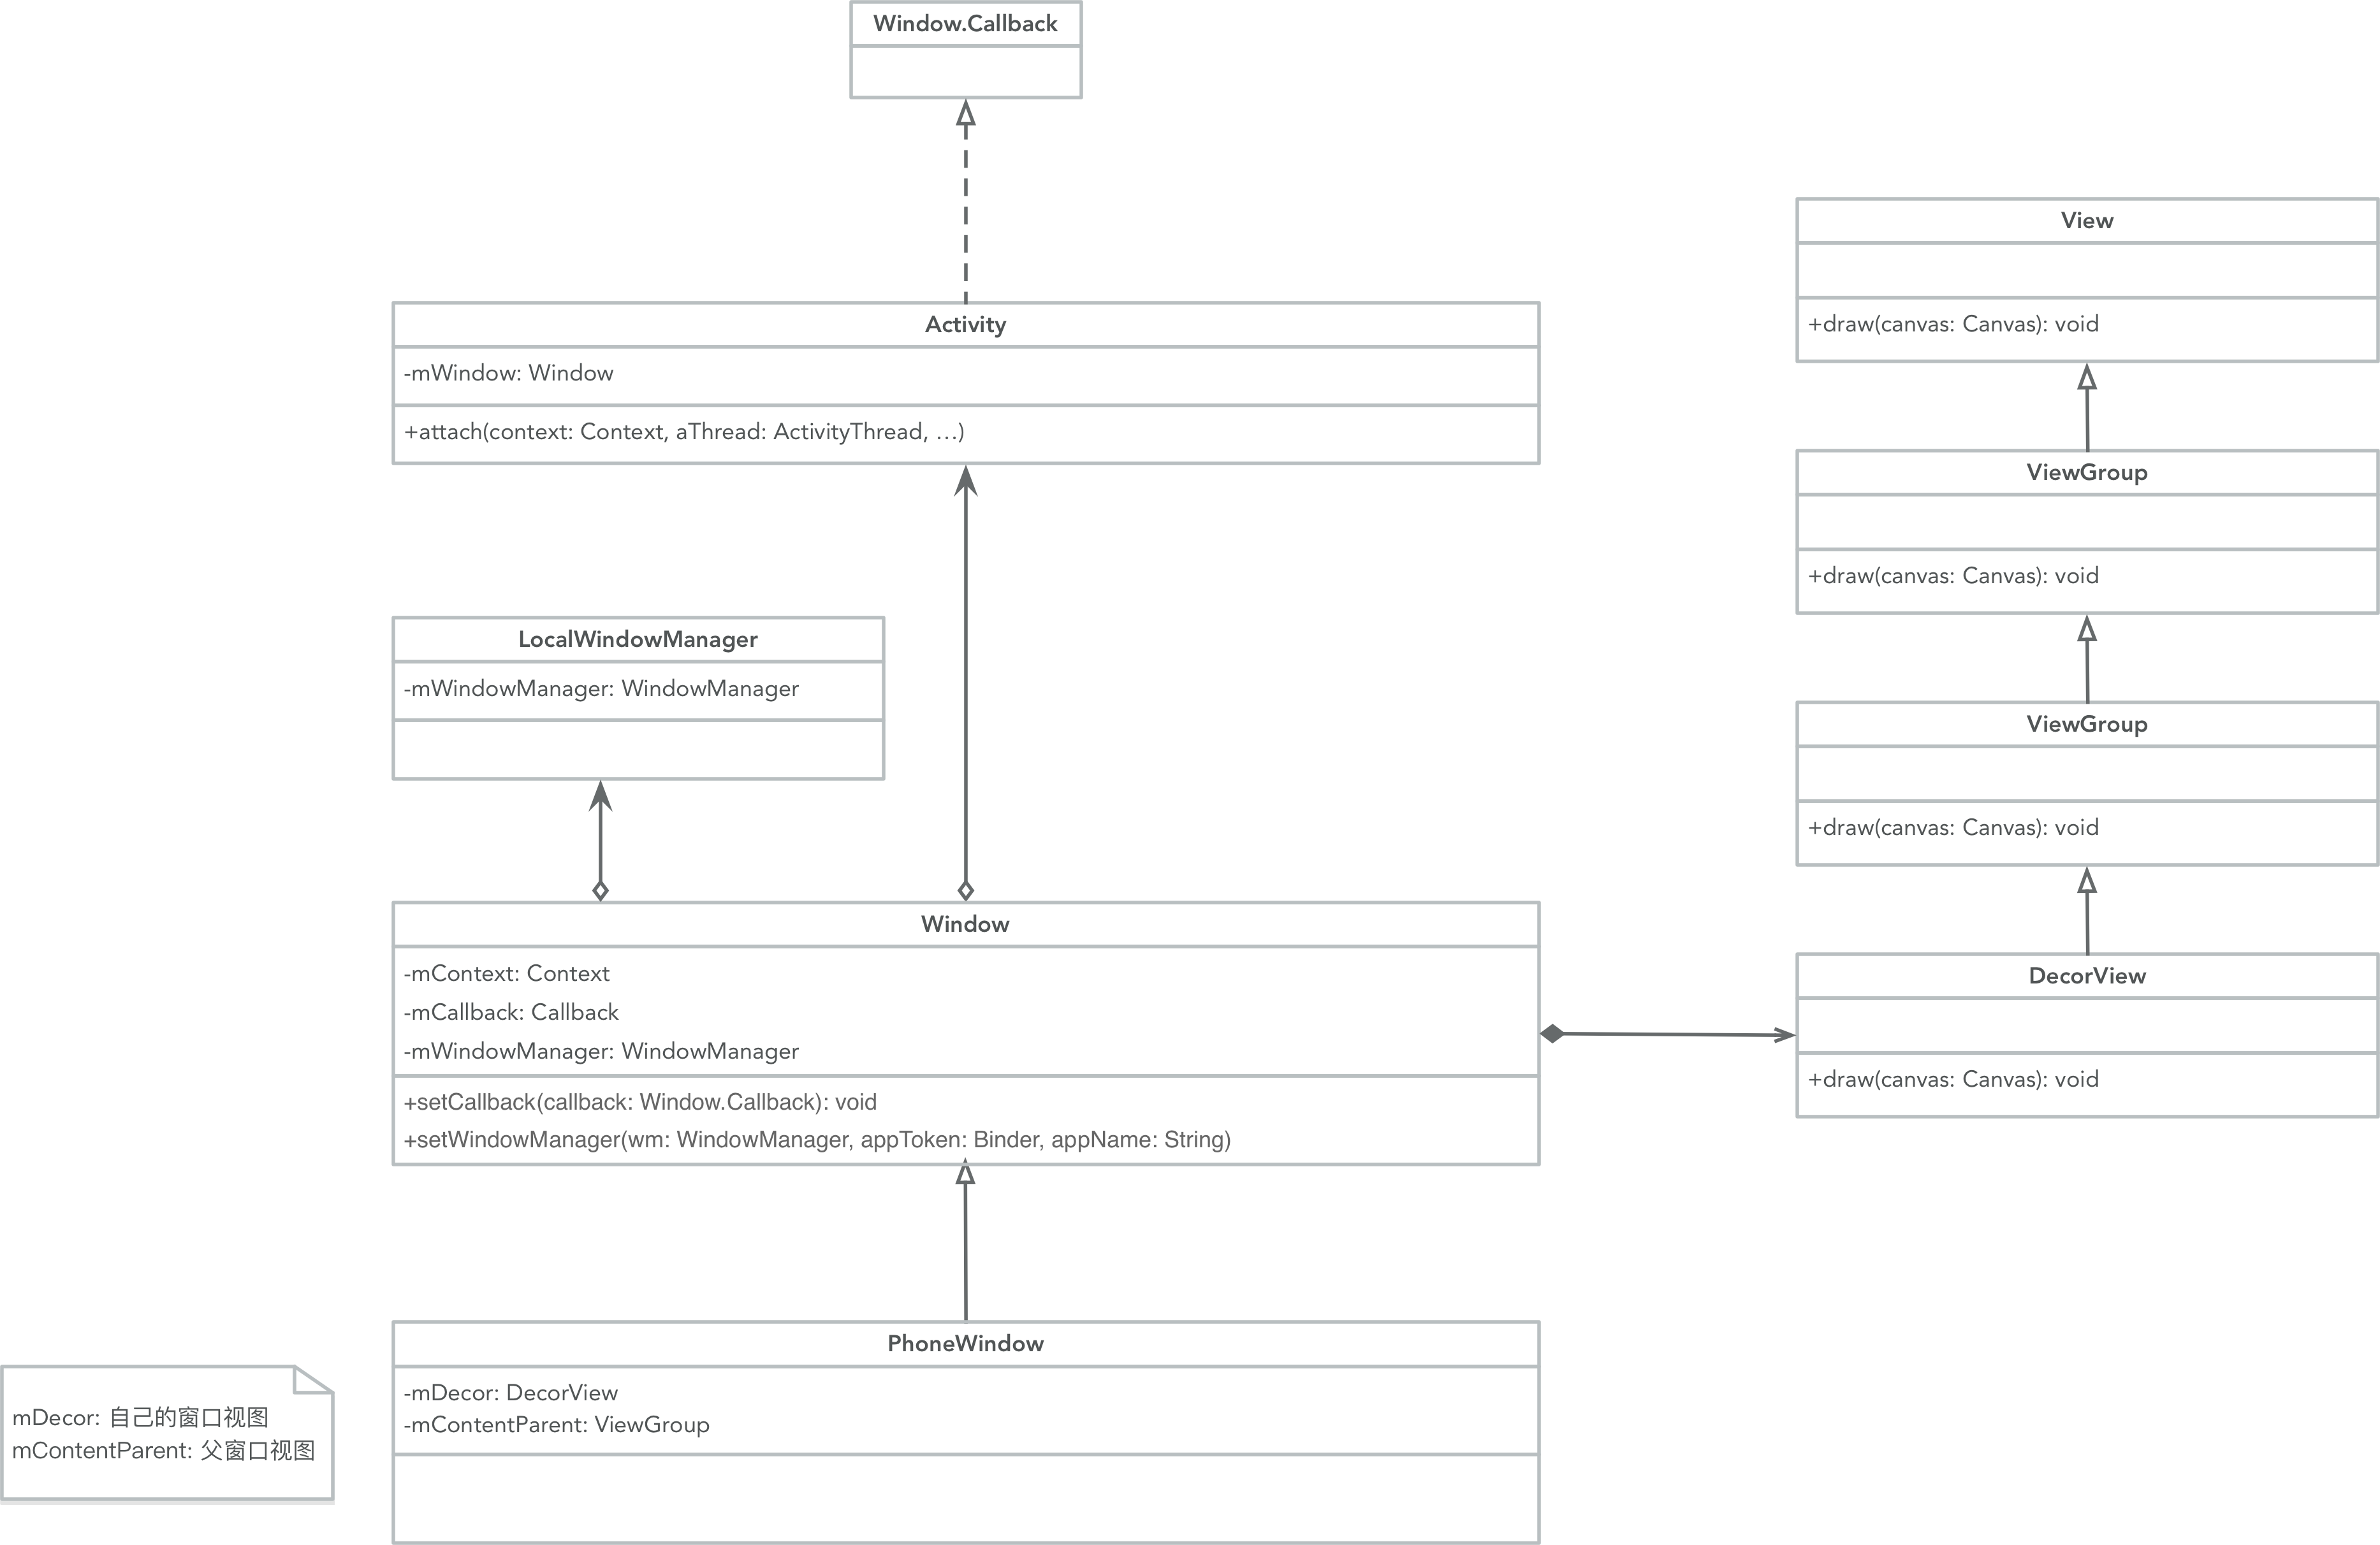
从上面的Activity.attach()方法的分析我们得知了ContextImpl的创建流程,我们发现它不仅创建了上下文环境Context,它还创建了Window对象,用来描述一个具体的应用窗口,可以看出 Activity只不过是一个高度抽象的UI组件,它的具体UI实现是由它的一系列对象来完成的,它们的类图关系如下所示:
从上文的描述我们可以知道,Windows是在Activity的attach()方法中开始创建的,我们来看下它的创建流程。
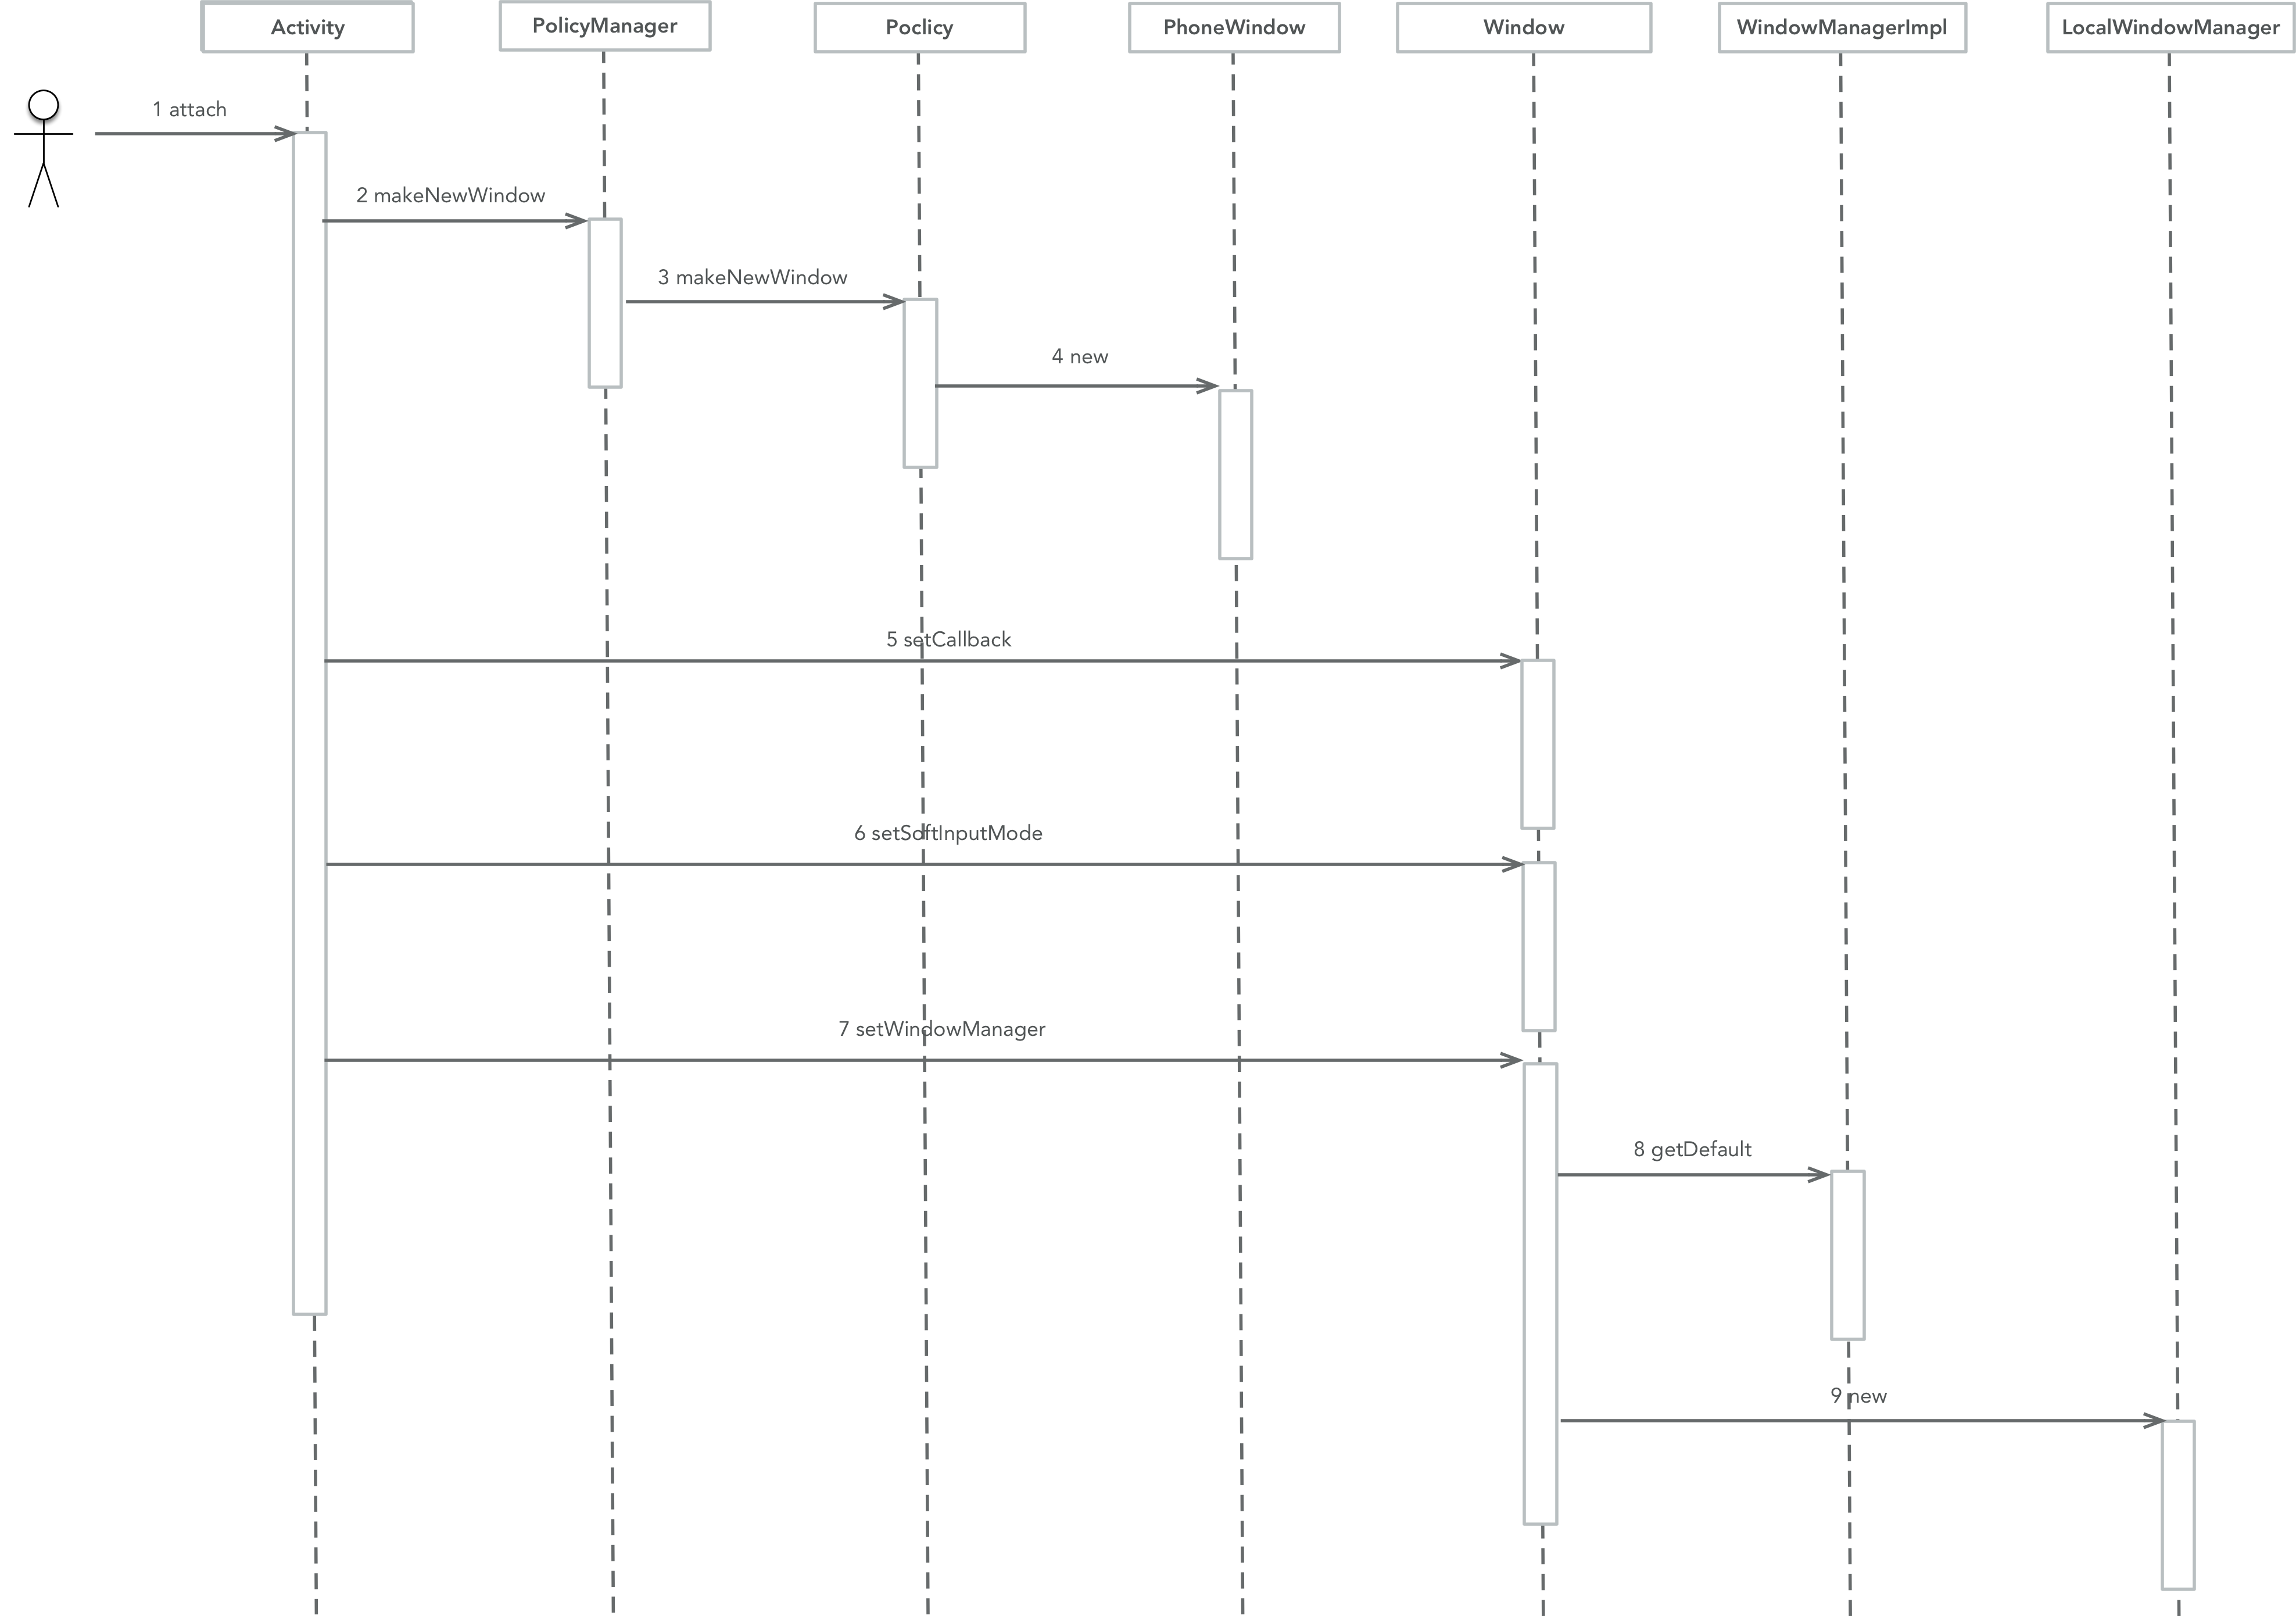
主要角色:
- PhoneWindow:Window的子类,应用视图窗口。
- WindowManagerImpl:实现了WIndowManager接口,用来管理窗口。
关键点1:PhoneWindow(Context context)
PolicyManager.makeNewWindow(this)用来创建Window对象,该函数通过反射最终调用Policy.makeNewWindow(Context context),在这个 方法里调用了PhoneWindow的构造函数,返回了一个PhoneWindow对象。
在PhoneWindow的构造函数里,我们很惊奇的发现它返回了一个LayoutInflater对象。这货就是我们用来绘制xml里面UI的东西。
public PhoneWindow(Context context) {
    super(context);
    mLayoutInflater = LayoutInflater.from(context);
}
PhoneWindow其实就是我们最终要用的视图窗口了,除了mLayoutInflater,它里面还有两个重要的成员变量:
- private DecorView mDecor:顶级View视图,它由mLayoutInflater来创建。
- private ViewGroup mContentParent:视图容器。
关键点2:Window.setCallback(this)
Activity实现了Window.Callback接口,将Activity关联给Window,Window就可以将一些事件交由Activity处理,具体有哪些事情呢?
 public interface Callback {

        //键盘事件分发
        public boolean dispatchKeyEvent(KeyEvent event);

        //触摸事件分发
        public boolean dispatchTouchEvent(MotionEvent event);

        //轨迹球事件分发
        public boolean dispatchTrackballEvent(MotionEvent event);

        //可见性事件分发
        public boolean dispatchPopulateAccessibilityEvent(AccessibilityEvent event);

        //创建Panel View
        public View onCreatePanelView(int featureId);

        //创建menu
        public boolean onCreatePanelMenu(int featureId, Menu menu);

        //画板准备好时回调
        public boolean onPreparePanel(int featureId, View view, Menu menu);

        //menu打开时回调
        public boolean onMenuOpened(int featureId, Menu menu);

        //menu item被选择时回调
        public boolean onMenuItemSelected(int featureId, MenuItem item);

        //Window Attributes发生变化时回调
        public void onWindowAttributesChanged(WindowManager.LayoutParams attrs);

        //Content View发生变化时回调
        public void onContentChanged();

        //窗口焦点发生变化时回调
        public void onWindowFocusChanged(boolean hasFocus);

        //Window被添加到WIndowManager时回调
        public void onAttachedToWindow();

        //Window被从WIndowManager中移除时回调
        public void onDetachedFromWindow();

         */
        //画板关闭时回调
        public void onPanelClosed(int featureId, Menu menu);

        //用户开始执行搜索操作时回调
        public boolean onSearchRequested();
    }
关键点3:Window.setSoftInputMode(int mode)
这个我们就比较熟悉了,我们会在AndroidManifest.xml里Activity的标签下设置android:windowSoftInputMode="adjustNothing",来控制输入键盘显示行为。
可选的有6个参数,源码里也有6个值与之对应:
- SOFT_INPUT_STATE_UNSPECIFIED:没有指定软键盘输入区域的显示状态。
- SOFT_INPUT_STATE_UNCHANGED:不要改变软键盘输入区域的显示状态。
- SOFT_INPUT_STATE_HIDDEN:在合适的时候隐藏软键盘输入区域,例如,当用户导航到当前窗口时。
- SOFT_INPUT_STATE_ALWAYS_HIDDEN:当窗口获得焦点时,总是隐藏软键盘输入区域。
- SOFT_INPUT_STATE_VISIBLE:在合适的时候显示软键盘输入区域,例如,当用户导航到当前窗口时。
- SOFT_INPUT_STATE_ALWAYS_VISIBLE:当窗口获得焦点时,总是显示软键盘输入区域。
关键点4: Window.setWindowManager(WindowManager wm, IBinder appToken, String appName)
public void setWindowManager(WindowManager wm,
        IBinder appToken, String appName) {
    mAppToken = appToken;
    mAppName = appName;
    if (wm == null) {
        wm = WindowManagerImpl.getDefault();
    }
    mWindowManager = new LocalWindowManager(wm);
}
上述的Activity.attach()最后会调用Window.setWindowManager(WindowManager wm, IBinder appToken, String appName)来为已经创建的Window对象 设置一个WindowManger,用来管理Window。
这个LocalWindowManager我们来说道说道,它是Window的一个内部类,实现了WIndowManager接口,它主要用来管理两个内部变量
- private final WindowManager mWindowManager:真正的Window管理者,它的实现类是WindowManagerImpl,可以通过WindowManagerImpl.getDefault()获得。
- private final Display mDefaultDisplay:它是一个Display对象,它描述了屏幕的相关信息。
到这为止,我们的Window对象就创建完成了,我们来总结一下。
1 一个Activity组件所关联的应用程序窗口对象的类型为PhoneWindow。
2 这个类型为PhoneWindow的应用程序窗口是通过一个类型为LocalWindowManager的本地窗口管理器来维护的。
3 这个类型为LocalWindowManager的本地窗口管理器又是通过一个类型为WindowManagerImpl的窗口管理器来维护应用
程序窗口的。
4 这个类型为PhoneWindow的应用程序窗口内部有一个类型为DecorView的视图对象,这个视图对象才是真正用来描述一个
Activity组件的UI的
三 创建View对象
从上文分析可知,每个Activity组件关联一个Window对象(PhoneWindow),而每个Window内部又包含一个View对象(DecorView),用来描述应用视图。 它们的类图关系如下:

我们来看下View的创建流程
关键点1:ActivityThread.handleLaunchActivity(ActivityClientRecord r, Intent customIntent)
public final class ActivityThread{

    private final void handleLaunchActivity(ActivityClientRecord r, Intent customIntent) {
            // If we are getting ready to gc after going to the background, well
            // we are back active so skip it.
            unscheduleGcIdler();

            if (localLOGV) Slog.v(
                TAG, "Handling launch of " + r);
            Activity a = performLaunchActivity(r, customIntent);

            if (a != null) {
                r.createdConfig = new Configuration(mConfiguration);
                Bundle oldState = r.state;
                handleResumeActivity(r.token, false, r.isForward);

                if (!r.activity.mFinished && r.startsNotResumed) {
                    // The activity manager actually wants this one to start out
                    // paused, because it needs to be visible but isn't in the
                    // foreground.  We accomplish this by going through the
                    // normal startup (because activities expect to go through
                    // onResume() the first time they run, before their window
                    // is displayed), and then pausing it.  However, in this case
                    // we do -not- need to do the full pause cycle (of freezing
                    // and such) because the activity manager assumes it can just
                    // retain the current state it has.
                    try {
                        r.activity.mCalled = false;
                        mInstrumentation.callActivityOnPause(r.activity);
                        // We need to keep around the original state, in case
                        // we need to be created again.
                        r.state = oldState;
                        if (!r.activity.mCalled) {
                            throw new SuperNotCalledException(
                                "Activity " + r.intent.getComponent().toShortString() +
                                " did not call through to super.onPause()");
                        }

                    } catch (SuperNotCalledException e) {
                        throw e;

                    } catch (Exception e) {
                        if (!mInstrumentation.onException(r.activity, e)) {
                            throw new RuntimeException(
                                    "Unable to pause activity "
                                    + r.intent.getComponent().toShortString()
                                    + ": " + e.toString(), e);
                        }
                    }
                    r.paused = true;
                }
            } else {
                // If there was an error, for any reason, tell the activity
                // manager to stop us.
                try {
                    ActivityManagerNative.getDefault()
                        .finishActivity(r.token, Activity.RESULT_CANCELED, null);
                } catch (RemoteException ex) {
                }
            }
        }

}
在Activity启动流程的文章里我们分析过这个方法是ActivityManagerService接收到SCHEDULE_LAUNCH_ACTIVITY_TRANSACTION进程间通信请求是触发的。
它的执行流程如下:
- 先去调用performLaunchActivity()方法,创建Context、Window等对象。最终会调用到Activity.onCreate()方法。
- 再去调用handleResumeActivity()方法,handleResumeActivity()会调用performResumeActivity()来通知Activity组件它将要被激活,最终会调用 Activity.onResume()方法。
关键点2:PhoneWindow.setContentView(int layoutResID)
在上面的描述中,我们知道ActivityThread.performLaunchActivity()方法会去调用Activity.onCreate()方法。当我们在覆写Activity的onCreate()方法 时,里面有个非常熟悉的方法setContentView(),它实际上调用的是Window.setContentView()。我们来看看Window子类PhoneWindow里 对这个方法的实现。
public class PhoneWindow extends Window implements MenuBuilder.Callback {

        // This is the top-level view of the window, containing the window decor.
        private DecorView mDecor;

        // This is the view in which the window contents are placed. It is either
        // mDecor itself, or a child of mDecor where the contents go.
        private ViewGroup mContentParent;

        @Override
        public void setContentView(int layoutResID) {
            if (mContentParent == null) {
                installDecor();
            } else {
                mContentParent.removeAllViews();
            }
            mLayoutInflater.inflate(layoutResID, mContentParent);
            final Callback cb = getCallback();
            if (cb != null) {
                cb.onContentChanged();
            }
        }

        private void installDecor() {
            if (mDecor == null) {
                mDecor = generateDecor();
                mDecor.setDescendantFocusability(ViewGroup.FOCUS_AFTER_DESCENDANTS);
                mDecor.setIsRootNamespace(true);
            }
            if (mContentParent == null) {
                mContentParent = generateLayout(mDecor);

                mTitleView = (TextView)findViewById(com.android.internal.R.id.title);
                if (mTitleView != null) {
                    if ((getLocalFeatures() & (1 << FEATURE_NO_TITLE)) != 0) {
                        View titleContainer = findViewById(com.android.internal.R.id.title_container);
                        if (titleContainer != null) {
                            titleContainer.setVisibility(View.GONE);
                        } else {
                            mTitleView.setVisibility(View.GONE);
                        }
                        if (mContentParent instanceof FrameLayout) {
                            ((FrameLayout)mContentParent).setForeground(null);
                        }
                    } else {
                        mTitleView.setText(mTitle);
                    }
                }
            }
        }
}
mContentParent用来描述一个类型为DecorView的视图对象,如果它为空,则调用installDecor()方法创建窗口视图。如果不空则清除原来的UI。 然后根据mLayoutInflater根据layoutResID去构建UI,并通过Window.Callback通知窗口视图内容已经发生变化。通过前面的分析,我们知道 Activity实现了该Callback,因此最终调用的是Activity里的nContentChanged()方法。
我们再来看看installDecor()方法:
- 如果mDecor为空则通过generateDecor()调用DecorView的构造方法构建一个DecorView对象。
- 如果mContentParent为空,则通过generateLayout(mDecor)构建一个mContentParent对象。
generateLayout(mDecor)这个方法比较长
彩蛋:你在installDecor()这个方法里还可以我们经常用来隐藏标题栏的状态标志位FEATURE_NO_TITLE。
我们从里也了解到了源码里xml文件的id,就不往这里贴了,它主要用来设置窗口的标志位,mContentParent通过
public static final int ID_ANDROID_CONTENT = com.android.internal.R.id.content;

ViewGroup contentParent = (ViewGroup)findViewById(ID_ANDROID_CONTENT);
通过上面的描述,我们还了解到了一些源码内部的View Id:
- com.android.internal.R.id.title:标题
- com.android.internal.R.id.title_container:标题容器
- com.android.internal.R.id.content:内容
关键点3:ActivityThread.handleResumeActivity(IBinder token, boolean clearHide, boolean isForward)
public final class ActivityThread{

        final void handleResumeActivity(IBinder token, boolean clearHide, boolean isForward) {
                // If we are getting ready to gc after going to the background, well
                // we are back active so skip it.
                unscheduleGcIdler();

                //1. 调用performResumeActivity()来通知Activity组件它将要被激活,最终会调用Activity.onResume()方法。该方法还返回一个ActivityClientRecord
                ActivityClientRecord r = performResumeActivity(token, clearHide);

                if (r != null) {
                    final Activity a = r.activity;

                    if (localLOGV) Slog.v(
                        TAG, "Resume " + r + " started activity: " +
                        a.mStartedActivity + ", hideForNow: " + r.hideForNow
                        + ", finished: " + a.mFinished);

                    final int forwardBit = isForward ?
                            WindowManager.LayoutParams.SOFT_INPUT_IS_FORWARD_NAVIGATION : 0;

                    // If the window hasn't yet been added to the window manager,
                    // and this guy didn't finish itself or start another activity,
                    // then go ahead and add the window.
                    boolean willBeVisible = !a.mStartedActivity;
                    if (!willBeVisible) {
                        try {
                            willBeVisible = ActivityManagerNative.getDefault().willActivityBeVisible(
                                    a.getActivityToken());
                        } catch (RemoteException e) {
                        }
                    }
                    if (r.window == null && !a.mFinished && willBeVisible) {
                        r.window = r.activity.getWindow();
                        View decor = r.window.getDecorView();
                        decor.setVisibility(View.INVISIBLE);
                        ViewManager wm = a.getWindowManager();
                        WindowManager.LayoutParams l = r.window.getAttributes();
                        a.mDecor = decor;
                        l.type = WindowManager.LayoutParams.TYPE_BASE_APPLICATION;
                        l.softInputMode |= forwardBit;
                        if (a.mVisibleFromClient) {
                            a.mWindowAdded = true;
                            wm.addView(decor, l);
                        }

                    // If the window has already been added, but during resume
                    // we started another activity, then don't yet make the
                    // window visible.
                    } else if (!willBeVisible) {
                        if (localLOGV) Slog.v(
                            TAG, "Launch " + r + " mStartedActivity set");
                        r.hideForNow = true;
                    }

                    // The window is now visible if it has been added, we are not
                    // simply finishing, and we are not starting another activity.

                    //2. 判断将要激活的Activity组件是否可见,即willBeVisible的值。Activity里有个成员变量mStartedActivity描述一个Activity组件是否正在启动一个新的
                    //Activity组件,并且等待这个Activity的执行结果,也就是startActivityForResult()的情况。这种情况下mStartedActivity为true,那么在这个新的Activity
                    //组件返回之前,这个Activity始终处于不可见状态,但是,如果这个新的Activity组件不是全屏的,那么即便mStartedActivity == true,willBeVisible也要设置
                    //为true,即该Activity组件可见。
                    if (!r.activity.mFinished && willBeVisible
                            && r.activity.mDecor != null && !r.hideForNow) {
                        if (r.newConfig != null) {
                            if (DEBUG_CONFIGURATION) Slog.v(TAG, "Resuming activity "
                                    + r.activityInfo.name + " with newConfig " + r.newConfig);
                            performConfigurationChanged(r.activity, r.newConfig);
                            r.newConfig = null;
                        }
                        if (localLOGV) Slog.v(TAG, "Resuming " + r + " with isForward="
                                + isForward);
                        WindowManager.LayoutParams l = r.window.getAttributes();
                        if ((l.softInputMode
                                & WindowManager.LayoutParams.SOFT_INPUT_IS_FORWARD_NAVIGATION)
                                != forwardBit) {
                            l.softInputMode = (l.softInputMode
                                    & (~WindowManager.LayoutParams.SOFT_INPUT_IS_FORWARD_NAVIGATION))
                                    | forwardBit;
                            if (r.activity.mVisibleFromClient) {
                                ViewManager wm = a.getWindowManager();
                                View decor = r.window.getDecorView();
                                wm.updateViewLayout(decor, l);
                            }
                        }
                        r.activity.mVisibleFromServer = true;
                        mNumVisibleActivities++;
                        if (r.activity.mVisibleFromClient) {
                            r.activity.makeVisible();
                        }
                    }

                    r.nextIdle = mNewActivities;
                    mNewActivities = r;
                    if (localLOGV) Slog.v(
                        TAG, "Scheduling idle handler for " + r);
                    Looper.myQueue().addIdleHandler(new Idler());

                } else {
                    // If an exception was thrown when trying to resume, then
                    // just end this activity.
                    try {
                        ActivityManagerNative.getDefault()
                            .finishActivity(token, Activity.RESULT_CANCELED, null);
                    } catch (RemoteException ex) {
                    }
                }
            }
}
这个方法主要用来处理Activity.onCreate()之后Activity.onResume()的流程,它的主要流程如下:
- 调用performResumeActivity()来通知Activity组件它将要被激活,最终会调用Activity.onResume()方法。该方法还返回一个ActivityClientRecord 对象,该对象描述正在激活的Activity组件。
- 判断将要激活的Activity组件是否可见,即willBeVisible的值。Activity里有个成员变量mStartedActivity描述一个Activity组件是否正在启动一个新的 Activity组件,并且等待这个Activity的执行结果,也就是startActivityForResult()的情况。这种情况下mStartedActivity为true,那么在这个新的Activity 组件返回之前,这个Activity始终处于不可见状态,但是,如果这个新的Activity组件不是全屏的,那么即便mStartedActivity == true,willBeVisible也要设置 为true,即该Activity组件可见。
- 调用WIndowManager.addView()方法为当前正在激活的Activity组件关联一个ViewRoot对象,调用链比较长,可以参考序列图。
关于LocalWindowManager、WindowManager与WindowManagerImpl的关系我们前面已经分析过,我们直接来看WindowManagerImpl.addView()方法。
关键点4:WindowManagerImpl.addView(View view, ViewGroup.LayoutParams params, boolean nest)
public class WindowManagerImpl implements WindowManager {

    private View[] mViews;
    private ViewRoot[] mRoots;
    private WindowManager.LayoutParams[] mParams;

    private void addView(View view, ViewGroup.LayoutParams params, boolean nest)
        {
            if (Config.LOGV) Log.v("WindowManager", "addView view=" + view);

            if (!(params instanceof WindowManager.LayoutParams)) {
                throw new IllegalArgumentException(
                        "Params must be WindowManager.LayoutParams");
            }

            final WindowManager.LayoutParams wparams
                    = (WindowManager.LayoutParams)params;

            ViewRoot root;
            View panelParentView = null;

            synchronized (this) {
                // Here's an odd/questionable case: if someone tries to add a
                // view multiple times, then we simply bump up a nesting count
                // and they need to remove the view the corresponding number of
                // times to have it actually removed from the window manager.
                // This is useful specifically for the notification manager,
                // which can continually add/remove the same view as a
                // notification gets updated.
                int index = findViewLocked(view, false);
                if (index >= 0) {
                    if (!nest) {
                        throw new IllegalStateException("View " + view
                                + " has already been added to the window manager.");
                    }
                    root = mRoots[index];
                    root.mAddNesting++;
                    // Update layout parameters.
                    view.setLayoutParams(wparams);
                    root.setLayoutParams(wparams, true);
                    return;
                }

                // If this is a panel window, then find the window it is being
                // attached to for future reference.
                if (wparams.type >= WindowManager.LayoutParams.FIRST_SUB_WINDOW &&
                        wparams.type <= WindowManager.LayoutParams.LAST_SUB_WINDOW) {
                    final int count = mViews != null ? mViews.length : 0;
                    for (int i=0; i<count; i++) {
                        if (mRoots[i].mWindow.asBinder() == wparams.token) {
                            panelParentView = mViews[i];
                        }
                    }
                }

                root = new ViewRoot(view.getContext());
                root.mAddNesting = 1;

                view.setLayoutParams(wparams);

                if (mViews == null) {
                    index = 1;
                    mViews = new View[1];
                    mRoots = new ViewRoot[1];
                    mParams = new WindowManager.LayoutParams[1];
                } else {
                    index = mViews.length + 1;
                    Object[] old = mViews;
                    mViews = new View[index];
                    System.arraycopy(old, 0, mViews, 0, index-1);
                    old = mRoots;
                    mRoots = new ViewRoot[index];
                    System.arraycopy(old, 0, mRoots, 0, index-1);
                    old = mParams;
                    mParams = new WindowManager.LayoutParams[index];
                    System.arraycopy(old, 0, mParams, 0, index-1);
                }
                index--;

                mViews[index] = view;
                mRoots[index] = root;
                mParams[index] = wparams;
            }
            // do this last because it fires off messages to start doing things
            root.setView(view, wparams, panelParentView);
        }
}
你可以看到在WIndowManagerImpl这个类了有三个数组,这三个数组的大小始终都是相等的。
- private View[] mViews:View对象
- private ViewRoot[] mRoots:与View关联的ViewRoot对象
- private WindowManager.LayoutParams[] mParams:与View关联的WindowManager.LayoutParams对象,它用来描述窗口视图的布局属性。
如果mViews包含目标View,则说明View已经关联过ViewRoot与WindowManager.LayoutParams,则直接查找对应位置的索引。 如果mViews不包含目标View,则创建新的ViewRoot,并添加到这三个数组中。
关键点5:ViewRoot.setView(View view, WindowManager.LayoutParams attrs, View panelParentView)
public final class ViewRoot extends Handler implements ViewParent,
        View.AttachInfo.Callbacks {

    public void setView(View view, WindowManager.LayoutParams attrs,
                View panelParentView) {
            synchronized (this) {
                if (mView == null) {
                    mView = view;
                    mWindowAttributes.copyFrom(attrs);
                    attrs = mWindowAttributes;
                    if (view instanceof RootViewSurfaceTaker) {
                        mSurfaceHolderCallback =
                                ((RootViewSurfaceTaker)view).willYouTakeTheSurface();
                        if (mSurfaceHolderCallback != null) {
                            mSurfaceHolder = new TakenSurfaceHolder();
                            mSurfaceHolder.setFormat(PixelFormat.UNKNOWN);
                        }
                    }
                    Resources resources = mView.getContext().getResources();
                    CompatibilityInfo compatibilityInfo = resources.getCompatibilityInfo();
                    mTranslator = compatibilityInfo.getTranslator();

                    if (mTranslator != null || !compatibilityInfo.supportsScreen()) {
                        mSurface.setCompatibleDisplayMetrics(resources.getDisplayMetrics(),
                                mTranslator);
                    }

                    boolean restore = false;
                    if (mTranslator != null) {
                        restore = true;
                        attrs.backup();
                        mTranslator.translateWindowLayout(attrs);
                    }
                    if (DEBUG_LAYOUT) Log.d(TAG, "WindowLayout in setView:" + attrs);

                    if (!compatibilityInfo.supportsScreen()) {
                        attrs.flags |= WindowManager.LayoutParams.FLAG_COMPATIBLE_WINDOW;
                    }

                    mSoftInputMode = attrs.softInputMode;
                    mWindowAttributesChanged = true;
                    mAttachInfo.mRootView = view;
                    mAttachInfo.mScalingRequired = mTranslator != null;
                    mAttachInfo.mApplicationScale =
                            mTranslator == null ? 1.0f : mTranslator.applicationScale;
                    if (panelParentView != null) {
                        mAttachInfo.mPanelParentWindowToken
                                = panelParentView.getApplicationWindowToken();
                    }
                    mAdded = true;
                    int res; /* = WindowManagerImpl.ADD_OKAY; */

                    // Schedule the first layout -before- adding to the window
                    // manager, to make sure we do the relayout before receiving
                    // any other events from the system.
                    requestLayout();
                    mInputChannel = new InputChannel();
                    try {
                        res = sWindowSession.add(mWindow, mWindowAttributes,
                                getHostVisibility(), mAttachInfo.mContentInsets,
                                mInputChannel);
                    } catch (RemoteException e) {
                        mAdded = false;
                        mView = null;
                        mAttachInfo.mRootView = null;
                        mInputChannel = null;
                        unscheduleTraversals();
                        throw new RuntimeException("Adding window failed", e);
                    } finally {
                        if (restore) {
                            attrs.restore();
                        }
                    }

                    if (mTranslator != null) {
                        mTranslator.translateRectInScreenToAppWindow(mAttachInfo.mContentInsets);
                    }
                    mPendingContentInsets.set(mAttachInfo.mContentInsets);
                    mPendingVisibleInsets.set(0, 0, 0, 0);
                    if (Config.LOGV) Log.v(TAG, "Added window " + mWindow);
                    if (res < WindowManagerImpl.ADD_OKAY) {
                        mView = null;
                        mAttachInfo.mRootView = null;
                        mAdded = false;
                        unscheduleTraversals();
                        switch (res) {
                            case WindowManagerImpl.ADD_BAD_APP_TOKEN:
                            case WindowManagerImpl.ADD_BAD_SUBWINDOW_TOKEN:
                                throw new WindowManagerImpl.BadTokenException(
                                    "Unable to add window -- token " + attrs.token
                                    + " is not valid; is your activity running?");
                            case WindowManagerImpl.ADD_NOT_APP_TOKEN:
                                throw new WindowManagerImpl.BadTokenException(
                                    "Unable to add window -- token " + attrs.token
                                    + " is not for an application");
                            case WindowManagerImpl.ADD_APP_EXITING:
                                throw new WindowManagerImpl.BadTokenException(
                                    "Unable to add window -- app for token " + attrs.token
                                    + " is exiting");
                            case WindowManagerImpl.ADD_DUPLICATE_ADD:
                                throw new WindowManagerImpl.BadTokenException(
                                    "Unable to add window -- window " + mWindow
                                    + " has already been added");
                            case WindowManagerImpl.ADD_STARTING_NOT_NEEDED:
                                // Silently ignore -- we would have just removed it
                                // right away, anyway.
                                return;
                            case WindowManagerImpl.ADD_MULTIPLE_SINGLETON:
                                throw new WindowManagerImpl.BadTokenException(
                                    "Unable to add window " + mWindow +
                                    " -- another window of this type already exists");
                            case WindowManagerImpl.ADD_PERMISSION_DENIED:
                                throw new WindowManagerImpl.BadTokenException(
                                    "Unable to add window " + mWindow +
                                    " -- permission denied for this window type");
                        }
                        throw new RuntimeException(
                            "Unable to add window -- unknown error code " + res);
                    }

                    if (view instanceof RootViewSurfaceTaker) {
                        mInputQueueCallback =
                            ((RootViewSurfaceTaker)view).willYouTakeTheInputQueue();
                    }
                    if (mInputQueueCallback != null) {
                        mInputQueue = new InputQueue(mInputChannel);
                        mInputQueueCallback.onInputQueueCreated(mInputQueue);
                    } else {
                        InputQueue.registerInputChannel(mInputChannel, mInputHandler,
                                Looper.myQueue());
                    }

                    view.assignParent(this);
                    mAddedTouchMode = (res&WindowManagerImpl.ADD_FLAG_IN_TOUCH_MODE) != 0;
                    mAppVisible = (res&WindowManagerImpl.ADD_FLAG_APP_VISIBLE) != 0;
                }
            }
        }
}
这个函数主要做了三件事情:
- 保存上一步传递进来的View view, WindowManager.LayoutParams attrs等参数。
- 调用ViewRoot.requestLayout()方法进行应用窗口UI的第一次布局。
- 调用ViewRoot.sWindowSession.add(方法来请求WindowManagerService增加一个WindowState对象,以便可以描述当前ViewRoot正在处理的应用的窗口。
走到这里,我们的应用视图View就创建完成了。
四 创建WindowState对象
前面我们就说过,WindowState对象是由WindowManagerService创建的,用来描述窗口相关信息,创建WindowState对象的过程也是与WindowManagerService连接的过程。
- 当我们启动应用的第一个Activity组件时,它会打开一个到WindowManagerService的连接,这个连接用应用进程从WindowManagerService服务处获取的一个实现了IWindowSession接口 的Session代理对象来表示,
- 在应用这一侧,每个Activity对象都关联了一个实现了IWindow接口的对象W,这个W对象在Activity视图创建完毕后,就会通过Session对象传递给WndowManagerService,
- WindowManagerService接收到这个对象后,就会在内部创建一个WindowState对象来描述与该W对象关联的Activity窗口的状态,并且以后通过这个W对象控制对应的Activity的窗口状态。
它们的关系如下所示:
主要角色
- Session:实现了IWindowSession接口,它保存在ViewRoot的静态变量sWindowSession中,用来与WindowManagerService通信。调用Session.add()方法将一个关联的W对象传递 给WindowManagerService,调用Session.remove()方法移除WindowManagerService之前为Activity窗口创建的WindowState对象。调用Session.relayout()方法来请求WindowManagerService 来对Activity组件的UI进行布局。
- W:继承于IWindow.Stub,是ViewRoot的一个静态内部类,它同样也是ViewRoot的一个包装类,内部的功能通过调用ViewRoot的方法来完成,WindowManagerService可以通过它在内部创建的 WindowState对象的成员变量IWindow mClient来要求运行在应用进程这一侧的Activity组件配合管理窗口的状态。
- WindowState:WindowManagerService的一个内部类,由WindowManagerService创建,用来描述应用窗口的状态。
它们的类图如下所示:

理解了一些基本的概念,我们来分析WindowState对象的创建流程。
WindowState对象的创建可以细分为三步:
- 创建AppWindowToken对象
- 创建Session对象
- 创建WindowState对象
整个流程序列图如下所示:
Activity组件在创建过程中,会调用ActivityStack.startActivityLocked()方法,该函数会请求WindowManagerService为正在启动的Activity组件创建一个AppWindowToken对象。
注:AppWindowToken继承与WindowToken,只不过WindowToken可以用来描述多种窗口类型,AppWindowToken只用来描述Activity的窗口。
关键点分析
关键点1:AppWindowToken
WindowToken(IBinder _token, int type, boolean _explicit) {
    token = _token;//指向的是ActivityRecord对象的IBinder接口,用来标志一个Activity组件的窗口
    windowType = type;//窗口类型,Activity窗口的类型为WIndowManager.LayoutParams.TYPE_APPLICATION
    explicit = _explicit;//表示窗口是否由应用进程请求添加的
}
AppWindowToken(IApplicationToken _token) {
super(_token.asBinder(),
WindowManager.LayoutParams.TYPE_APPLICATION, true);
appWindowToken = this;//appWindowToken是类WindowToken的成员变量,指向它自己
appToken = _token;//当它不为空的时候,它描述的就是Activity组件窗口
}关键点2:Session(IInputMethodClient client, IInputContext inputContext) )
从上面的序列图我们可以看出,ViewRoot在创建的时候会调用WindowManagerService.openSession()来创建Session。
private final class Session extends IWindowSession.Stub
        implements IBinder.DeathRecipient {

      public Session(IInputMethodClient client, IInputContext inputContext) {
                mClient = client;
                mInputContext = inputContext;
                mUid = Binder.getCallingUid();
                mPid = Binder.getCallingPid();
                StringBuilder sb = new StringBuilder();
                sb.append("Session{");
                sb.append(Integer.toHexString(System.identityHashCode(this)));
                sb.append(" uid ");
                sb.append(mUid);
                sb.append("}");
                mStringName = sb.toString();

                synchronized (mWindowMap) {
                    //1 检查检查是否需要获得系统中输入法管理服务
                    if (mInputMethodManager == null && mHaveInputMethods) {
                        IBinder b = ServiceManager.getService(
                                Context.INPUT_METHOD_SERVICE);
                        mInputMethodManager = IInputMethodManager.Stub.asInterface(b);
                    }
                }
                long ident = Binder.clearCallingIdentity();
                try {
                    // Note: it is safe to call in to the input method manager
                    // here because we are not holding our lock.
                    if (mInputMethodManager != null) {
                        //2 为正在请求与 WindowManagerService建立连接的应用进程增加它所使用的输入法客户端对象与输入法上下文对象
                        mInputMethodManager.addClient(client, inputContext,
                                mUid, mPid);
                    } else {
                        client.setUsingInputMethod(false);
                    }
                    client.asBinder().linkToDeath(this, 0);
                } catch (RemoteException e) {
                    // The caller has died, so we can just forget about this.
                    try {
                        if (mInputMethodManager != null) {
                            mInputMethodManager.removeClient(client);
                        }
                    } catch (RemoteException ee) {
                    }
                } finally {
                    Binder.restoreCallingIdentity(ident);
                }
            }
}
我们先来看下该构造函数的两个参数:
- IInputMethodClient client:从应用进程传递过来的输入法客户端对象。
- IInputContext inputContext:从应用进程传递过来的输入法上下文对象。
它主要做了两件事情:
- 检查检查是否需要获得系统中输入法管理服务。
- 为正在请求与 WindowManagerService建立连接的应用进程增加它所使用的输入法客户端对象与输入法上下文对象
关键点3:WindowManagerService.addWindow()
前面我们已经了解了Session对象的创建过程中,该对象保存在ViewRoot中,用来与WindowManagerService通信,接下来它会调用自己的add()方法来请求 WindowManagerService创建爱女WindowState对象。从上面的序列图我们可以知道,该方法最终会调用WindowManagerService.addWindow()方法。
public class WindowManagerService extends IWindowManager.Stub
        implements Watchdog.Monitor {

  public int addWindow(Session session, IWindow client,
              WindowManager.LayoutParams attrs, int viewVisibility,
              Rect outContentInsets, InputChannel outInputChannel) {
          int res = mPolicy.checkAddPermission(attrs);
          if (res != WindowManagerImpl.ADD_OKAY) {
              return res;
          }

          boolean reportNewConfig = false;
          WindowState attachedWindow = null;
          WindowState win = null;

          synchronized(mWindowMap) {
              // Instantiating a Display requires talking with the simulator,
              // so don't do it until we know the system is mostly up and
              // running.
              if (mDisplay == null) {
                  WindowManager wm = (WindowManager)mContext.getSystemService(Context.WINDOW_SERVICE);
                  mDisplay = wm.getDefaultDisplay();
                  mInitialDisplayWidth = mDisplay.getWidth();
                  mInitialDisplayHeight = mDisplay.getHeight();
                  mInputManager.setDisplaySize(0, mInitialDisplayWidth, mInitialDisplayHeight);
                  reportNewConfig = true;
              }

              //如果已经包含该窗口,则返回ADD_DUPLICATE_ADD
              if (mWindowMap.containsKey(client.asBinder())) {
                  Slog.w(TAG, "Window " + client + " is already added");
                  return WindowManagerImpl.ADD_DUPLICATE_ADD;
              }

              //如果type大于FIRST_SUB_WINDOW且小于LAST_SUB_WINDOW,说明在添加一个子窗口,则需要寻找它的父窗口
              if (attrs.type >= FIRST_SUB_WINDOW && attrs.type <= LAST_SUB_WINDOW) {
                  attachedWindow = windowForClientLocked(null, attrs.token, false);
                  if (attachedWindow == null) {
                      Slog.w(TAG, "Attempted to add window with token that is not a window: "
                            + attrs.token + ".  Aborting.");
                      return WindowManagerImpl.ADD_BAD_SUBWINDOW_TOKEN;
                  }
                  if (attachedWindow.mAttrs.type >= FIRST_SUB_WINDOW
                          && attachedWindow.mAttrs.type <= LAST_SUB_WINDOW) {
                      Slog.w(TAG, "Attempted to add window with token that is a sub-window: "
                              + attrs.token + ".  Aborting.");
                      return WindowManagerImpl.ADD_BAD_SUBWINDOW_TOKEN;
                  }
              }

              boolean addToken = false;
              WindowToken token = mTokenMap.get(attrs.token);
              //如果token为null,则说明窗口还未创建该窗口,则检测窗口的类型
              if (token == null) {
                  //应用窗口
                  if (attrs.type >= FIRST_APPLICATION_WINDOW
                          && attrs.type <= LAST_APPLICATION_WINDOW) {
                      Slog.w(TAG, "Attempted to add application window with unknown token "
                            + attrs.token + ".  Aborting.");
                      return WindowManagerImpl.ADD_BAD_APP_TOKEN;
                  }
                  //输入法窗口
                  if (attrs.type == TYPE_INPUT_METHOD) {
                      Slog.w(TAG, "Attempted to add input method window with unknown token "
                            + attrs.token + ".  Aborting.");
                      return WindowManagerImpl.ADD_BAD_APP_TOKEN;
                  }
                  //壁纸窗口
                  if (attrs.type == TYPE_WALLPAPER) {
                      Slog.w(TAG, "Attempted to add wallpaper window with unknown token "
                            + attrs.token + ".  Aborting.");
                      return WindowManagerImpl.ADD_BAD_APP_TOKEN;
                  }
                  token = new WindowToken(attrs.token, -1, false);
                  addToken = true;
              } else if (attrs.type >= FIRST_APPLICATION_WINDOW
                      && attrs.type <= LAST_APPLICATION_WINDOW) {
                  AppWindowToken atoken = token.appWindowToken;
                  if (atoken == null) {
                      Slog.w(TAG, "Attempted to add window with non-application token "
                            + token + ".  Aborting.");
                      return WindowManagerImpl.ADD_NOT_APP_TOKEN;
                  } else if (atoken.removed) {
                      Slog.w(TAG, "Attempted to add window with exiting application token "
                            + token + ".  Aborting.");
                      return WindowManagerImpl.ADD_APP_EXITING;
                  }
                  if (attrs.type == TYPE_APPLICATION_STARTING && atoken.firstWindowDrawn) {
                      // No need for this guy!
                      if (localLOGV) Slog.v(
                              TAG, "**** NO NEED TO START: " + attrs.getTitle());
                      return WindowManagerImpl.ADD_STARTING_NOT_NEEDED;
                  }
              } else if (attrs.type == TYPE_INPUT_METHOD) {
                  if (token.windowType != TYPE_INPUT_METHOD) {
                      Slog.w(TAG, "Attempted to add input method window with bad token "
                              + attrs.token + ".  Aborting.");
                        return WindowManagerImpl.ADD_BAD_APP_TOKEN;
                  }
              } else if (attrs.type == TYPE_WALLPAPER) {
                  if (token.windowType != TYPE_WALLPAPER) {
                      Slog.w(TAG, "Attempted to add wallpaper window with bad token "
                              + attrs.token + ".  Aborting.");
                        return WindowManagerImpl.ADD_BAD_APP_TOKEN;
                  }
              }

              //创建WindowState对象
              win = new WindowState(session, client, token,
                      attachedWindow, attrs, viewVisibility);
              if (win.mDeathRecipient == null) {
                  // Client has apparently died, so there is no reason to
                  // continue.
                  Slog.w(TAG, "Adding window client " + client.asBinder()
                          + " that is dead, aborting.");
                  return WindowManagerImpl.ADD_APP_EXITING;
              }

              //调整当前正在增加的窗口的布局参数
              mPolicy.adjustWindowParamsLw(win.mAttrs);

              //检查当前应用进程请求增加的窗口是否合法
              res = mPolicy.prepareAddWindowLw(win, attrs);
              if (res != WindowManagerImpl.ADD_OKAY) {
                  return res;
              }

              //创建IO输入事件,以便正在增加的窗口可以接收到系统所发生的键盘与触摸事件
              if (outInputChannel != null) {
                  String name = win.makeInputChannelName();
                  InputChannel[] inputChannels = InputChannel.openInputChannelPair(name);
                  win.mInputChannel = inputChannels[0];
                  inputChannels[1].transferToBinderOutParameter(outInputChannel);

                  mInputManager.registerInputChannel(win.mInputChannel);
              }

              // From now on, no exceptions or errors allowed!

              res = WindowManagerImpl.ADD_OKAY;

              final long origId = Binder.clearCallingIdentity();

              //新创建的token添加到mTokenMap与mTokenList中
              if (addToken) {
                  mTokenMap.put(attrs.token, token);
                  mTokenList.add(token);
              }

              //为当前正在增加的窗口创建一个用来连接到SurfaceFlinger服务的SurfaceSession对象,用来与SurfaceFlinger通信
              win.attach();
              mWindowMap.put(client.asBinder(), win);

              if (attrs.type == TYPE_APPLICATION_STARTING &&
                      token.appWindowToken != null) {
                  token.appWindowToken.startingWindow = win;
              }

              boolean imMayMove = true;

              //将创建的WindowState添加合适的位置
              if (attrs.type == TYPE_INPUT_METHOD) {
                  mInputMethodWindow = win;
                  //如果是一个输入法窗口,则按照Z轴坐标从大到小的顺序检查当前是哪一个窗口是需要输入法窗口的
                  //找到了这个位于最上面的需要输入法的窗口之后,就可以将输入法窗口放在它上面
                  addInputMethodWindowToListLocked(win);
                  imMayMove = false;
              } else if (attrs.type == TYPE_INPUT_METHOD_DIALOG) {
                  mInputMethodDialogs.add(win);
                  //如果是一个对话框窗口,则将WindowState对象win添加到mWindows中,然后调整win在mWindows中的
                  //位置,是它位于输入法窗口之上
                  addWindowToListInOrderLocked(win, true);
                  adjustInputMethodDialogsLocked();
                  imMayMove = false;
              } else {
                  //如果是个应用窗口或者壁纸窗口,则将WindowState对象win添加到mWindows中,如果是壁纸窗口则进一步
                  //将其Z轴的位置,是其他窗口都在壁纸窗口下面
                  addWindowToListInOrderLocked(win, true);
                  if (attrs.type == TYPE_WALLPAPER) {
                      mLastWallpaperTimeoutTime = 0;
                      adjustWallpaperWindowsLocked();
                  } else if ((attrs.flags&FLAG_SHOW_WALLPAPER) != 0) {
                      adjustWallpaperWindowsLocked();
                  }
              }

              //即将进入窗口动画
              win.mEnterAnimationPending = true;

              //获取当前窗口的UI内容的边距大小,这通常用来排除屏幕边框和状态栏所占据的屏幕区域
              mPolicy.getContentInsetHintLw(attrs, outContentInsets);

              //是否处于触屏模式
              if (mInTouchMode) {
                  res |= WindowManagerImpl.ADD_FLAG_IN_TOUCH_MODE;
              }
              if (win == null || win.mAppToken == null || !win.mAppToken.clientHidden) {
                  res |= WindowManagerImpl.ADD_FLAG_APP_VISIBLE;
              }

              //是否可见
              boolean focusChanged = false;
              if (win.canReceiveKeys()) {
                  focusChanged = updateFocusedWindowLocked(UPDATE_FOCUS_WILL_ASSIGN_LAYERS);
                  if (focusChanged) {
                      imMayMove = false;
                  }
              }

              if (imMayMove) {
                  moveInputMethodWindowsIfNeededLocked(false);
              }

              assignLayersLocked();
              // Don't do layout here, the window must call
              // relayout to be displayed, so we'll do it there.

              //dump();

              if (focusChanged) {
                  finishUpdateFocusedWindowAfterAssignLayersLocked();
              }

              if (localLOGV) Slog.v(
                  TAG, "New client " + client.asBinder()
                  + ": window=" + win);

              if (win.isVisibleOrAdding() && updateOrientationFromAppTokensLocked()) {
                  reportNewConfig = true;
              }
          }

          // sendNewConfiguration() checks caller permissions so we must call it with
          // privilege.  updateOrientationFromAppTokens() clears and resets the caller
          // identity anyway, so it's safe to just clear & restore around this whole
          // block.
          final long origId = Binder.clearCallingIdentity();
          if (reportNewConfig) {
              sendNewConfiguration();
          }
          Binder.restoreCallingIdentity(origId);

          return res;
      }
}
关键点4:WindowState
private final class WindowState implements WindowManagerPolicy.WindowState {

    WindowState(Session s, IWindow c, WindowToken token,
                   WindowState attachedWindow, WindowManager.LayoutParams a,
                   int viewVisibility) {
                //指向一个类型为Session的Binder本地对象,表示当前创建的WindowState对象属于哪个应用进程
                mSession = s;
                //指向一个实现了IWindow接口的Binder代理对象,它引用了运行在应用进程这一侧的一个类型为W的Binder对象
                mClient = c;
                //指向一个WindowToken对象,通过它可以唯一标识一个窗口
                mToken = token;
                //指向一个WIndowManager.LayoutParams对象,表示窗口布局参数
                mAttrs.copyFrom(a);
                //窗口可见性
                mViewVisibility = viewVisibility;
                //兼容mClient所引用的对象,如果这个Binder对象死亡了之后,就说明这个应用进程关闭了,它用来接收死亡通知
                DeathRecipient deathRecipient = new DeathRecipient();
                mAlpha = a.alpha;
                if (localLOGV) Slog.v(
                    TAG, "Window " + this + " client=" + c.asBinder()
                    + " token=" + token + " (" + mAttrs.token + ")");
                try {
                    c.asBinder().linkToDeath(deathRecipient, 0);
                } catch (RemoteException e) {
                    mDeathRecipient = null;
                    mAttachedWindow = null;
                    mLayoutAttached = false;
                    mIsImWindow = false;
                    mIsWallpaper = false;
                    mIsFloatingLayer = false;
                    mBaseLayer = 0;
                    mSubLayer = 0;
                    return;
                }
                mDeathRecipient = deathRecipient;

                if ((mAttrs.type >= FIRST_SUB_WINDOW &&
                        mAttrs.type <= LAST_SUB_WINDOW)) {
                    // The multiplier here is to reserve space for multiple
                    // windows in the same type layer.
                    //int型,描述一个窗口的基础Z轴位置
                    mBaseLayer = mPolicy.windowTypeToLayerLw(
                            attachedWindow.mAttrs.type) * TYPE_LAYER_MULTIPLIER
                            + TYPE_LAYER_OFFSET;
                    //int型,描述一个子窗口相对其父窗口的Z轴偏移值
                    mSubLayer = mPolicy.subWindowTypeToLayerLw(a.type);
                    //WindowState对象,描述子窗口的父窗口
                    mAttachedWindow = attachedWindow;
                    mAttachedWindow.mChildWindows.add(this);
                    //boolean型,描述一个子窗口的视图是否嵌入在父窗口视图里面
                    mLayoutAttached = mAttrs.type !=
                            WindowManager.LayoutParams.TYPE_APPLICATION_ATTACHED_DIALOG;
                    //boolean型,表示当前创建的对象WindowState对象所描述的窗口是否是一个输入法窗口或者输入法对话框
                    mIsImWindow = attachedWindow.mAttrs.type == TYPE_INPUT_METHOD
                            || attachedWindow.mAttrs.type == TYPE_INPUT_METHOD_DIALOG;
                    //boolean型,表示当前创建的对象WindowState对象所描述的窗口是否是一个壁纸窗口
                    mIsWallpaper = attachedWindow.mAttrs.type == TYPE_WALLPAPER;
                    //boolean型,表示当前创建的对象WindowState对象所描述的窗口是否是一个浮动壁纸窗口
                    mIsFloatingLayer = mIsImWindow || mIsWallpaper;
                } else {
                    // The multiplier here is to reserve space for multiple
                    // windows in the same type layer.
                    mBaseLayer = mPolicy.windowTypeToLayerLw(a.type)
                            * TYPE_LAYER_MULTIPLIER
                            + TYPE_LAYER_OFFSET;
                    mSubLayer = 0;
                    mAttachedWindow = null;
                    mLayoutAttached = false;
                    mIsImWindow = mAttrs.type == TYPE_INPUT_METHOD
                            || mAttrs.type == TYPE_INPUT_METHOD_DIALOG;
                    mIsWallpaper = mAttrs.type == TYPE_WALLPAPER;
                    mIsFloatingLayer = mIsImWindow || mIsWallpaper;
                }

                WindowState appWin = this;
                while (appWin.mAttachedWindow != null) {
                    appWin = mAttachedWindow;
                }
                WindowToken appToken = appWin.mToken;
                while (appToken.appWindowToken == null) {
                    WindowToken parent = mTokenMap.get(appToken.token);
                    if (parent == null || appToken == parent) {
                        break;
                    }
                    appToken = parent;
                }
                mRootToken = appToken;
                mAppToken = appToken.appWindowToken;

                mSurface = null;
                mRequestedWidth = 0;
                mRequestedHeight = 0;
                mLastRequestedWidth = 0;
                mLastRequestedHeight = 0;
                mXOffset = 0;
                mYOffset = 0;
                mLayer = 0;
                mAnimLayer = 0;
                mLastLayer = 0;
            }
}
以上便是WindowState对象的创建过程。
五 创建Surface对象
前面我们分析了应用窗口连接到WndowManagerService服务的过程,在这个过程中WindowManagerService会为应用窗口创建一个到SurfaceFlinger的连接,通过这个连接,WindowManagerService就 可以为Activity创建绘图表面Surface,进而可以在Surface上渲染UI。
Java层实现的应用窗口的绘图表面通过两个Surface对象来描述,一个在应用进程这一侧创建的,一个在WindowManagerService侧创建的,它们对应了SurfaceFlinger这一侧同一个Layer对象,如下所示:
- 在应用进程这一侧,每一个Activity组件都要一个关联的Surface对象,这个Surface对象保存在一个关联的ViewRoot对象的成员变量mSurface中。它负责绘制应用窗口的UI,即 往应用窗口的图形缓冲区填充UI数据,
- 在WindowManagerService这一侧,每个Activity组件都有一个对应的WindowState对象,每个WindowState对象的成员变量同样指向一个Surface对象。它负责设置应用窗口的属性。
可以看到同样是Surface,完成的工作却不一样,之所以会有这样的差别,是因为绘制应用窗口是独立的,由应用进程来完成,而设置应用窗口属性却需要全局考虑,即由WindowManagerService来统筹安排。
从上面的创建View对象的分析我们可以知道,当一个应用窗口被激活且它的视图对象View创建之后就会调用View.requestLayout()方法对UI进行布局以及显示,整个流程如下所示:
主要角色
关键点1:ViewRoot.performTraversals()
从上面的序列图我们可以看出ViewRoot发送的DO_TRAVERSAL消息由performTraversals()函数来进行处理。
public final class ViewRoot extends Handler implements ViewParent,
        View.AttachInfo.Callbacks {
    ...

    View mView;
    ...

    boolean mLayoutRequested;
    boolean mFirst;
    ...
    boolean mFullRedrawNeeded;
    ...

    private final Surface mSurface = new Surface();
    ...

    private void performTraversals() {
        ...

        final View host = mView;
        ...

        mTraversalScheduled = false;
        ...
        boolean fullRedrawNeeded = mFullRedrawNeeded;
        boolean newSurface = false;
        ...

        if (mLayoutRequested) {
            ...

            host.measure(childWidthMeasureSpec, childHeightMeasureSpec);

            ...
        }

        ...

        int relayoutResult = 0;
        if (mFirst || windowShouldResize || insetsChanged
                || viewVisibilityChanged || params != null) {
            ...

            boolean hadSurface = mSurface.isValid();
            try {
                ...

                relayoutResult = relayoutWindow(params, viewVisibility, insetsPending);
                ...

                if (!hadSurface) {
                    if (mSurface.isValid()) {
                        ...
                        newSurface = true;
                        fullRedrawNeeded = true;
                        ...
                    }
                }
                ...
            } catch (RemoteException e) {
            }
            ....
        }

        final boolean didLayout = mLayoutRequested;
        ...

        if (didLayout) {
            mLayoutRequested = false;
            ...

            host.layout(0, 0, host.mMeasuredWidth, host.mMeasuredHeight);

            ...
        }

        ...

        mFirst = false;
        ...

        boolean cancelDraw = attachInfo.mTreeObserver.dispatchOnPreDraw();

        if (!cancelDraw && !newSurface) {
            mFullRedrawNeeded = false;
            draw(fullRedrawNeeded);

            ...
        } else {
            ....

            // Try again
            scheduleTraversals();
        }
    }
}
这其实是个相当复杂的函数,它完成了measure,layout,draw等过程,这个我们下篇文章再详细讨论,这个部分我们关注的还是 Surface的创建。
- 可以看到这里有个mSurface变量,它指向的是一个Surface对象,但是它还没有和C++层的Surface对象进行关联,因此它是一个无效的Surface对象 (UI绘制最终在C++层完成),因此我们要借助WindowManagerService来让它变得有效。
- 可以发现该方法会继续调用realyoutWindow()方法来请求系统重新布局系统中所有窗口,这个其实是由Sesssion对象请求WindowManagerService来完成的,WindowManagerService在处理应用窗口时会为当期应用窗口创建一个有效的Surface。
- WindowManagerService.realyoutWindow()会继续调用WindowState.createSurfaceLocked()来完成与C++层Surface对象的关联,使之成为有效的 Surface。
关键点2:WindowState.createSurfaceLocked
 private final class WindowState implements WindowManagerPolicy.WindowState {
    Surface createSurfaceLocked() {
            if (mSurface == null) {
                mReportDestroySurface = false;
                mSurfacePendingDestroy = false;
                mDrawPending = true;
                mCommitDrawPending = false;
                mReadyToShow = false;
                if (mAppToken != null) {
                    mAppToken.allDrawn = false;
                }

                int flags = 0;
                if (mAttrs.memoryType == MEMORY_TYPE_PUSH_BUFFERS) {
                    flags |= Surface.PUSH_BUFFERS;
                }

                if ((mAttrs.flags&WindowManager.LayoutParams.FLAG_SECURE) != 0) {
                    flags |= Surface.SECURE;
                }
                if (DEBUG_VISIBILITY) Slog.v(
                    TAG, "Creating surface in session "
                    + mSession.mSurfaceSession + " window " + this
                    + " w=" + mFrame.width()
                    + " h=" + mFrame.height() + " format="
                    + mAttrs.format + " flags=" + flags);

                int w = mFrame.width();
                int h = mFrame.height();
                if ((mAttrs.flags & LayoutParams.FLAG_SCALED) != 0) {
                    // for a scaled surface, we always want the requested
                    // size.
                    w = mRequestedWidth;
                    h = mRequestedHeight;
                }

                // Something is wrong and SurfaceFlinger will not like this,
                // try to revert to sane values
                if (w <= 0) w = 1;
                if (h <= 0) h = 1;

                mSurfaceShown = false;
                mSurfaceLayer = 0;
                mSurfaceAlpha = 1;
                mSurfaceX = 0;
                mSurfaceY = 0;
                mSurfaceW = w;
                mSurfaceH = h;
                try {
                        //构造Surface对象
                    mSurface = new Surface(
                            mSession.mSurfaceSession, mSession.mPid,
                            mAttrs.getTitle().toString(),
                            0, w, h, mAttrs.format, flags);
                    if (SHOW_TRANSACTIONS) Slog.i(TAG, "  CREATE SURFACE "
                            + mSurface + " IN SESSION "
                            + mSession.mSurfaceSession
                            + ": pid=" + mSession.mPid + " format="
                            + mAttrs.format + " flags=0x"
                            + Integer.toHexString(flags)
                            + " / " + this);
                } catch (Surface.OutOfResourcesException e) {
                    Slog.w(TAG, "OutOfResourcesException creating surface");
                    reclaimSomeSurfaceMemoryLocked(this, "create");
                    return null;
                } catch (Exception e) {
                    Slog.e(TAG, "Exception creating surface", e);
                    return null;
                }

                if (localLOGV) Slog.v(
                    TAG, "Got surface: " + mSurface
                    + ", set left=" + mFrame.left + " top=" + mFrame.top
                    + ", animLayer=" + mAnimLayer);
                if (SHOW_TRANSACTIONS) {
                    Slog.i(TAG, ">>> OPEN TRANSACTION");
                    if (SHOW_TRANSACTIONS) logSurface(this,
                            "CREATE pos=(" + mFrame.left + "," + mFrame.top + ") (" +
                            mFrame.width() + "x" + mFrame.height() + "), layer=" +
                            mAnimLayer + " HIDE", null);
                }
                Surface.openTransaction();
                try {
                    try {
                        mSurfaceX = mFrame.left + mXOffset;
                        mSurfaceY = mFrame.top + mYOffset;
                        mSurface.setPosition(mSurfaceX, mSurfaceY);
                        mSurfaceLayer = mAnimLayer;
                        mSurface.setLayer(mAnimLayer);
                        mSurfaceShown = false;
                        mSurface.hide();
                        if ((mAttrs.flags&WindowManager.LayoutParams.FLAG_DITHER) != 0) {
                            if (SHOW_TRANSACTIONS) logSurface(this, "DITHER", null);
                            mSurface.setFlags(Surface.SURFACE_DITHER,
                                    Surface.SURFACE_DITHER);
                        }
                    } catch (RuntimeException e) {
                        Slog.w(TAG, "Error creating surface in " + w, e);
                        reclaimSomeSurfaceMemoryLocked(this, "create-init");
                    }
                    mLastHidden = true;
                } finally {
                    if (SHOW_TRANSACTIONS) Slog.i(TAG, "<<< CLOSE TRANSACTION");
                    Surface.closeTransaction();
                }
                if (localLOGV) Slog.v(
                        TAG, "Created surface " + this);
            }
            return mSurface;
        }
 }
在创建Surface之前,我们需要以下数据:
- WindowState.mPid:应用窗口所在应用进程的PID
- WindowState.mSurfaceSession:与应用窗口所在应用进程所关联的SurfaceSession对象
- WindowState.mAttr.getTitle(): 应用窗口标题
- WindowState.mAttr.getFormat(): 应用窗口像素格式
- WindowState.mFrame; 应用窗口宽度/高度
- WindowState.mAttr.getMemoryType(): 应用窗口图形缓冲区属性标志
准备好以上数据后,就调用Surface构造方法来构造Surface对象,构造好Surface对象后,还会在事务中处理窗口的以下属性:
- X/Y轴位置:当一个WindowState对象所描述的应用程序窗口是一个壁纸窗口时,该WindowState对象的成员变量mXOffset和mYOffset用来描述壁纸窗口相对当前要显示的窗口在X轴和Y轴上的偏移量。 mFrame.left + mXOffset即得到X轴位置,mSurfaceY = mFrame.top + mYOffset即得到Y轴位置。
- Z轴位置:WindowState类的成员变量mAnimLayer用来描述一个应用程序窗口的Z轴位置,这里将其赋值给mSurfaceLayer,再调用setLayer()方法将其传递给SurfaceFlinger。
- 抖动标志:mAttrs.flags标志位WindowManager.LayoutParams.FLAG_DITHER不等于0时,图形缓冲区需要做抖动处理。
- 显示状态:刚刚创建的Surface,需要用SurfaceFLinger将它隐藏一起。
注:为了避免SurfaceFlinger没设置一个窗口的属性就重新渲染一次,属性的设置需要在事务中进行,这样可以避免界面闪烁。
关键点3:
public class Surface implements Parcelable {

    @SuppressWarnings("unused")
    private int mSurfaceControl;
    @SuppressWarnings("unused")
    private int mSaveCount;
    @SuppressWarnings("unused")
    private Canvas mCanvas;
    @SuppressWarnings("unused")
    private int mNativeSurface;
    private String mName;

     public Surface(SurfaceSession s,
            int pid, int display, int w, int h, int format, int flags)
        throws OutOfResourcesException {
        if (DEBUG_RELEASE) {
            mCreationStack = new Exception();
        }
        mCanvas = new CompatibleCanvas();
        init(s,pid,null,display,w,h,format,flags);
    }
}

private native void init(SurfaceSession s,
            int pid, String name, int display, int w, int h, int format, int flags)
可以看出Surface里有三个主要成员变量:
- private int mSurfaceControl: 保存的是在C++层的一个SurfaceControl对象的地址值。
- private Canvas mCanvas:用来描述一块类型为CompatibleCanvas的画布,画布是真正用来绘制UI的地方。
- private String mName:用来描述画布的名词。
讲到这里,Surface的创建流程分析完了,我们来总结一下。
- 每一个应用程序窗口都对应有两个Java层的Surface对象,其中一个是在WindowManagerService服务这一侧创建的,而另外一个是在应用程序进程这一侧创建的。
- 在WindowManagerService服务这一侧创建的Java层的Surface对象在C++层关联有一个SurfaceControl对象,用来设置应用窗口的属性,例如,大小和位置等。
- 在应用程序进程这一侧创建的ava层的Surface对象在C++层关联有一个Surface对象,用来绘制应用程序窗品的UI。
好,本篇文章至此结束,本篇文章完成了Context、Window、View、WindowState与Surface对象创建流程的分析,这样我们就可以在应用界面上绘制UI了,下篇文章 就来分析UI的绘制流程。