Android媒体开发:Bitmap实践指南
本篇文章用来介绍Android平台的图像压缩方案以及图像编解码的通识性理解,事实上Android平台对图像的处理最终都交由底层实现,篇幅有限,我们这里不会去过多的分析底层的细节实现细节,但是我们会提一下底层的实现方案概览,给向进一步扩展的同学提供一些思路。
在介绍Bitmap之前,我们先要了解一下和压缩相关的图像的基本知识,这也可以帮助我们理解Bitmap.java里定义的一些变量的含义。
像素密度
像素密度指的是每英寸像素数目,在Bitmap里用mDensity/mTargetDensity,mDensity默认是设备屏幕的像素密度,mTargetDensity是图片的目标像素密度,在加载图片时就是 drawable 目录的像素密度。
色彩模式
色彩模式是数字世界中表示颜色的一种算法,在Bitmap里用Config来表示。
- ARGB_8888:每个像素占四个字节,A、R、G、B 分量各占8位,是 Android 的默认设置;
- RGB_565:每个像素占两个字节,R分量占5位,G分量占6位,B分量占5位;
- ARGB_4444:每个像素占两个字节,A、R、G、B分量各占4位,成像效果比较差;
- Alpha_8: 只保存透明度,共8位,1字节;
一 Bitmap内存管理
Bitmap是我们应用里使用内存的大户,很多OOM都是由于不当的图像使用造成内存过多占用而造成的,Bitmap在Android虚拟机内存存储的结构图如下所示:
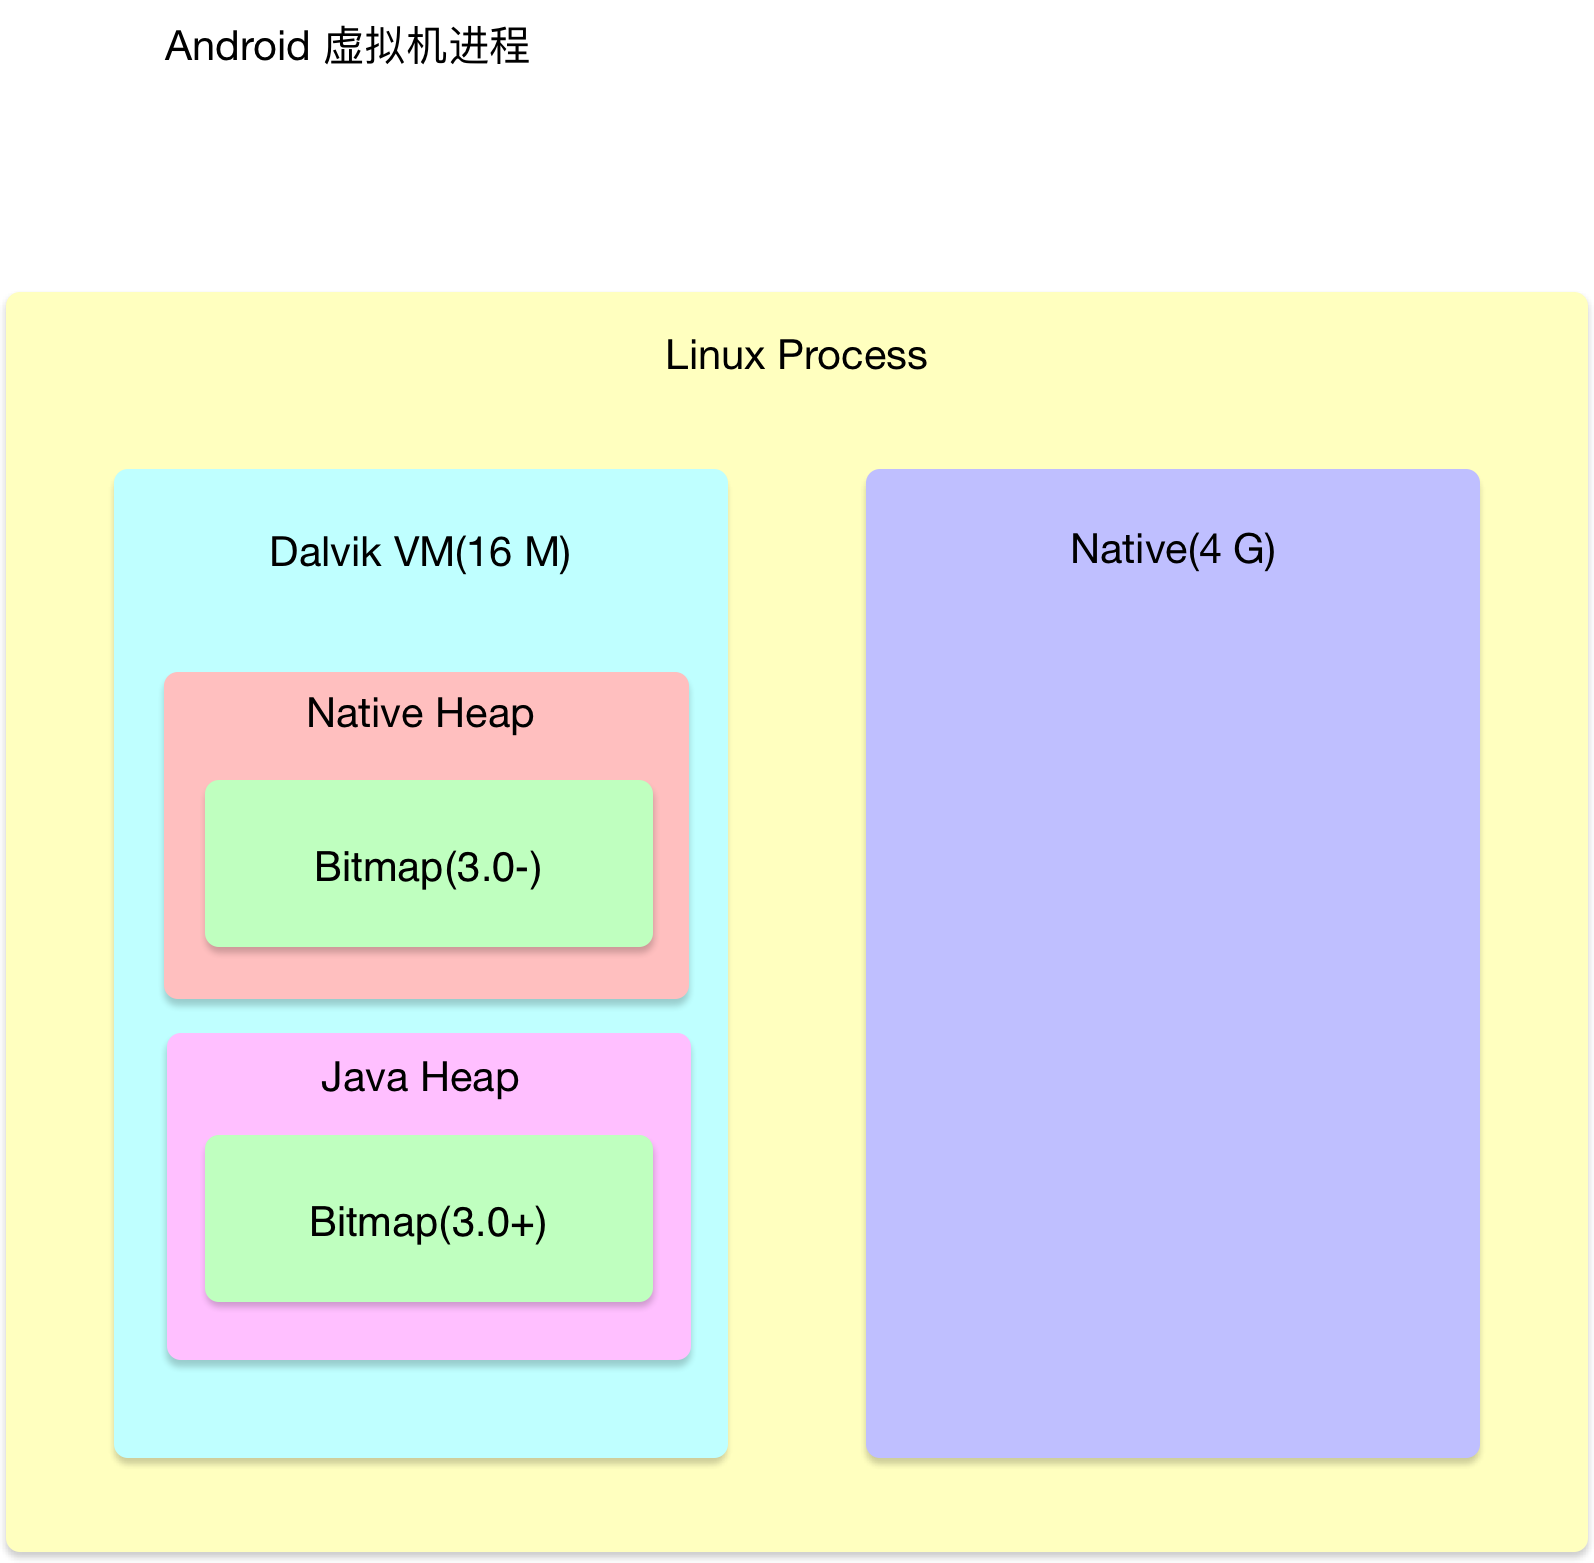
从上图可以看出:
- Andrroid 3.0 以前:Bitmap存储在Native Heap中,不收GC管理,需要手动调用Bitmap的recycle()方法。
- Andrroid 3.0 以前:Bitmap存储在Java Heap中,收GC管理,无需手动调用Bitmap的recycle()方法。
如何计算Bitmap占用内存的大小呢?🤔
Bitamp 占用内存大小 = 宽度像素 x (inTargetDensity / inDensity) x 高度像素 x (inTargetDensity / inDensity)x 一个像素所占的内存
👉 注:这里inDensity表示目标图片的dpi(放在哪个资源文件夹下),inTargetDensity表示目标屏幕的dpi,所以你可以发现inDensity和inTargetDensity会对Bitmap的宽高 进行拉伸,进而改变Bitmap占用内存的大小。
在Bitmap里有两个获取内存占用大小的方法。
- getByteCount():API12 加入,代表存储 Bitmap 的像素需要的最少内存。
- getAllocationByteCount():API19 加入,代表在内存中为 Bitmap 分配的内存大小,代替了 getByteCount() 方法。
在不复用 Bitmap 时,getByteCount() 和 getAllocationByteCount 返回的结果是一样的。在通过复用 Bitmap 来解码图片时,那么 getByteCount() 表示新解码图片占用内存的大 小,getAllocationByteCount() 表示被复用 Bitmap真实占用的内存大小(即 mBuffer 的长度)。
除了以上这些概念,我们再提一下Bitmap.java里的一些成员变量,这些变量大家在可能也经常遇到,要理解清楚。
- private byte[] mBuffer:图像数组,用来存储图像,这个Java层的数组实际上是在C++层创建的,下面会说明这个问题。
- private final boolean mIsMutable:图像是否是可变的,这么说有点抽象,它就像String与StringBuffer的关系一样,String是不可修改的,StringBuffer是可以修改的。
- private boolean mRecycled:图像是否已经被回收,图像的回收也是在C++层完成的。
从上面的分析可以看出,不管是在哪个Android版本是虚拟机进程所在内存大小16M这一点是没有改变的,我们要有节制的去使用内存。
可以从以下几个方面来考虑:
- 缓存图片。
- 复用图片。
- UC黑科技 - 偷用Native内存
- 图片压缩。
缓存图片
可以使用LruCache来缓存图片。
Set<SoftReference<Bitmap>> mReusableBitmaps;
private LruCache<String, BitmapDrawable> mMemoryCache;

// If you're running on Honeycomb or newer, create a
// synchronized HashSet of references to reusable bitmaps.
if (Utils.hasHoneycomb()) {
    mReusableBitmaps =
            Collections.synchronizedSet(new HashSet<SoftReference<Bitmap>>());
}

mMemoryCache = new LruCache<String, BitmapDrawable>(mCacheParams.memCacheSize) {

    // Notify the removed entry that is no longer being cached.
    @Override
    protected void entryRemoved(boolean evicted, String key,
            BitmapDrawable oldValue, BitmapDrawable newValue) {
        if (RecyclingBitmapDrawable.class.isInstance(oldValue)) {
            // The removed entry is a recycling drawable, so notify it
            // that it has been removed from the memory cache.
            ((RecyclingBitmapDrawable) oldValue).setIsCached(false);
        } else {
            // The removed entry is a standard BitmapDrawable.
            if (Utils.hasHoneycomb()) {
                // We're running on Honeycomb or later, so add the bitmap
                // to a SoftReference set for possible use with inBitmap later.
                mReusableBitmaps.add
                        (new SoftReference<Bitmap>(oldValue.getBitmap()));
            }
        }
    }
....
}
复用图片
使用BitmapFactory.Option的inBitmap标志位来复用图片。
public static Bitmap decodeSampledBitmapFromFile(String filename,
        int reqWidth, int reqHeight, ImageCache cache) {

    final BitmapFactory.Options options = new BitmapFactory.Options();
    ...
    BitmapFactory.decodeFile(filename, options);
    ...

    // If we're running on Honeycomb or newer, try to use inBitmap.
    if (Utils.hasHoneycomb()) {
        addInBitmapOptions(options, cache);
    }
    ...
    return BitmapFactory.decodeFile(filename, options);
}

rivate static void addInBitmapOptions(BitmapFactory.Options options,
        ImageCache cache) {
    // inBitmap only works with mutable bitmaps, so force the decoder to
    // return mutable bitmaps.
    options.inMutable = true;

    if (cache != null) {
        // Try to find a bitmap to use for inBitmap.
        Bitmap inBitmap = cache.getBitmapFromReusableSet(options);

        if (inBitmap != null) {
            // If a suitable bitmap has been found, set it as the value of
            // inBitmap.
            options.inBitmap = inBitmap;
        }
    }
}

// This method iterates through the reusable bitmaps, looking for one
// to use for inBitmap:
protected Bitmap getBitmapFromReusableSet(BitmapFactory.Options options) {
        Bitmap bitmap = null;

    if (mReusableBitmaps != null && !mReusableBitmaps.isEmpty()) {
        synchronized (mReusableBitmaps) {
            final Iterator<SoftReference<Bitmap>> iterator
                    = mReusableBitmaps.iterator();
            Bitmap item;

            while (iterator.hasNext()) {
                item = iterator.next().get();

                if (null != item && item.isMutable()) {
                    // Check to see it the item can be used for inBitmap.
                    if (canUseForInBitmap(item, options)) {
                        bitmap = item;

                        // Remove from reusable set so it can't be used again.
                        iterator.remove();
                        break;
                    }
                } else {
                    // Remove from the set if the reference has been cleared.
                    iterator.remove();
                }
            }
        }
    }
    return bitmap;
}

static boolean canUseForInBitmap(
        Bitmap candidate, BitmapFactory.Options targetOptions) {

    if (Build.VERSION.SDK_INT >= Build.VERSION_CODES.KITKAT) {
        // From Android 4.4 (KitKat) onward we can re-use if the byte size of
        // the new bitmap is smaller than the reusable bitmap candidate
        // allocation byte count.
        int width = targetOptions.outWidth / targetOptions.inSampleSize;
        int height = targetOptions.outHeight / targetOptions.inSampleSize;
        int byteCount = width * height * getBytesPerPixel(candidate.getConfig());
        return byteCount <= candidate.getAllocationByteCount();
    }

    // On earlier versions, the dimensions must match exactly and the inSampleSize must be 1
    return candidate.getWidth() == targetOptions.outWidth
            && candidate.getHeight() == targetOptions.outHeight
            && targetOptions.inSampleSize == 1;
}

/**
 * A helper function to return the byte usage per pixel of a bitmap based on its configuration.
 */
static int getBytesPerPixel(Config config) {
    if (config == Config.ARGB_8888) {
        return 4;
    } else if (config == Config.RGB_565) {
        return 2;
    } else if (config == Config.ARGB_4444) {
        return 2;
    } else if (config == Config.ALPHA_8) {
        return 1;
    }
    return 1;
}
UC黑科技 - 偷用Native内存
👉 注:由于Bitmap解码是由底层Skia库来完成的,这么做可能会有兼容性问题,但这个方法对于需要大量使用图像的App可以考虑这个方法,当然 你需要定义自己的Skia库解决兼容性问题。
public Bitmap decodeFile (String filePath){
    Bitmap bitmap = null;
    BitmapFactory.Options options = new BitmapFactory.Options();
    options.inPurgeable = true;
    try {
        BitmapFactory.Options.class.getField("inNativeAlloc").setBoolean(options, true);
    } catch (IllegalArgumentException e) {
        e.printStackTrace();
    } catch (SecurityException e) {
        e.printStackTrace();
    } catch (IllegalAccessException e) {
        e.printStackTrace();
    } catch (NoSuchFieldException e) {
        e.printStackTrace();
    }
    if (mFilePath != null) {
        bitmap = BitmapFactory.decodeFile(mFilePath, options);
        return bitmap;
    }
}
接下来我们来重点分析图像压缩相关知识,知识保证图像低内存占用的重要手段。
Android平台压缩图像的手段通常有两种:
- 质量压缩
- 尺寸压缩
二 质量压缩
2.1 实现方法
质量压缩的关键在于Bitmap.compress()函数,该函数不会改变图像的大小,但是可以降低图像的质量,从而降低存储大小,进而达到压缩的目的。
compress(CompressFormat format, int quality, OutputStream stream)它有三个参数
- CompressFormat format:压缩格式,它有JPEG、PNG、WEBP三种选择,JPEG是有损压缩,PNG是无损压缩,压缩后的图像大小不会变化(也就是没有压缩效果),WEBP是Google推出的 图像格式,它相比JPEG会节省30%左右的空间,处于兼容性和节省空间的综合考虑,我们一般会选择JPEG。
- int quality:0~100可选,数值越大,质量越高,图像越大。
- OutputStream stream:压缩后图像的输出流。
我们来写个例子验证一下。
File file = new File(Environment.getExternalStoragePublicDirectory(Environment.DIRECTORY_DCIM)
                            , "timo_compress_quality_100.jpg");
if (!file.exists()) {
    try {
        file.createNewFile();
    } catch (IOException e) {
        e.printStackTrace();
    }
}
Bitmap bitmap = BitmapFactory.decodeResource(getResources(), R.drawable.timo);
BufferedOutputStream bos = null;
try {
    bos = new BufferedOutputStream(new FileOutputStream(file));
    bitmap.compress(Bitmap.CompressFormat.JPEG, 100, bos);
    bitmap.recycle();
} catch (FileNotFoundException e) {
    e.printStackTrace();
}finally {
    try {
        if(bos != null){
            bos.close();
        }
    } catch (IOException e) {
        e.printStackTrace();
    }
}
quality = 100
1823x1076 1.16m

quality = 50
1823x1076 124.52k

quality = 0
1823x1076 35.80k

可以看到随着quality的降低,图像质量发生了明显的变化,但是图像的尺寸没有发生变化。
2.2 实现原理
Android图片的编码是由Skia库来完成的。
Skia是一个开源的二维图形库,提供各种常用的API,并可在多种软硬件平台上运行。谷歌Chrome浏览器、Chrome OS、安卓、火狐浏览器、火狐操作 系统以及其它许多产品都使用它作为图形引擎。
Skia在external/skia包中,我们虽然在平时的开发中没有直接用到Skia,但它对我们太重要了,它 是Android系统的重要组成部分,很多重要操作例如图像编解码,Canvas绘制在底层都是通过Skia来完成的。它同样被广泛用于Google的其他产品中。
Skia在src/allList包下定义了各种格式图片的编解码器。
kImageEncoder.cpp
- SkJpegEncoder.cpp:JPEG解码器
- SkPngEncoder.cpp:PNG解码器
- SkWebpEncoder.cpp:WEBP解码器
Skia本身提供了基本的画图和编解码功能,它同时还挂载了其他第三方编解码库,例如:libpng.so、libjpeg.so、libgif.so、所以我们上面想要编码成jpeg图像最终是由libjpeg来完成的。 上面也提到,我们做图像压缩,一般选择的JPEG,我们重点来看看JPEG的编解码。
libjpeg是一个完全用C语言编写的处理JPEG图像数据格式的自由库。它包含一个JPEG编解码器的算法实现,以及用于处理JPEG数据的多种实用程序。
Android并非采用原生的libjpeg,而是做了一些修改,具体说来:
- 修改了内存管理的方式
- 增加了把压缩数据输出到输出流的支持
libjpeg源码在external/jpeg包下,接下来我们具体看看JPEG压缩的实现。
我们再来从上到下看看整个源码的实现流程。
public boolean compress(CompressFormat format, int quality, OutputStream stream) {
    checkRecycled("Can't compress a recycled bitmap");
    // do explicit check before calling the native method
    if (stream == null) {
        throw new NullPointerException();
    }
    if (quality < 0 || quality > 100) {
        throw new IllegalArgumentException("quality must be 0..100");
    }
    Trace.traceBegin(Trace.TRACE_TAG_RESOURCES, "Bitmap.compress");
    boolean result = nativeCompress(mNativePtr, format.nativeInt,
            quality, stream, new byte[WORKING_COMPRESS_STORAGE]);
    Trace.traceEnd(Trace.TRACE_TAG_RESOURCES);
    return result;
}可以看到它在内部调用的是一个native方法nativeCompress(),这是定义在Bitmap.java里的一个函数,它的实现在Bitmap.cpp里
它最终调用的是Bitmap.cpp里的Bitmap_compress()函数,我们来看看它的实现。
```c++ static bool Bitmap_compress(JNIEnv env, jobject clazz, SkBitmap bitmap, int format, int quality, jobject jstream, jbyteArray jstorage) { SkImageEncoder::Type fm;
//根据编码类型选择SkImageEncoder
switch (format) {
case kJPEG_JavaEncodeFormat:
    fm = SkImageEncoder::kJPEG_Type;
    break;
case kPNG_JavaEncodeFormat:
    fm = SkImageEncoder::kPNG_Type;
    break;
case kWEBP_JavaEncodeFormat:
    fm = SkImageEncoder::kWEBP_Type;
    break;
default:
    return false;
}

//判断当前bitmap指针是否为空
bool success = false;
if (NULL != bitmap) {
    SkAutoLockPixels alp(*bitmap);

    if (NULL == bitmap->getPixels()) {
        return false;
    }

    //创建SkWStream,用于将压缩数据输出到输出流
    SkWStream* strm = CreateJavaOutputStreamAdaptor(env, jstream, jstorage);
    if (NULL == strm) {
        return false;
    }

    //根据编码类型,创建对应的编码器,对bitmap指针指向的图像数据进行压缩并输出到输出流
    SkImageEncoder* encoder = SkImageEncoder::Create(fm);
    if (NULL != encoder) {
        //调用encodeStream进行编码
        success = encoder->encodeStream(strm, *bitmap, quality);
        delete encoder;
    }
    delete strm;
}
return success;
}
可以看到该函数根据编码格式选择[SkImageEncoder](https://android.googlesource.com/platform/external/skia/+/master/src/allList/SkJpegEncoder.cpp),从而创建对应的图像编码器,最后
调用encodeStream(strm, *bitmap, quality)方法来完成编码。通

上面的代码创建了SkJpegEncoder,并最终调用了它里面的make()方法,如下所示:

```c++
std::unique_ptr<SkEncoder> SkJpegEncoder::Make(SkWStream* dst, const SkPixmap& src,
                                               const Options& options) {
    if (!SkPixmapIsValid(src, options.fBlendBehavior)) {
        return nullptr;
    }
    std::unique_ptr<SkJpegEncoderMgr> encoderMgr = SkJpegEncoderMgr::Make(dst);
    if (setjmp(encoderMgr->jmpBuf())) {
        return nullptr;
    }
    if (!encoderMgr->setParams(src.info(), options)) {
        return nullptr;
    }
    //设置压缩质量
    jpeg_set_quality(encoderMgr->cinfo(), options.fQuality, TRUE);
    //开始压缩
    jpeg_start_compress(encoderMgr->cinfo(), TRUE);
    sk_sp<SkData> icc = icc_from_color_space(src.info());
    if (icc) {
        // Create a contiguous block of memory with the icc signature followed by the profile.
        sk_sp<SkData> markerData =
                SkData::MakeUninitialized(kICCMarkerHeaderSize + icc->size());
        uint8_t* ptr = (uint8_t*) markerData->writable_data();
        memcpy(ptr, kICCSig, sizeof(kICCSig));
        ptr += sizeof(kICCSig);
        *ptr++ = 1; // This is the first marker.
        *ptr++ = 1; // Out of one total markers.
        memcpy(ptr, icc->data(), icc->size());
        jpeg_write_marker(encoderMgr->cinfo(), kICCMarker, markerData->bytes(), markerData->size());
    }
    return std::unique_ptr<SkJpegEncoder>(new SkJpegEncoder(std::move(encoderMgr), src));
}
上面就是整个图像压缩的流程。
一般情况下,Android自带的libjpeg就可以满足日常的开发需求,如果业务对高质量和低存储的需求比较大,可以考虑一下以下两个库:
- libjpeg-turbo:增强版libjpeg,它是一种JPEG图像编解码器,它使用SIMD指令(MMX,SSE2,NEON,AltiVec)来加速x86,x86-64,ARM和 PowerPC系统上的基准JPEG压缩和解压缩。 在这样的系统上,libjpeg-turbo的速度通常是libjpeg的2-6倍,其他的都是相等的。 在其他类型的系统上,依靠其高度优化的Huffman编码例程,libjpeg-turbo仍然 可以胜过libjpeg。 在许多情况下,libjpeg-turbo的性能与专有的高速JPEG编解码器相媲美。
- mozilla/mozjpeg:基于libjpeg-turbo.实现,保证不降低图像质量且兼容主流编解码器的情况下进行jpeg压缩。
三 尺寸压缩
尺寸压缩本质上就是一个重新采样的过程,放大图像称为上采样,缩小图像称为下采样,Android提供了两种图像采样方法,邻近采样和双线性采样。
3.1 邻近采样
邻近采样采用邻近点插值算法,用一个像素点代替邻近的像素点,
它的实现代码大家也非常熟悉。
BitmapFactory.Options options = new BitmapFactory.Options();
options.inSampleSize = 1;
Bitmap bitmap = BitmapFactory.decodeResource(getResources(), R.drawable.blue_red, options);
String savePath = Environment.getExternalStoragePublicDirectory(Environment.DIRECTORY_DCIM).getAbsolutePath()
        + "/timo_BitmapFactory_1.png";
ImageUtils.save(bitmap, savePath, Bitmap.CompressFormat.PNG);
inSampleSize = 1
inSampleSize = 32

可以看到这种方式的关键在于inSampleSize的选择,它决定了压缩后图像的大小。
inSampleSize代表了压缩后的图像一个像素点代表了原来的几个像素点,例如inSampleSize为4,则压缩后的图像的宽高是原来的1/4,像素点数是原来的1/16,inSampleSize 一般会选择2的指数,如果不是2的指数,内部计算的时候也会像2的指数靠近。
关于inSampleSize的计算,Luban提供了很好的思路,作者也给出了算法思路。
算法思路
1. 判断图像比例值,是否处于以下区间内;
  - [1, 0.5625)    即图像处于 [1:1 ~ 9:16) 比例范围内
  - [0.5625, 0.5)  即图像处于 [9:16 ~ 1:2) 比例范围内
  - [0.5, 0)       即图像处于 [1:2 ~ 1:∞) 比例范围内
2. 判断图像最长边是否过边界值;
  - [1, 0.5625)   边界值为:1664 * n(n=1), 4990 * n(n=2), 1280 * pow(2, n-1)(n≥3)
  - [0.5625, 0.5) 边界值为:1280 * pow(2, n-1)(n≥1)
  - [0.5, 0)      边界值为:1280 * pow(2, n-1)(n≥1)
3. 计算压缩图像实际边长值,以第2步计算结果为准,超过某个边界值则:width / pow(2, n-1),height/pow(2, n-1)
4. 计算压缩图像的实际文件大小,以第2、3步结果为准,图像比例越大则文件越大。
    size = (newW * newH) / (width * height) * m;
  - [1, 0.5625) 则 width & height 对应 1664,4990,1280 * n(n≥3),m 对应 150,300,300;
  - [0.5625, 0.5) 则 width = 1440,height = 2560, m = 200;
  - [0.5, 0) 则 width = 1280,height = 1280 / scale,m = 500;注:scale为比例值
5. 判断第4步的size是否过小
  - [1, 0.5625) 则最小 size 对应 60,60,100
  - [0.5625, 0.5) 则最小 size 都为 100
  - [0.5, 0) 则最小 size 都为 100
6. 将前面求到的值压缩图像 width, height, size 传入压缩流程,压缩图像直到满足以上数值
具体实现
private int computeSize() {
    int mSampleSize;

    mSourceWidth = mSourceWidth % 2 == 1 ? mSourceWidth + 1 : mSourceWidth;
    mSourceHeight = mSourceHeight % 2 == 1 ? mSourceHeight + 1 : mSourceHeight;

    mSourceWidth = mSourceWidth > mSourceHeight ? mSourceHeight : mSourceWidth;
    mSourceHeight = mSourceWidth > mSourceHeight ? mSourceWidth : mSourceHeight;

    double scale = ((double) mSourceWidth / mSourceHeight);

    if (scale <= 1 && scale > 0.5625) {
      if (mSourceHeight < 1664) {
        mSampleSize = 1;
      } else if (mSourceHeight >= 1664 && mSourceHeight < 4990) {
        mSampleSize = 2;
      } else if (mSourceHeight >= 4990 && mSourceHeight < 10240) {
        mSampleSize = 4;
      } else {
        mSampleSize = mSourceHeight / 1280 == 0 ? 1 : mSourceHeight / 1280;
      }
    } else if (scale <= 0.5625 && scale > 0.5) {
      mSampleSize = mSourceHeight / 1280 == 0 ? 1 : mSourceHeight / 1280;
    } else {
      mSampleSize = (int) Math.ceil(mSourceHeight / (1280.0 / scale));
    }

    return mSampleSize;
}
核心思想就是通过对原图宽高的比较计算出合适的采样值。
同样的我们也来看看这种方式的底层实现原理,BitmapFactory里有很多decode方法,它们最终调用的是native方法。
private static native Bitmap nativeDecodeStream(InputStream is, byte[] storage,
        Rect padding, Options opts);
private static native Bitmap nativeDecodeFileDescriptor(FileDescriptor fd,
        Rect padding, Options opts);
private static native Bitmap nativeDecodeAsset(long nativeAsset, Rect padding, Options opts);
private static native Bitmap nativeDecodeByteArray(byte[] data, int offset,
int length, Options opts);这些native方法在BitmapFactory.cpp里实现,这些方法最终调用的是doDecode()方法
```c++ static jobject doDecode(JNIEnv env, SkStream stream, jobject padding, jobject options, bool allowPurgeable, bool forcePurgeable = false, bool applyScale = false, float scale = 1.0f) { int sampleSize = 1; //图像解码模式,这里是像素点模式 SkImageDecoder::Mode mode = SkImageDecoder::kDecodePixels_Mode; //参数初始化 SkBitmap::Config prefConfig = SkBitmap::kARGB_8888_Config; bool doDither = true; bool isMutable = false; bool willScale = applyScale && scale != 1.0f; bool isPurgeable = !willScale && (forcePurgeable || (allowPurgeable && optionsPurgeable(env, options))); bool preferQualityOverSpeed = false;
//javaBitmap对象
jobject javaBitmap = NULL;
//对options里的参数进行初始化
if (options != NULL) {
    sampleSize = env->GetIntField(options, gOptions_sampleSizeFieldID);
    if (optionsJustBounds(env, options)) {
        mode = SkImageDecoder::kDecodeBounds_Mode;
    }
    // initialize these, in case we fail later on
    env->SetIntField(options, gOptions_widthFieldID, -1);
    env->SetIntField(options, gOptions_heightFieldID, -1);
    env->SetObjectField(options, gOptions_mimeFieldID, 0);
    jobject jconfig = env->GetObjectField(options, gOptions_configFieldID);
    prefConfig = GraphicsJNI::getNativeBitmapConfig(env, jconfig);
    isMutable = env->GetBooleanField(options, gOptions_mutableFieldID);
    doDither = env->GetBooleanField(options, gOptions_ditherFieldID);
    preferQualityOverSpeed = env->GetBooleanField(options,
            gOptions_preferQualityOverSpeedFieldID);
    javaBitmap = env->GetObjectField(options, gOptions_bitmapFieldID);
}
if (willScale && javaBitmap != NULL) {
    return nullObjectReturn("Cannot pre-scale a reused bitmap");
}

//创建图像解码器,并设置从Java层传递过来的参数,例如sampleSize、doDither等
SkImageDecoder* decoder = SkImageDecoder::Factory(stream);
if (decoder == NULL) {
    return nullObjectReturn("SkImageDecoder::Factory returned null");
}
decoder->setSampleSize(sampleSize);
decoder->setDitherImage(doDither);
decoder->setPreferQualityOverSpeed(preferQualityOverSpeed);
NinePatchPeeker peeker(decoder);
//Java的像素分配器
JavaPixelAllocator javaAllocator(env);
SkBitmap* bitmap;
if (javaBitmap == NULL) {
    bitmap = new SkBitmap;
} else {
    if (sampleSize != 1) {
        return nullObjectReturn("SkImageDecoder: Cannot reuse bitmap with sampleSize != 1");
    }
    bitmap = (SkBitmap*) env->GetIntField(javaBitmap, gBitmap_nativeBitmapFieldID);
    // config of supplied bitmap overrules config set in options
    prefConfig = bitmap->getConfig();
}
SkAutoTDelete<SkImageDecoder> add(decoder);
SkAutoTDelete<SkBitmap> adb(bitmap, javaBitmap == NULL);
decoder->setPeeker(&peeker);
if (!isPurgeable) {
    decoder->setAllocator(&javaAllocator);
}
AutoDecoderCancel adc(options, decoder);
// To fix the race condition in case "requestCancelDecode"
// happens earlier than AutoDecoderCancel object is added
// to the gAutoDecoderCancelMutex linked list.
if (options != NULL && env->GetBooleanField(options, gOptions_mCancelID)) {
    return nullObjectReturn("gOptions_mCancelID");
}
SkImageDecoder::Mode decodeMode = mode;
if (isPurgeable) {
    decodeMode = SkImageDecoder::kDecodeBounds_Mode;
}

//解码
SkBitmap* decoded;
if (willScale) {
    decoded = new SkBitmap;
} else {
    decoded = bitmap;
}
SkAutoTDelete<SkBitmap> adb2(willScale ? decoded : NULL);
if (!decoder->decode(stream, decoded, prefConfig, decodeMode, javaBitmap != NULL)) {
    return nullObjectReturn("decoder->decode returned false");
}

//缩放操作
int scaledWidth = decoded->width();
int scaledHeight = decoded->height();
if (willScale && mode != SkImageDecoder::kDecodeBounds_Mode) {
    scaledWidth = int(scaledWidth * scale + 0.5f);
    scaledHeight = int(scaledHeight * scale + 0.5f);
}
// 更新选项参数
if (options != NULL) {
    env->SetIntField(options, gOptions_widthFieldID, scaledWidth);
    env->SetIntField(options, gOptions_heightFieldID, scaledHeight);
    env->SetObjectField(options, gOptions_mimeFieldID,
            getMimeTypeString(env, decoder->getFormat()));
}

//处于justBounds模式,不再创建Bitmap对象,直接返回,这个很熟悉吧,对应了
//options.inJustDecodeBounds = true,直解析大小,不实际加载图像
if (mode == SkImageDecoder::kDecodeBounds_Mode) {
    return NULL;
}
jbyteArray ninePatchChunk = NULL;
if (peeker.fPatchIsValid) {
    if (willScale) {
        scaleNinePatchChunk(peeker.fPatch, scale);
    }
    size_t ninePatchArraySize = peeker.fPatch->serializedSize();
    ninePatchChunk = env->NewByteArray(ninePatchArraySize);
    if (ninePatchChunk == NULL) {
        return nullObjectReturn("ninePatchChunk == null");
    }
    jbyte* array = (jbyte*) env->GetPrimitiveArrayCritical(ninePatchChunk, NULL);
    if (array == NULL) {
        return nullObjectReturn("primitive array == null");
    }
    peeker.fPatch->serialize(array);
    env->ReleasePrimitiveArrayCritical(ninePatchChunk, array, 0);
}
// detach bitmap from its autodeleter, since we want to own it now
adb.detach();

//处理缩放
if (willScale) {
    // This is weird so let me explain: we could use the scale parameter
    // directly, but for historical reasons this is how the corresponding
    // Dalvik code has always behaved. We simply recreate the behavior here.
    // The result is slightly different from simply using scale because of
    // the 0.5f rounding bias applied when computing the target image size
    const float sx = scaledWidth / float(decoded->width());
    const float sy = scaledHeight / float(decoded->height());
    bitmap->setConfig(decoded->getConfig(), scaledWidth, scaledHeight);
    bitmap->allocPixels(&javaAllocator, NULL);
    bitmap->eraseColor(0);
    SkPaint paint;
    paint.setFilterBitmap(true);
    SkCanvas canvas(*bitmap);
    canvas.scale(sx, sy);
    canvas.drawBitmap(*decoded, 0.0f, 0.0f, &paint);
}

//处理图像的边距
if (padding) {
    if (peeker.fPatchIsValid) {
        GraphicsJNI::set_jrect(env, padding,
                peeker.fPatch->paddingLeft, peeker.fPatch->paddingTop,
                peeker.fPatch->paddingRight, peeker.fPatch->paddingBottom);
    } else {
        GraphicsJNI::set_jrect(env, padding, -1, -1, -1, -1);
    }
}
SkPixelRef* pr;
if (isPurgeable) {
    pr = installPixelRef(bitmap, stream, sampleSize, doDither);
} else {
    // if we get here, we're in kDecodePixels_Mode and will therefore
    // already have a pixelref installed.
    pr = bitmap->pixelRef();
}
if (!isMutable) {
    // promise we will never change our pixels (great for sharing and pictures)
    pr->setImmutable();
}
if (javaBitmap != NULL) {
    // If a java bitmap was passed in for reuse, pass it back
    return javaBitmap;
}
// 创建Bitmap对象并返回
return GraphicsJNI::createBitmap(env, bitmap, javaAllocator.getStorageObj(),
        isMutable, ninePatchChunk);
}
我们发现在最后调用了createBitmap()方法来创建Bitmap对象,这个方法在[Graphics.cpp](https://android.googlesource.com/platform/frameworks/base/+/7b2f8b8/core/jni/android/graphics/Graphics.cpp)里定义的,我们来看看它是如何创建Bitmap的。

```c++
jobject GraphicsJNI::createBitmap(JNIEnv* env, SkBitmap* bitmap, jbyteArray buffer,
                                  bool isMutable, jbyteArray ninepatch, int density)
{
    SkASSERT(bitmap);
    SkASSERT(bitmap->pixelRef());
    //调用Java方法,创建一个对象
    jobject obj = env->NewObject(gBitmap_class, gBitmap_constructorMethodID,
            static_cast<jint>(reinterpret_cast<uintptr_t>(bitmap)),
            buffer, isMutable, ninepatch, density);
    hasException(env); // For the side effect of logging.
    //返回Bitmap对象
    return obj;
}
可以看到最终C++层调用JNI方法创建了Java层的Bitmap对象,至此,整个BitmapFactory的解码流程我们就分析完了。
3.2 双线性采样
双线性采样采用双线性插值算法,相比邻近采样简单粗暴的选择一个像素点代替其他像素点,双线性采样参考源像素相应位置周围2x2个点的值,根据相对位置取对应的权重,经过计算得到目标图像。
它的实现方式也很简单
Bitmap bitmap = BitmapFactory.decodeResource(getResources(), R.drawable.blue_red);
Matrix matrix = new Matrix();
matrix.setScale(0.5f, 0.5f);
Bitmap sclaedBitmap = Bitmap.createBitmap(bitmap, 0, 0, bitmap.getWidth()/2, bitmap.getHeight()/2, matrix, true);
String savePath = Environment.getExternalStoragePublicDirectory(Environment.DIRECTORY_DCIM).getAbsolutePath() + "/timo_BitmapFactory_1.png";
ImageUtils.save(bitmap, savePath, Bitmap.CompressFormat.PNG);
这种方式的关键在于Bitmap.createBitmap(Bitmap source, int x, int y, int width, int height, Matrix m, boolean filter)方法。
这个方法有七个参数:
- Bitmap source:源图像
- int x:目标图像第一个像素的x坐标
- int y:目标图像第一个像素的y坐标
- int width:目标图像的宽度(像素点个数)
- int height:目标图像的高度(像素点个数)
- Matrix m:变换矩阵
- boolean filter:是否开启过滤
我们来看看它的实现。
  public static Bitmap createBitmap(Bitmap source, int x, int y, int width, int height,
            Matrix m, boolean filter) {

        //参数校验
        ...

        int neww = width;
        int newh = height;
        Canvas canvas = new Canvas();
        Bitmap bitmap;
        Paint paint;

        Rect srcR = new Rect(x, y, x + width, y + height);
        RectF dstR = new RectF(0, 0, width, height);

        //选择图像的编码格式,和源图像保持一致
        Config newConfig = Config.ARGB_8888;
        final Config config = source.getConfig();
        // GIF files generate null configs, assume ARGB_8888
        if (config != null) {
            switch (config) {
                case RGB_565:
                    newConfig = Config.RGB_565;
                    break;
                case ALPHA_8:
                    newConfig = Config.ALPHA_8;
                    break;
                //noinspection deprecation
                case ARGB_4444:
                case ARGB_8888:
                default:
                    newConfig = Config.ARGB_8888;
                    break;
            }
        }

        if (m == null || m.isIdentity()) {
            bitmap = createBitmap(neww, newh, newConfig, source.hasAlpha());
            paint = null;   // not needed
        } else {
            final boolean transformed = !m.rectStaysRect();

            //通过Matrix变换获取新的图像宽高
            RectF deviceR = new RectF();
            m.mapRect(deviceR, dstR);

            neww = Math.round(deviceR.width());
            newh = Math.round(deviceR.height());

            //传入图像参数到底层,创建爱女Bitmap对象
            bitmap = createBitmap(neww, newh, transformed ? Config.ARGB_8888 : newConfig,
                    transformed || source.hasAlpha());

            canvas.translate(-deviceR.left, -deviceR.top);
            canvas.concat(m);

            paint = new Paint();
            paint.setFilterBitmap(filter);
            if (transformed) {
                paint.setAntiAlias(true);
            }
        }

        // The new bitmap was created from a known bitmap source so assume that
        // they use the same density
        bitmap.mDensity = source.mDensity;
        bitmap.setHasAlpha(source.hasAlpha());
        bitmap.setPremultiplied(source.mRequestPremultiplied);

        canvas.setBitmap(bitmap);
        canvas.drawBitmap(source, srcR, dstR, paint);
        canvas.setBitmap(null);

        return bitmap;
    }
可以看到这个方法又调用了它的同名方法createBitmap(neww, newh, transformed ? Config.ARGB_8888 : newConfig,transformed || source.hasAlpha()) 该方法当然也是借由底层的native方法实现Bitmap的创建。
private static native Bitmap nativeCreate(int[] colors, int offset,
                                              int stride, int width, int height,
int nativeConfig, boolean mutable);这个方法对应着Bitmap.cpp里的Bitmap_creator()方法。
```c++ static jobject Bitmap_creator(JNIEnv env, jobject, jintArray jColors, int offset, int stride, int width, int height, SkBitmap::Config config, jboolean isMutable) { if (NULL != jColors) { size_t n = env->GetArrayLength(jColors); if (n < SkAbs32(stride) (size_t)height) { doThrowAIOOBE(env); return NULL; } }
//SkBitmap对象
SkBitmap bitmap;

//设置图像配置信息
bitmap.setConfig(config, width, height);

//创建图像数组,这里对应着Bitmap.java里的mBuffers
jbyteArray buff = GraphicsJNI::allocateJavaPixelRef(env, &bitmap, NULL);
if (NULL == buff) {
    return NULL;
}

if (jColors != NULL) {
    GraphicsJNI::SetPixels(env, jColors, offset, stride,
                           0, 0, width, height, bitmap);
}

//创建Bitmap对象,并返回
return GraphicsJNI::createBitmap(env, new SkBitmap(bitmap), buff, isMutable, NULL);
}
可以看到上面调用allocateJavaPixelRef()方法来创建图像数组,该方法在[Graphics.cpp](https://android.googlesource.com/platform/frameworks/base/+/7b2f8b8/core/jni/android/graphics/Graphics.cpp)里定义的。

```c++
jbyteArray GraphicsJNI::allocateJavaPixelRef(JNIEnv* env, SkBitmap* bitmap,
                                             SkColorTable* ctable) {
    Sk64 size64 = bitmap->getSize64();
    if (size64.isNeg() || !size64.is32()) {
        jniThrowException(env, "java/lang/IllegalArgumentException",
                          "bitmap size exceeds 32bits");
        return NULL;
    }
    size_t size = size64.get32();
    //调用Java层的方法创建一个Java数组
    jbyteArray arrayObj = env->NewByteArray(size);
    if (arrayObj) {
        // TODO: make this work without jniGetNonMovableArrayElements
       //获取数组地址
        jbyte* addr = jniGetNonMovableArrayElements(&env->functions, arrayObj);
        if (addr) {
            SkPixelRef* pr = new AndroidPixelRef(env, (void*) addr, size, arrayObj, ctable);
            bitmap->setPixelRef(pr)->unref();
            // since we're already allocated, we lockPixels right away
            // HeapAllocator behaves this way too
            bitmap->lockPixels();
        }
    }
    return arrayObj;
}
创建完成图像数组后,就接着调用createBitmap()创建Java层的Bitmap对象,这个我们在上面已经说过,自此Bitmap.createBitmap()方法的实现流程我们也分析完了。
以上便是Android原生支持的两种采样方式,如果这些并不能满足你的业务需求,可以考虑以下两种方式。
- 双立方/双三次采样:双立方/双三次采样使用的是双立方/双三次插值算法。邻近点插值算法的目标像素值由源图上单个像素决定,双线性內插值算法由源像素某点周围 2x2 个像素点按一定权重获得,而双立 方/双三次插值算法更进一步参考了源像素某点周围 4x4 个像素。这个算法在 Android 中并没有原生支持,如果需要使用,可以通过手动编写算法或者引用第三方算法库,这个算法在 ffmpeg 中已经给到了支持, 具体的实现在 libswscale/swscale.c 文件中:FFmpeg Scaler Documentation。
- Lanczos 采样:Lanczos 采样和 Lanczos 过滤是 Lanczos 算法的两种常见应用,它可以用作低通滤波器或者用于平滑地在采样之间插入数字信号,Lanczos 采样一般用来增加数字信号的采样率,或者间隔 采样来降低采样率。
好了,以上就是关于Android平台处理图像压缩的全部内容,下一篇文章我们来分析视频压缩的实现方案。另外phoenix项目完整的实现了图片与视频的压缩,其中图片的压缩就是用的上文提到的 Luban的算法实现,大家在做项目的时候可以做个参考。