Flutter中http请求抓包解决方案
前言
前阵子有同学反馈Flutter中的http请求无法通过fiddler抓包,作者喜欢使用Charles抓包工具,于是抽时间写了个小demo测试了一下,结论是在手机上设置代理,Charles确实抓不到请求数据包。于是对该问题进行了分析:
- 确定使用的是http发起的get请求,理论上http协议应该可以被Charles抓到包的,如果没有抓到包,那可能是没有走代理,于是乎通过将笔记本连接的wifi断开测试了一下手机上APP发起http请求,发现请求成功,证实确实没有走代理;
- 为什么http请求没有通过wifi走代理呢,因为之前安卓原生使用的一些http框架都是正常走代理的啊,那是不是有可能代码中有api方法可以设置请求不走代理,于是乎就研读了一下Flutter中http相关的源码,最终找到了答案。
http请求源码跟踪
http.dart中的HttpClient是一个抽象类,成员方法的具体实现在http_impl.dart中,http的get请求实现如下:
Future<HttpClientRequest> getUrl(Uri url) => _openUrl("get", url);

Future<_HttpClientRequest> _openUrl(String method, Uri uri) {
  .
  .
  .
  // Check to see if a proxy server should be used for this connection.
  var proxyConf = const _ProxyConfiguration.direct();
  if (_findProxy != null) {
    // TODO(sgjesse): Keep a map of these as normally only a few
    // configuration strings will be used.
    try {
      proxyConf = new _ProxyConfiguration(_findProxy(uri));
    } catch (error, stackTrace) {
      return new Future.error(error, stackTrace);
    }
  }
  return _getConnection(uri.host, port, proxyConf, isSecure)
      .then((_ConnectionInfo info) {
    .
    .
    .
  });
}首先,我们可以发现方法中有一行注释// Check to see if a proxy server should be used for this connection.,意思是“检查是否应该使用代理服务器进行此连接”;
然后,有一个proxyConf对象初始化和根据_findProxy来创建新的proxyConf对象的语句,然后通过_getConnection(uri.host, port, proxyConf, isSecure)来创建连接,_getConnection的源码如下:
Future<_ConnectionInfo> _getConnection(String uriHost, int uriPort,
    _ProxyConfiguration proxyConf, bool isSecure) {
  Iterator<_Proxy> proxies = proxyConf.proxies.iterator;

  Future<_ConnectionInfo> connect(error) {
    if (!proxies.moveNext()) return new Future.error(error);
    _Proxy proxy = proxies.current;
    String host = proxy.isDirect ? uriHost : proxy.host;
    int port = proxy.isDirect ? uriPort : proxy.port;
    return _getConnectionTarget(host, port, isSecure)
        .connect(uriHost, uriPort, proxy, this)
        // On error, continue with next proxy.
        .catchError(connect);
  }

  return connect(new HttpException("No proxies given"));
}
从代码中我们可以看到根据代理配置信息来将请求的host和port进行重置,然后创建真实的连接。
跟踪以上源码我们发现dart中http请求是否走代理是需要配置的,而_findProxy变量和配置的代理信息有关。
http_impl.dart文件中的HttpClient类中定义了_findProxy的默认值
Function _findProxy = HttpClient.findProxyFromEnvironment;HttpClient类中findProxyFromEnvironment方法的实现
static String findProxyFromEnvironment(Uri url,
    {Map<String, String> environment}) {
  HttpOverrides overrides = HttpOverrides.current;
  if (overrides == null) {
    return _HttpClient._findProxyFromEnvironment(url, environment);
  }
  return overrides.findProxyFromEnvironment(url, environment);
}_HttpClient类中_findProxyFromEnvironment方法的实现
static String _findProxyFromEnvironment(
    Uri url, Map<String, String> environment) {
  checkNoProxy(String option) {
    if (option == null) return null;
    Iterator<String> names = option.split(",").map((s) => s.trim()).iterator;
    while (names.moveNext()) {
      var name = names.current;
      if ((name.startsWith("[") &&
              name.endsWith("]") &&
              "[${url.host}]" == name) ||
          (name.isNotEmpty && url.host.endsWith(name))) {
        return "DIRECT";
      }
    }
    return null;
  }

  checkProxy(String option) {
    if (option == null) return null;
    option = option.trim();
    if (option.isEmpty) return null;
    int pos = option.indexOf("://");
    if (pos >= 0) {
      option = option.substring(pos + 3);
    }
    pos = option.indexOf("/");
    if (pos >= 0) {
      option = option.substring(0, pos);
    }
    // Add default port if no port configured.
    if (option.indexOf("[") == 0) {
      var pos = option.lastIndexOf(":");
      if (option.indexOf("]") > pos) option = "$option:1080";
    } else {
      if (option.indexOf(":") == -1) option = "$option:1080";
    }
    return "PROXY $option";
  }

  // Default to using the process current environment.
  if (environment == null) environment = _platformEnvironmentCache;

  String proxyCfg;

  String noProxy = environment["no_proxy"];
  if (noProxy == null) noProxy = environment["NO_PROXY"];
  if ((proxyCfg = checkNoProxy(noProxy)) != null) {
    return proxyCfg;
  }

  if (url.scheme == "http") {
    String proxy = environment["http_proxy"];
    if (proxy == null) proxy = environment["HTTP_PROXY"];
    if ((proxyCfg = checkProxy(proxy)) != null) {
      return proxyCfg;
    }
  } else if (url.scheme == "https") {
    String proxy = environment["https_proxy"];
    if (proxy == null) proxy = environment["HTTPS_PROXY"];
    if ((proxyCfg = checkProxy(proxy)) != null) {
      return proxyCfg;
    }
  }
  return "DIRECT";
}从以上代码中可以发现代理配置从environment中读取,设置代理时必须指定http_proxy或https_proxy等。而从_openUrl方法实现中proxyConf = new _ProxyConfiguration(_findProxy(uri));得出默认情况下environment是为空的,所以要想在Flutter的http请求中使用代理,则要指定相应的代理配置,即设置httpClient.findProxy的值。
示例代码:
_getHttpData() async {
  var httpClient = new HttpClient();
  httpClient.findProxy = (url) {
    return HttpClient.findProxyFromEnvironment(url, environment: {"http_proxy": 'http://192.168.124.7:8888',});
  };
  var uri =
      new Uri.http('t.weather.sojson.com', '/api/weather/city/101210101');
  var request = await httpClient.getUrl(uri);
  var response = await request.close();
  if (response.statusCode == 200) {
    print('请求成功');
    var responseBody = await response.transform(Utf8Decoder()).join();
    print('responseBody = $responseBody');
  } else {
    print('请求失败');
  }
}
以上代码设置后即可使用Fiddler或Charles抓包了。
注:
- 代码中已设置代理,手机wifi不再需要进行代理设置;
192.168.124.7该IP为我们需要抓包的Charles所在电脑IP;
第二种抓包解决方案
如果使用Flutter写的APP不手动设置代理,则可以使用另一种方案来抓包。
通过电脑设置热点 -> 使用手机连接电脑热点上网 -> 在电脑上使用Wireshark抓数据包。
具体步骤如下(macOS系统下):
1. 打开系统偏好设置,找到“共享”
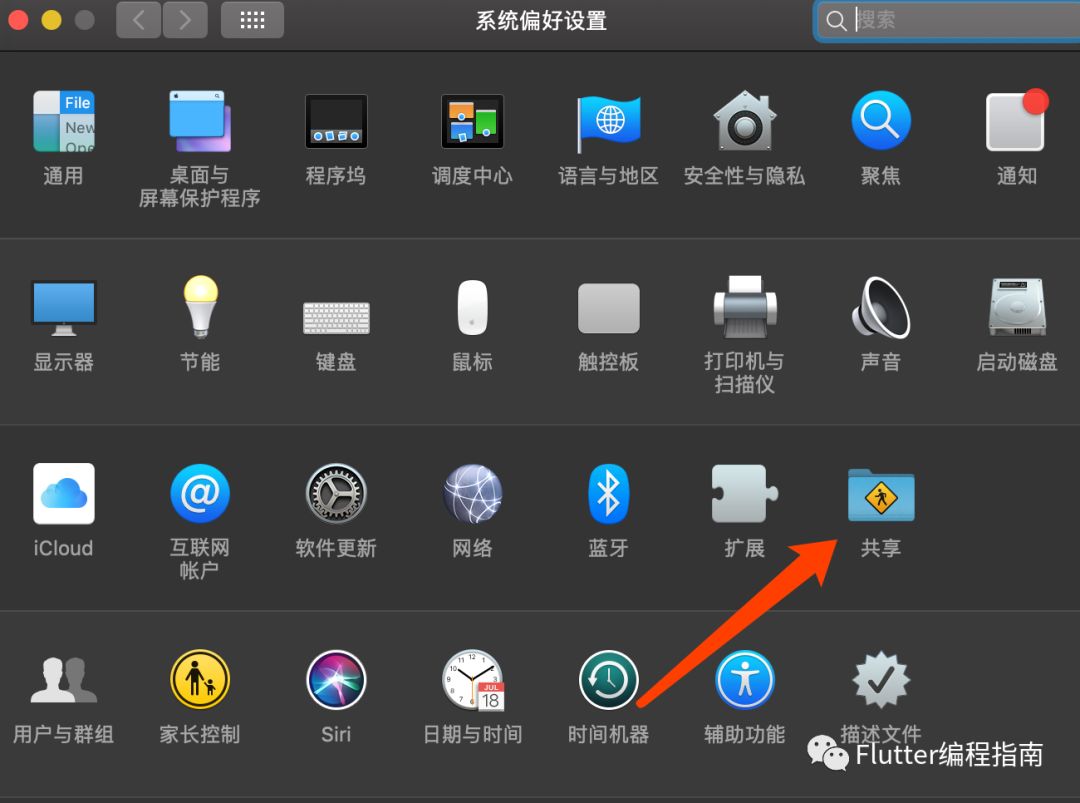
2. 打开“共享”,显示以下窗口,并选择共享以下来源的连接为指定的有线网络,用以下端口共享给电脑选择为Wi-Fi
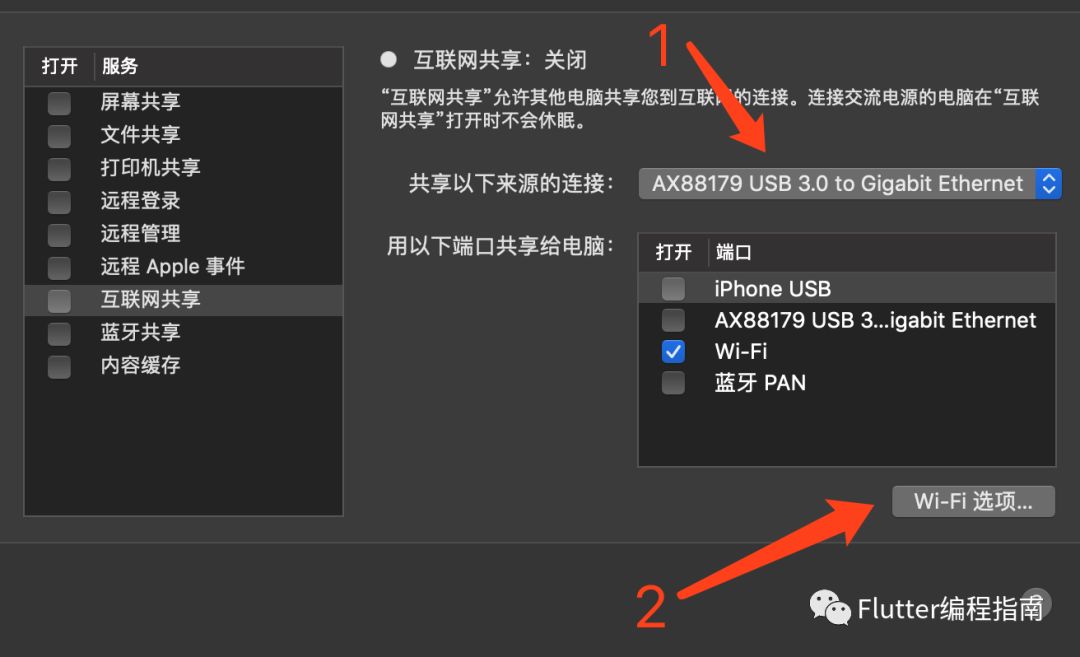
3. 点击右下角Wi-Fi选项按钮,显示如下,填写对应信息后点击“好”保存

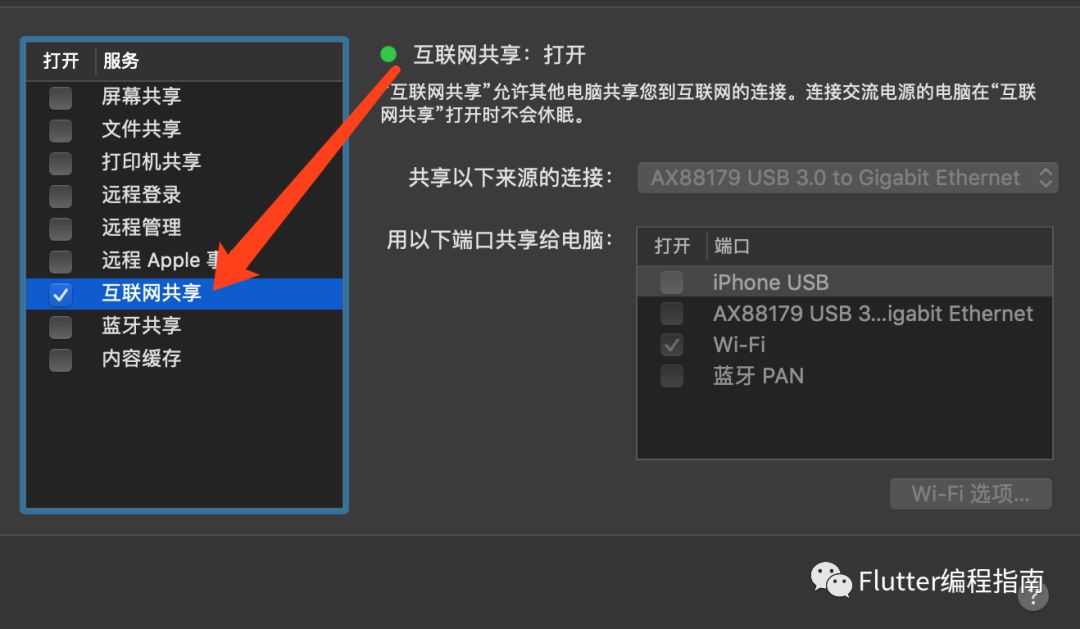
4. 回到刚才的“共享”窗口,打开左侧窗口中的服务“互联网共享”
5. 然后打开Wireshark软件界面,首页选择对应开热点的网络双击
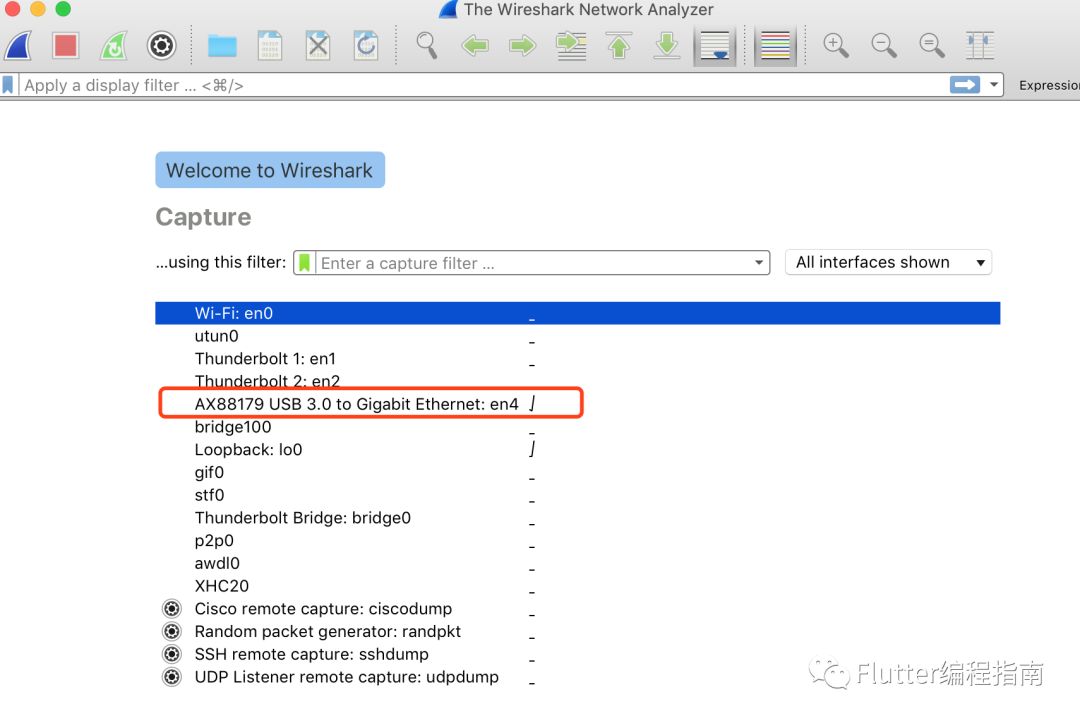
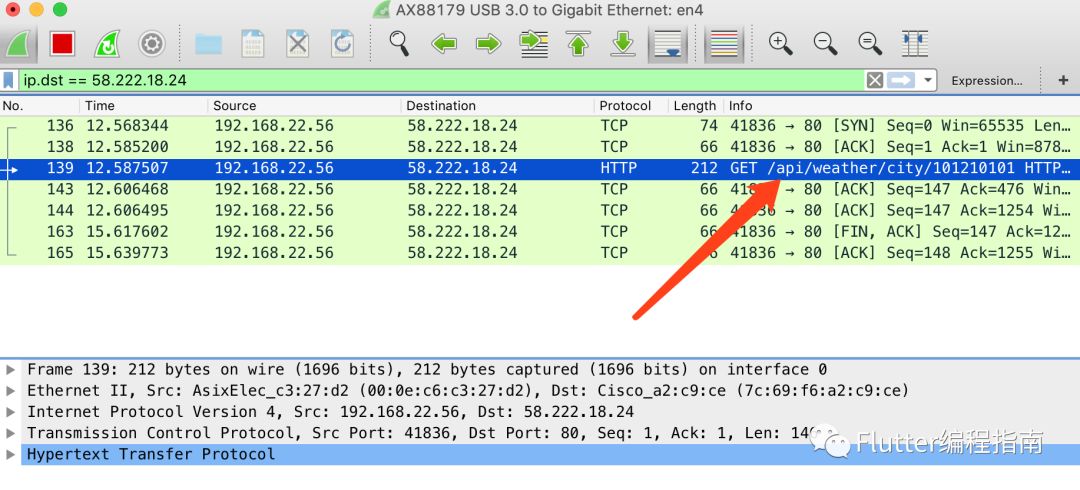
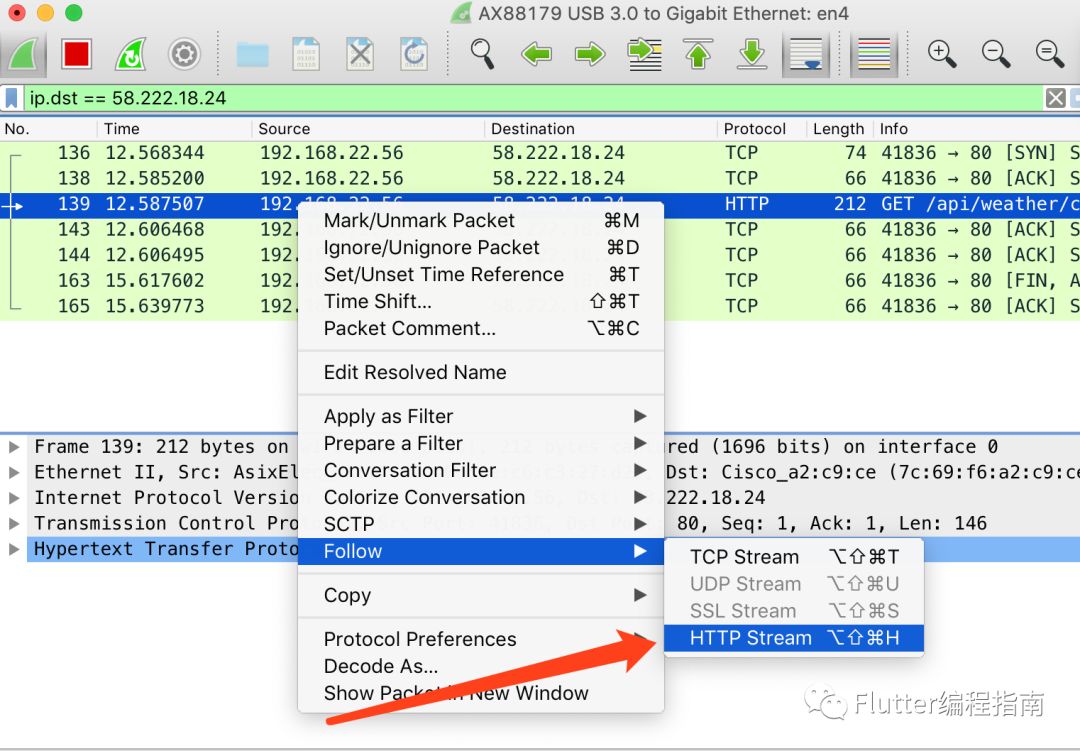
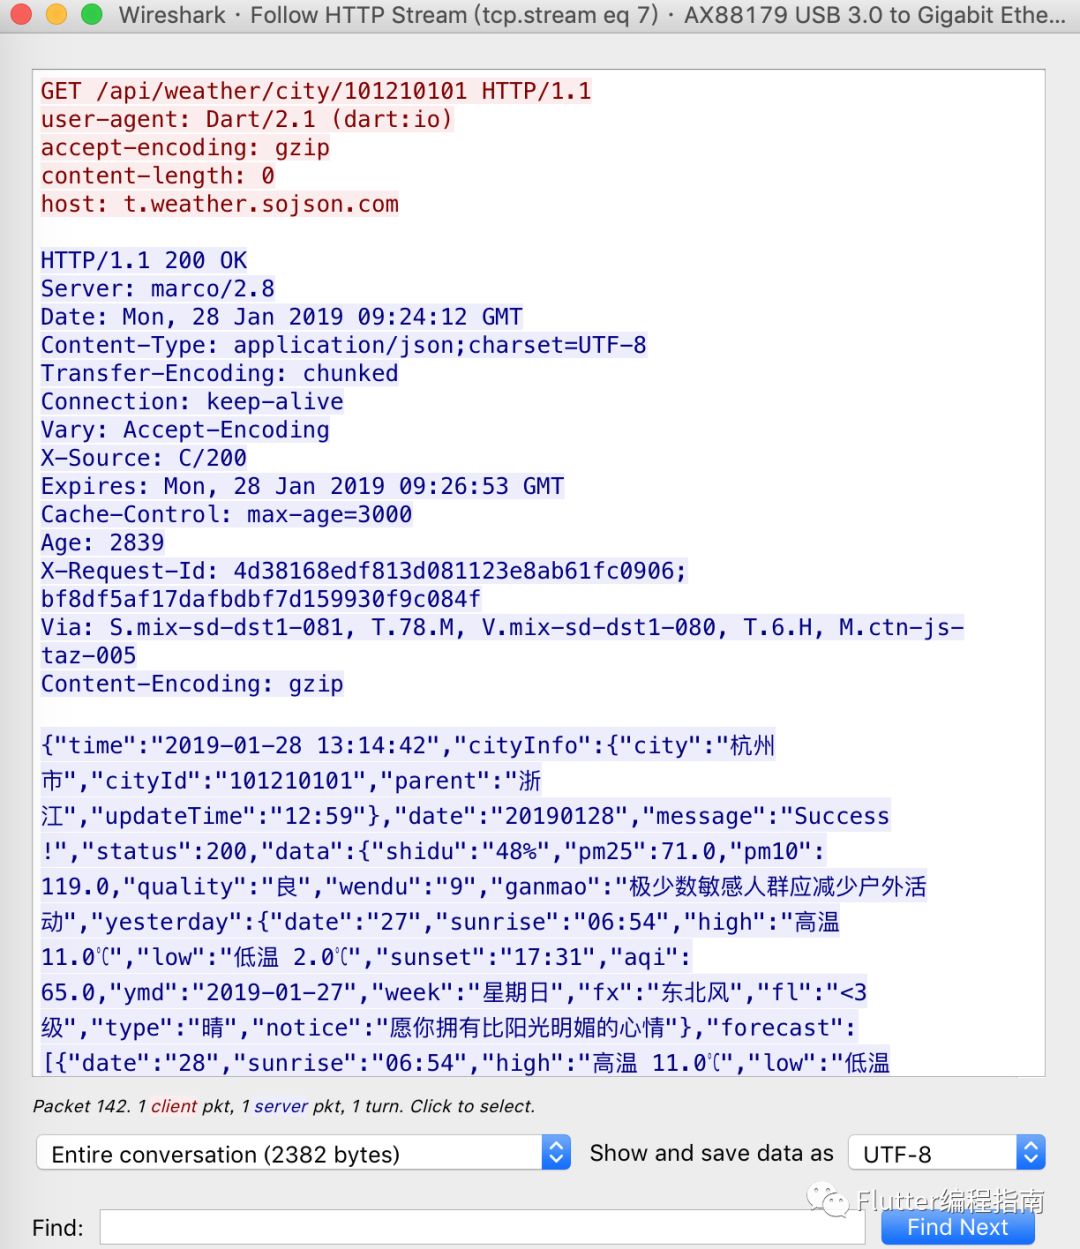
6. 请求接口域名t.weather.sojson.com对应的IP为 58.222.18.24,则在上面输入框中输入请求过滤条件 "ip.dst == 58.222.18.24",然后通过手机APP发起网络请求
查看接口的IP地址
$ ping t.weather.sojson.com
PING nm.ctn.aicdn.com (58.222.18.24): 56 data bytes
64 bytes from 58.222.18.24: icmp_seq=0 ttl=54 time=16.792 ms
64 bytes from 58.222.18.24: icmp_seq=1 ttl=54 time=16.926 ms
64 bytes from 58.222.18.24: icmp_seq=2 ttl=54 time=15.804 ms